On my previous camera bodies I had occasionally shot at very high ISO settings as a result of the lack of light. I had not paid a huge amount of attention to any secondary effects of doing so. My current cameras had a work out in some very low light when I decided to test them in some rather unfriendly conditions. When I was at home, I was running some disc backups and I found I could not get the normal number of files onto a single disc. A quick bit of investigation and I could see why. The high ISO shots had a significant increase in file size. As I understand it, RAW files, while containing all of the data from the sensor, do have an amount of compression applied. I imagine that the noise inherent in high ISO shots means that the compression is less effective as there is so much variation across pixels. As an example, a shot at ISO 320 will average at about 22Mb. The shots at ISO 51,200 are coming in at over 30Mb. At ISO 204,000, the files can hit 40Mb. That is quite an increase! Something to keep in mind when planning to shoot in very low light conditions.
Tag Archives: technique
Lightning Photography
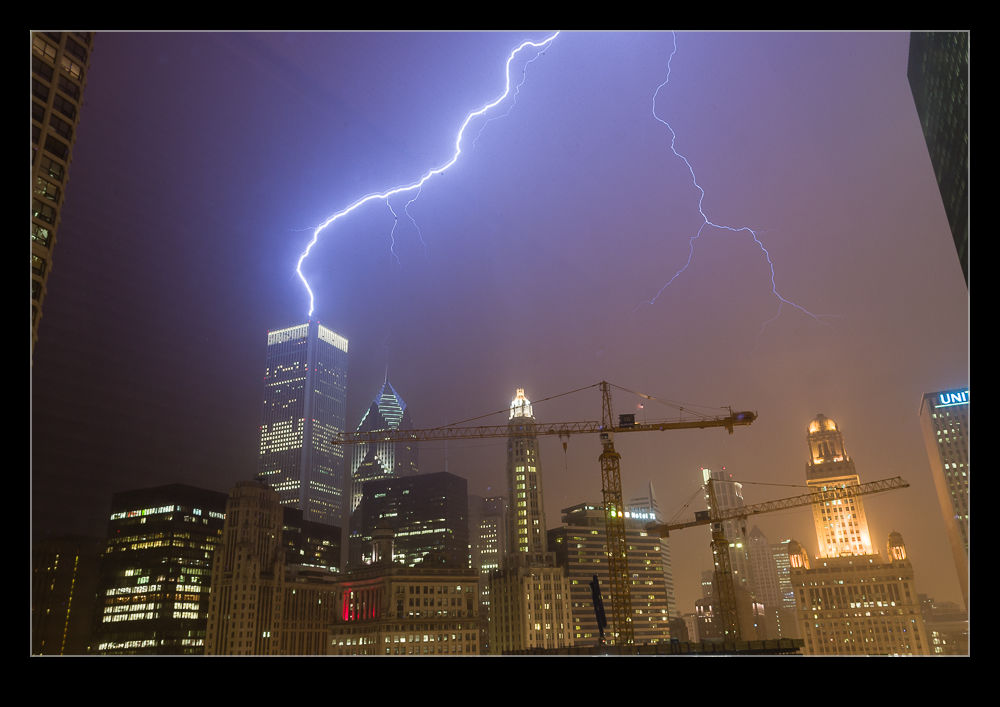 When I shot film I had a go at shooting lightning a number of times but never with any success. I would try and react to get the bolt but it was always gone. When you are using film and having a very low success rate, things get too expensive. Consequently, I gave up on it. The move to digital opened up a new range of possibilities.
My new approach doesn’t involve much skill (but then neither does using an electronic trigger). I set up the exposure to have a reasonably long shutter speed. Then I put the camera on continuous mode, plug in the cable release and lock the shutter open. Then the camera takes a steady stream of shots. Of course, when there is a slight gap between shots, you can imagine when the lightning will strike.
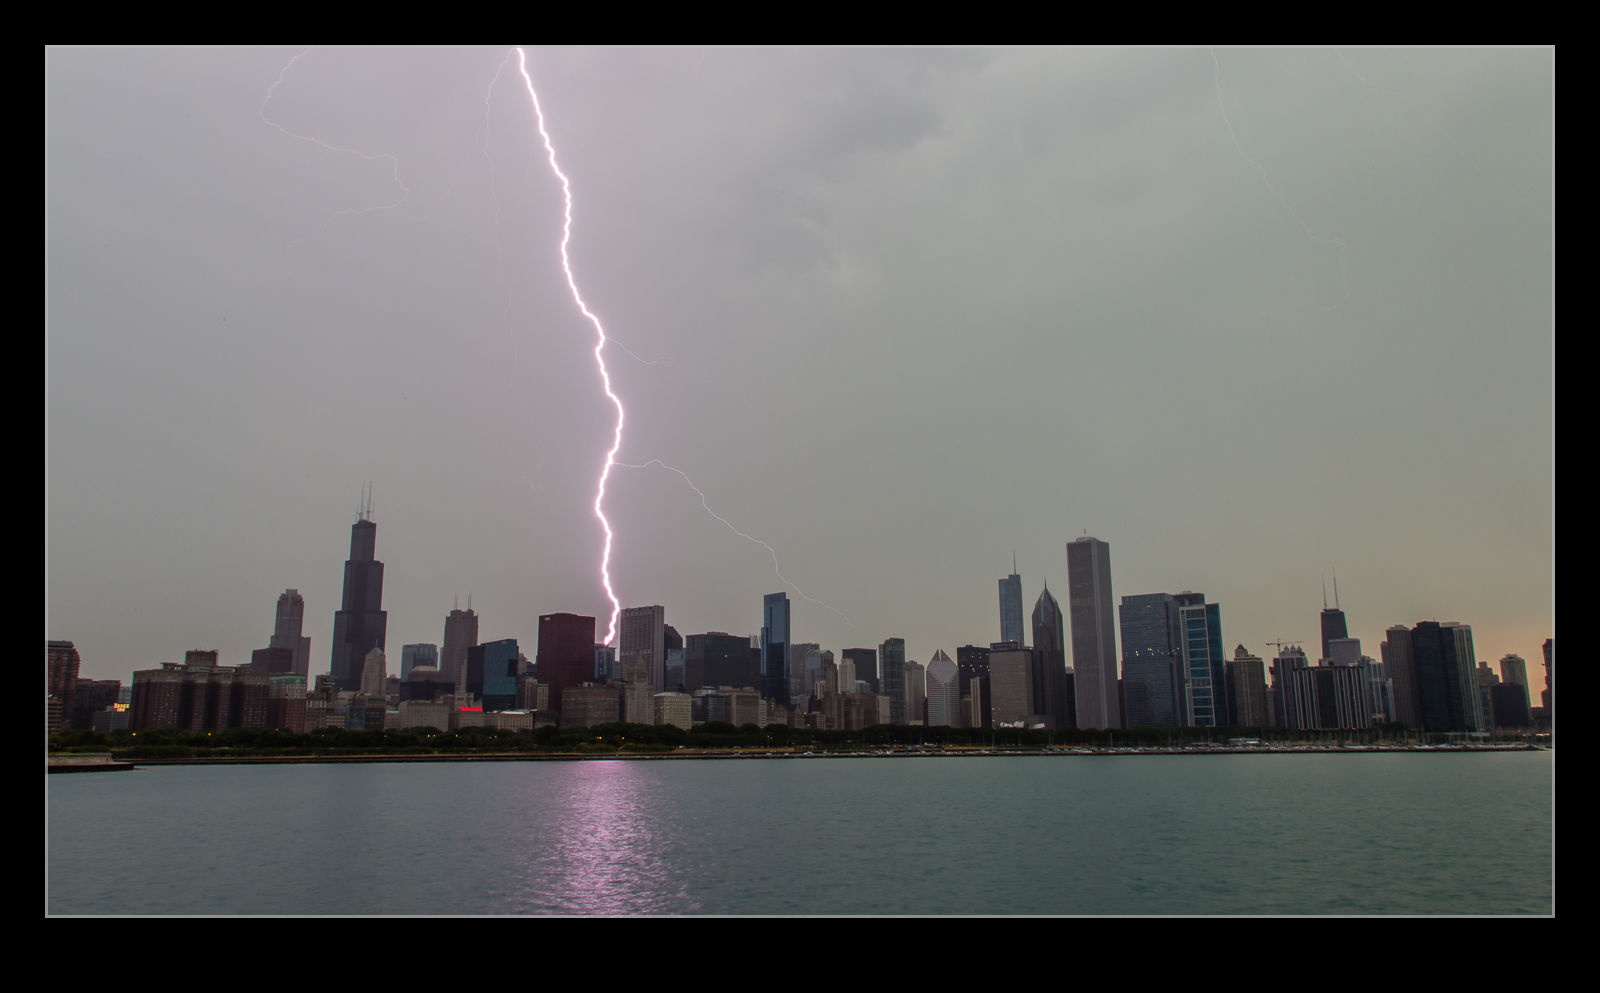 I used to shoot a lot from the apartment in Chicago. Set the camera up and go and do something else. Unfortunately, the heavy rains that would accompany the storm activity could result in the sky glaring out but you still had a chance. Some of the shots were okay and every once in a while you would get a really cool outcome. The Trump Tower was next to us and it would be struck occasionally but it was too close to get a good look at. You could hear it though!
Crosswind Training in the Citabria
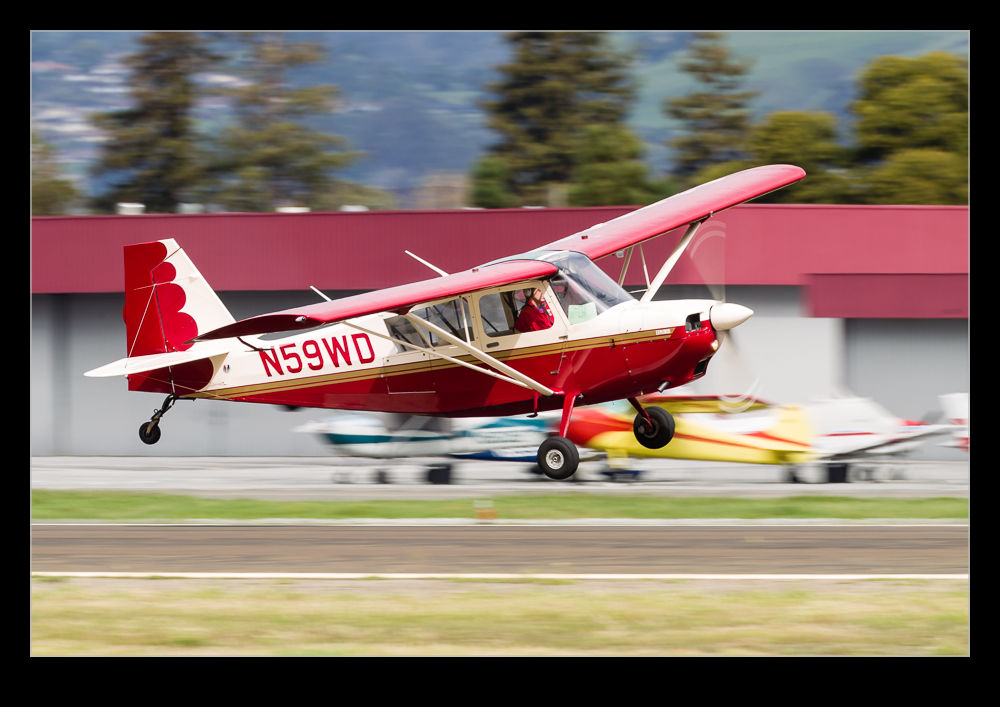
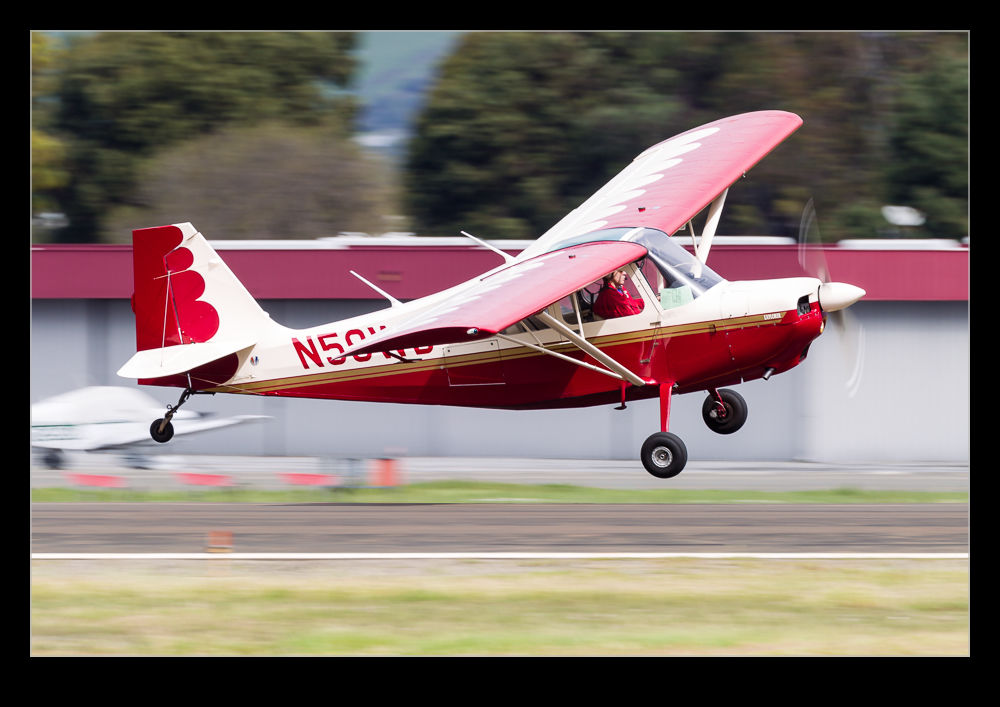 This Citabria was flying circuits at Hayward while I was there. The wind was pretty strong and coming across the runway so the pilot was taking the opportunity to practice their crosswind landings. A lot of wing was down into wind in order to compensate for the conditions and, while they occasionally struggled with some of the bigger gusts, they did seem to have good control of the aircraft. I guess awkward conditions are a reason a lot of flyers would stay on the ground but this one saw an opportunity to get some good practice in. Nicely done!
An Alternative to Negative Scanning
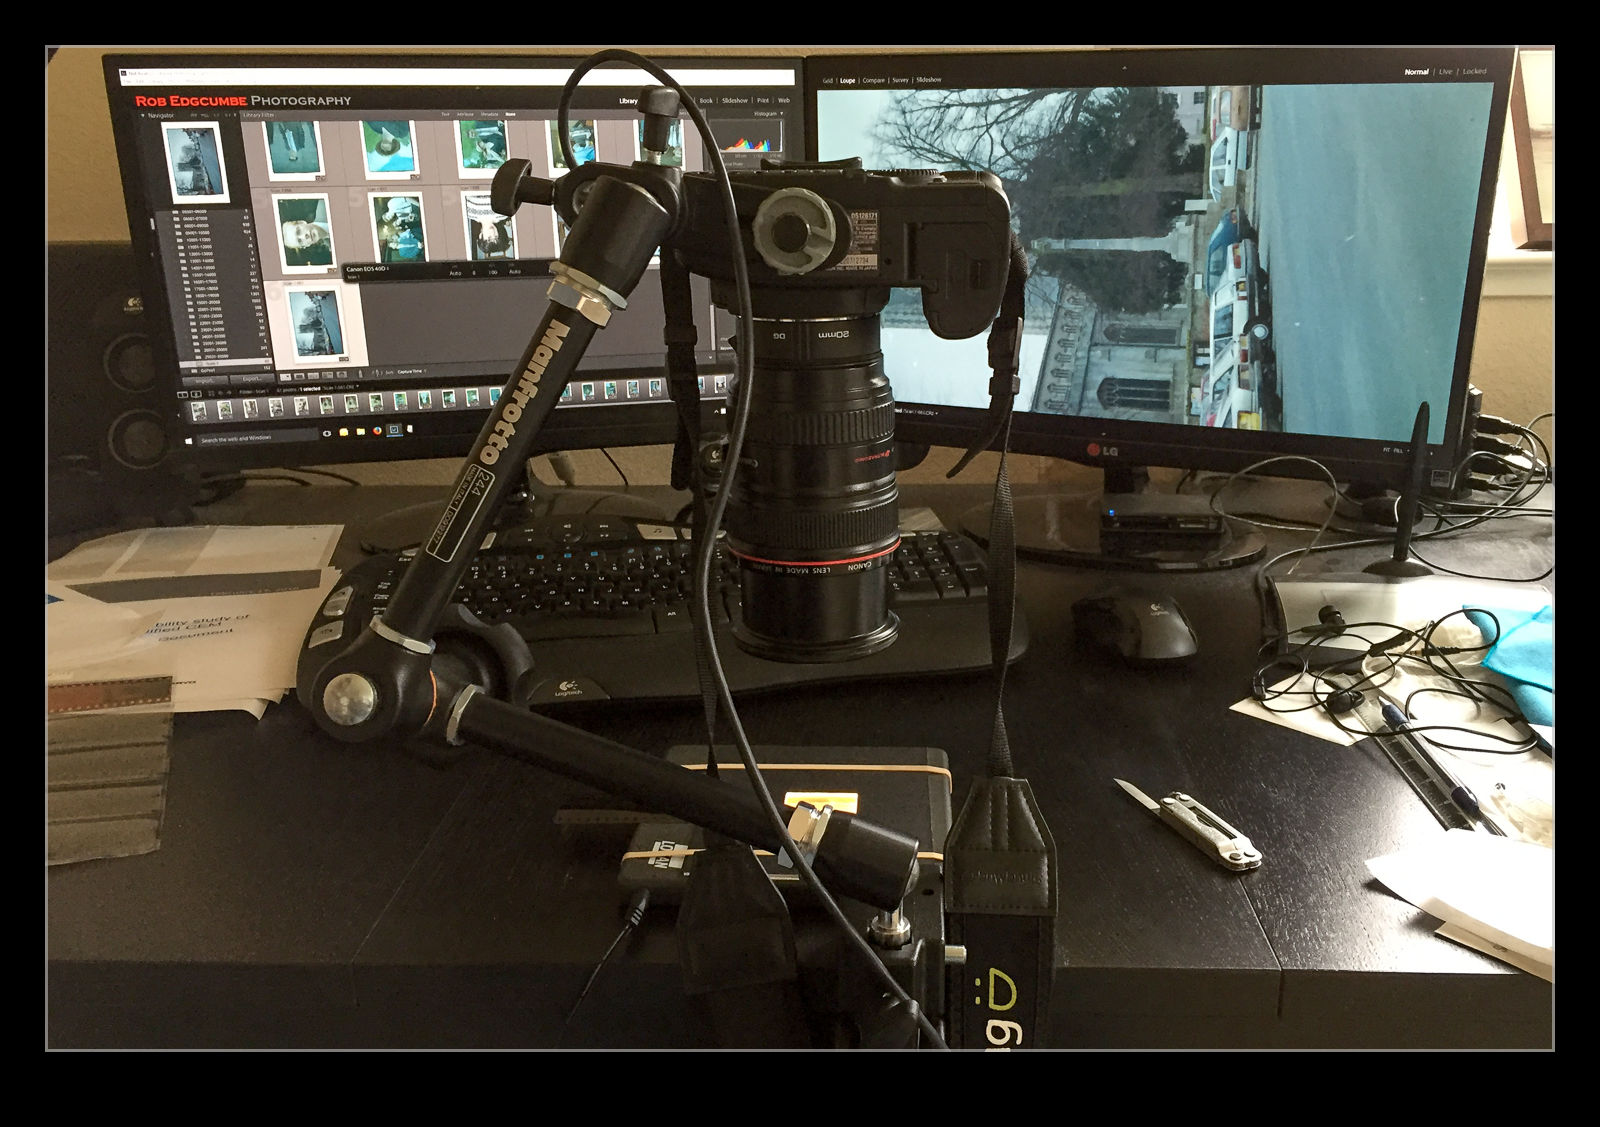 I am in the process of experimenting with a new approach to scanning old photographs. For many years I have been using a Minolta Scan Dual III scanner. It can accept strips of negatives or slides and does a reasonable job of scanning them in. It is a bit labor intensive and is certainly not fast. Moreover, the scanner is not terribly reliable and it will often hang mid scan requiring me to restart it and close down the application before restarting that too. Since it takes a long time, I often get it running and go and do something else so I might miss the problem.
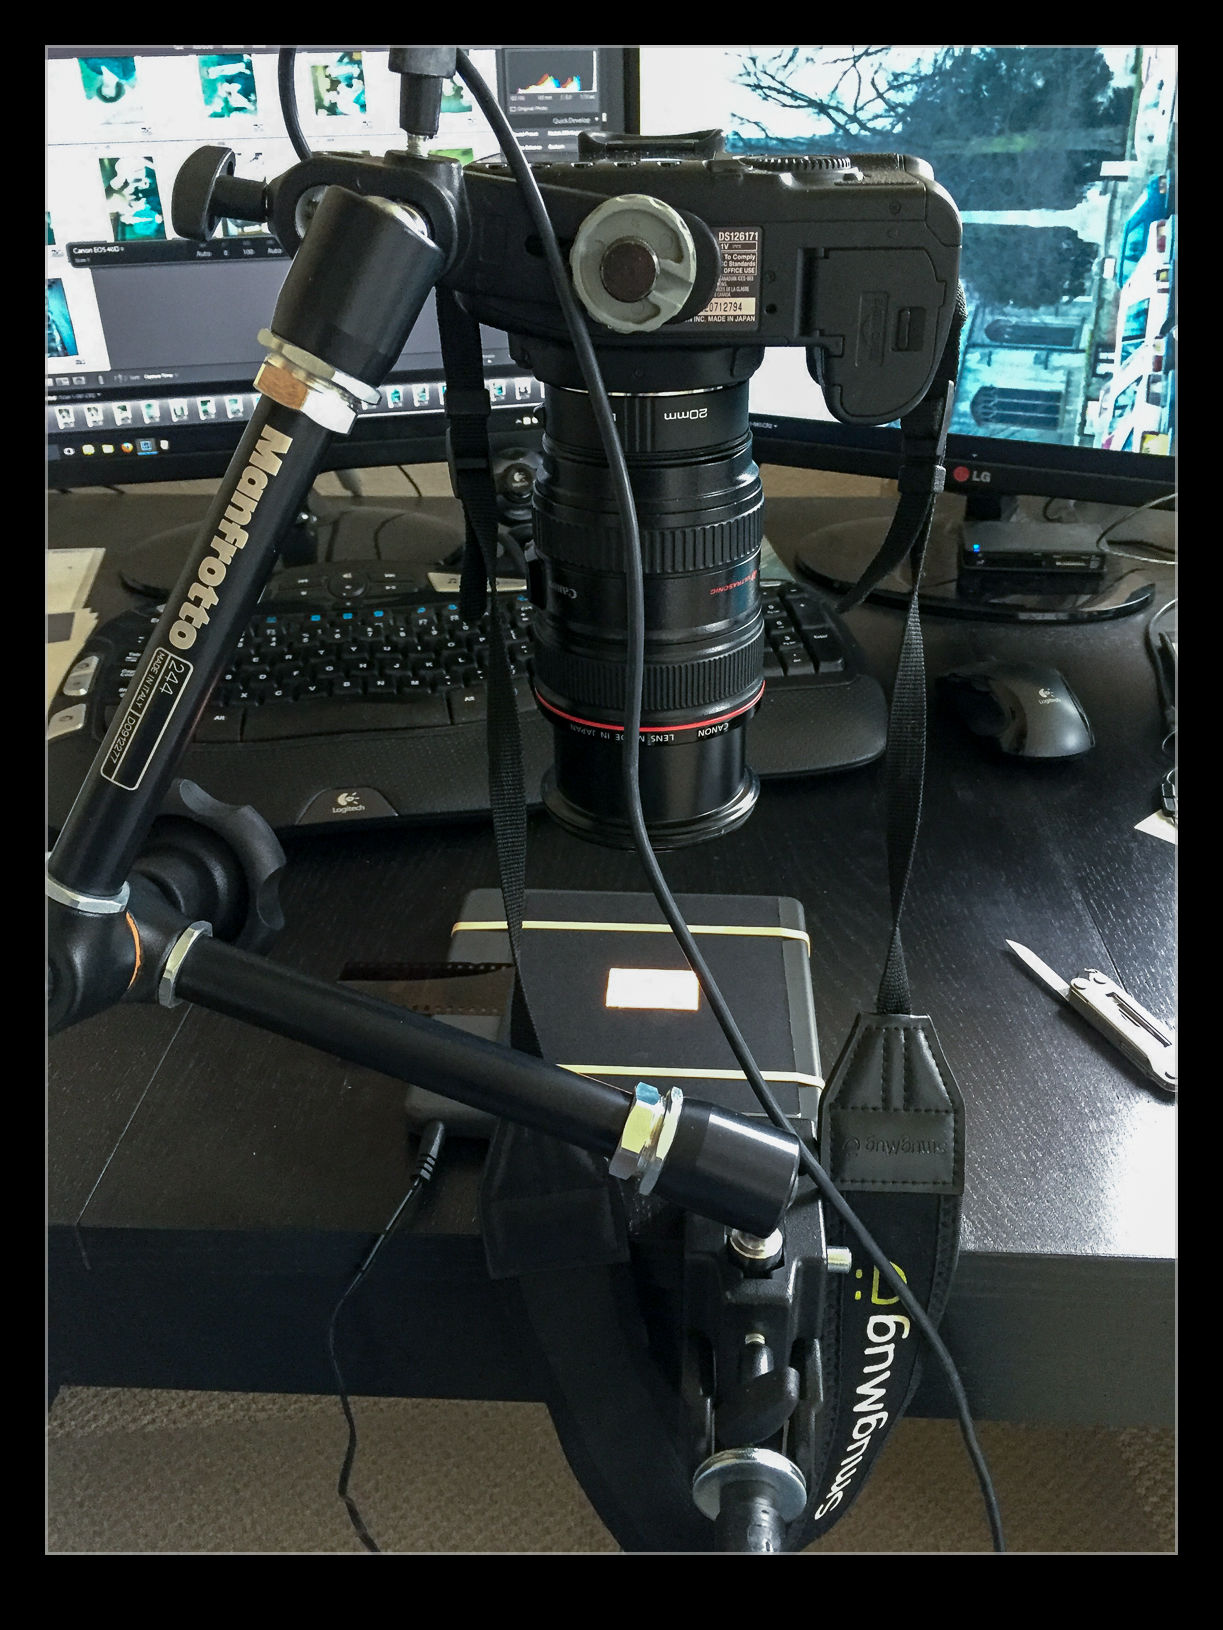
I do have another imaging tool that works very quickly. In fact I have several of them. These are my current digital cameras. I have bought a set of extension tubes to allow me to treat existing lenses as macro lenses. I have also acquired a small light pad. Cutting some card to shape means I can hold down any old negatives and view them through a hole with illumination from the light pad below. Mount a camera on an arm looking down on the pad and I now have a way to image the negative.
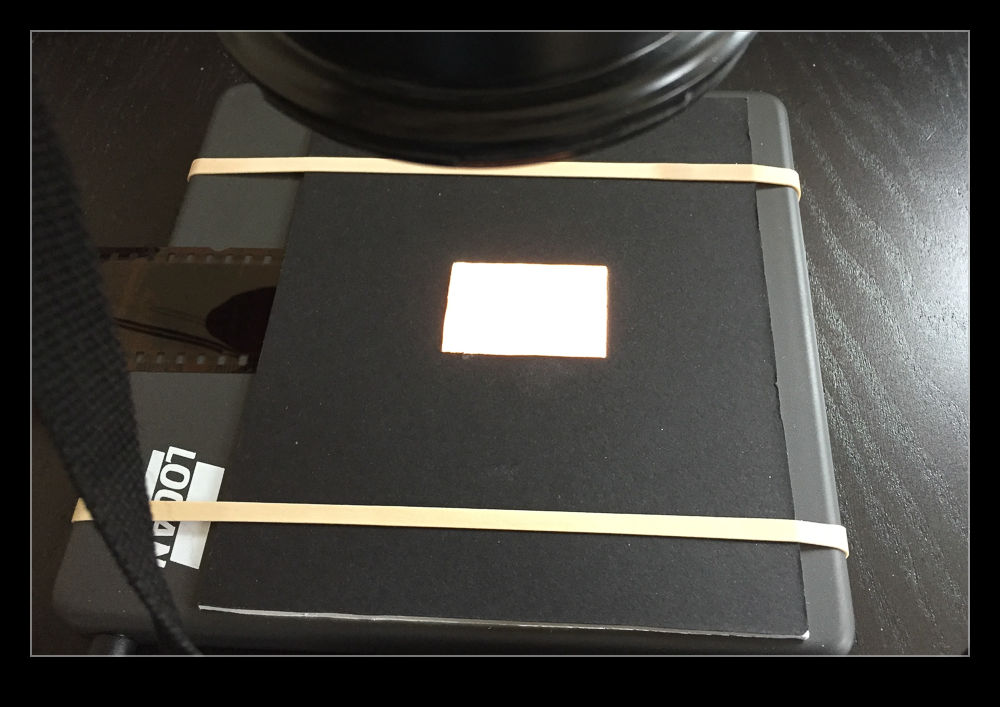 I am taking the images at my desk so I am able to tether the camera to the computer and use Lightroom to capture the images directly. This has actually provided me with an opportunity to drag out one of my older bodies that doesn’t get used anymore. My old 40D has been sitting on a shelf for a long time but it has come back into use for this project. It has more than enough resolution for this task. (Unfortunately, the batteries are now rather old and don’t hold a charge well so I am going to get an AC adapter from Amazon for ten dollars which should free me to scan as much as I want.)
I slide the negative into the holder and check the rough alignment through the viewfinder. Fortunately, although it took me a while to find it, the 40D does have Liveview so I can make use of that to make sure the alignment is right. I use the trigger release in Lightroom’s tether dialog to take the shot to avoid disturbing the setup. If an image needs over or under exposure, I have to remember that it is a negative so I have to use exposure compensation in the opposite sense. The shot is imported straight in the Lightroom when it is taken. The first thing that I need to do is reverse the tone curve to change the negative to a positive. A white balance correction will take out the color cast of the negative and I now have an image to work with. I have a preset for given film types that does this during the import process.
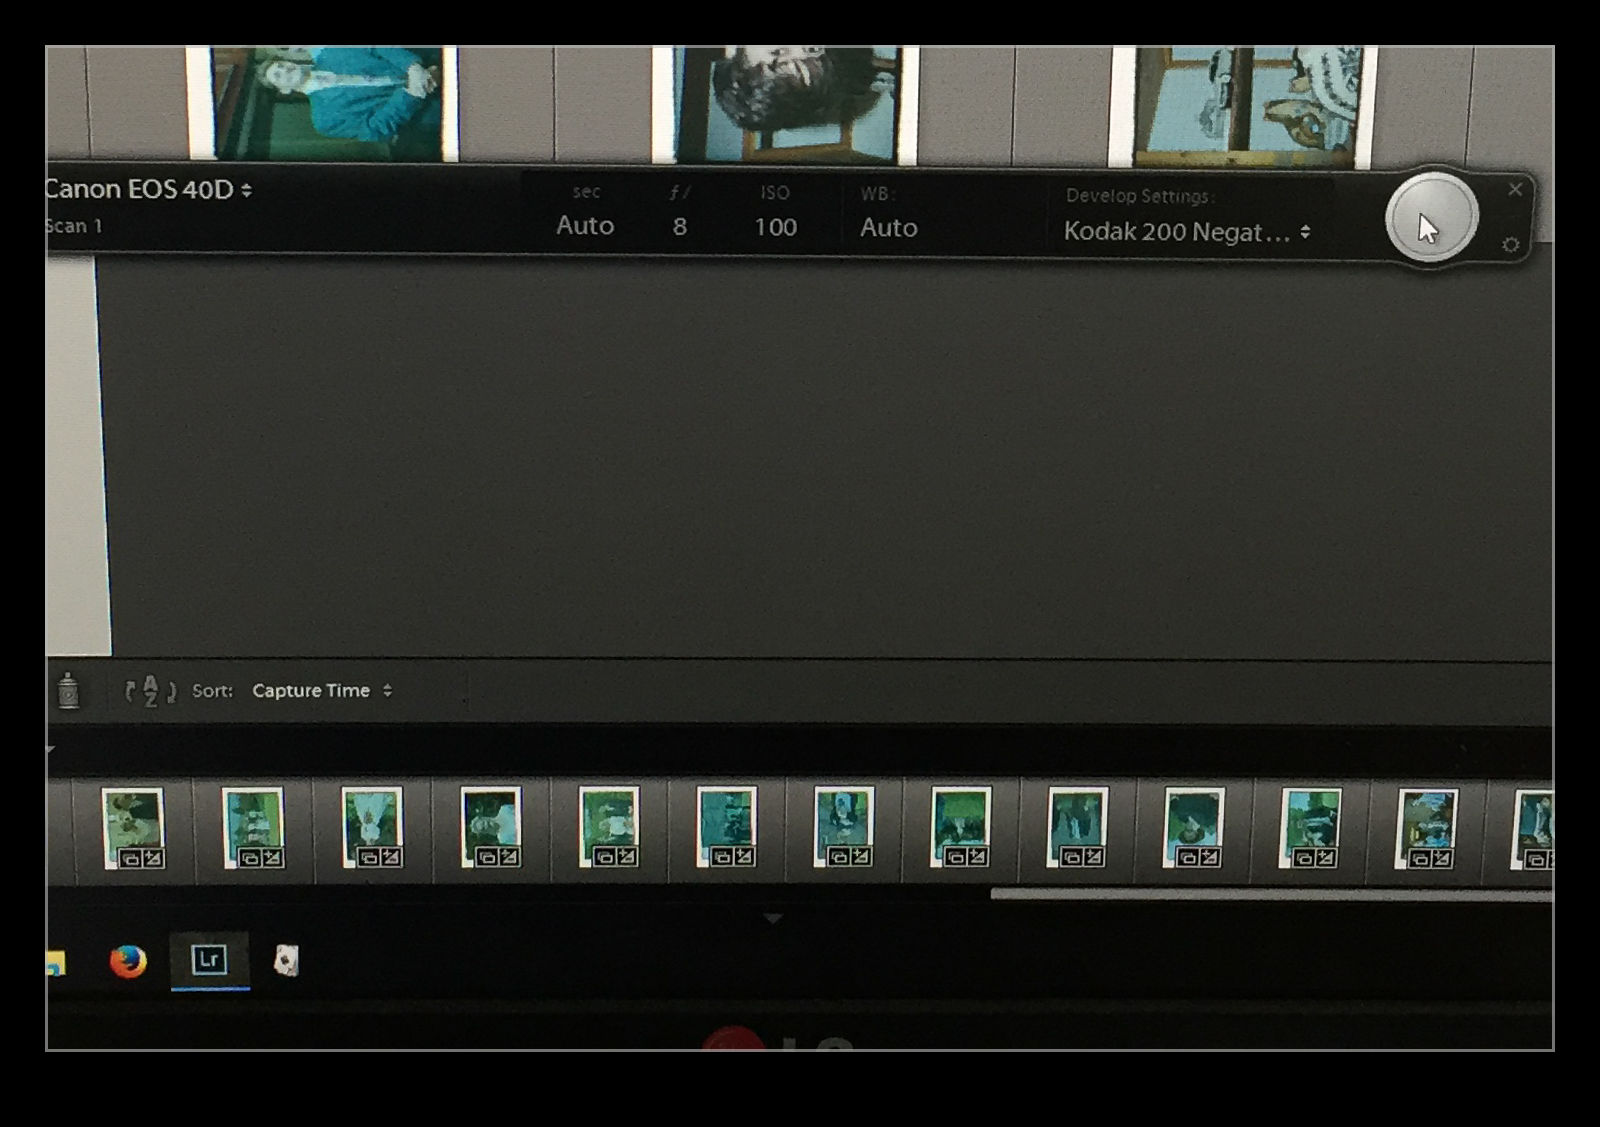 The image is now recognizable but not there yet. Now I have to do some manual manipulation to tidy it up. The sliders have to be used carefully in this case because they are now working in reverse as a result of the tone curve that I applied. This requires some thought. Exposure is still exposure but is reversed. Usually shots look a bit washed out so, what would normally by the Blacks slider is now the Whites. Shadows are handled with the Highlights and vice versa. It takes a bit of getting used to but it is not too hard after some practice. I tried using Auto Tone but it did not do a great job. I imagine the algorithms were not designed for operating in reverse!
With everything set up, I can work through a shoot very quickly. Choosing which ones to ignore and reshooting if something doesn’t look right can be done pretty much on the fly. Is the image quality great? It’s okay but not amazing. However, many of the originals are not that great either. For the majority, it actually does a pretty decent job and sets me up for something that I can do more work on if I need to. It is a big improvement on my previous approach and now I will make quick scans when I need them rather than be dreading the time involved and avoiding all but the must have shots to save time.
Fisheye Correction in Lightroom
I have a pretty well defined routine for importing and processing my images in Adobe Lightroom. I have presets for importing images that put them in the right folders, apply copyright information and apply development presets. I can then edit from there as I go. One of the settings I have set as a default is the application of the lens correction settings. This setting deals with any natural vignette in the lens as well as some distortion. Occasionally this can be tricky if you have something close to the edge of a wide lens and it gets slightly chopped by the correction.
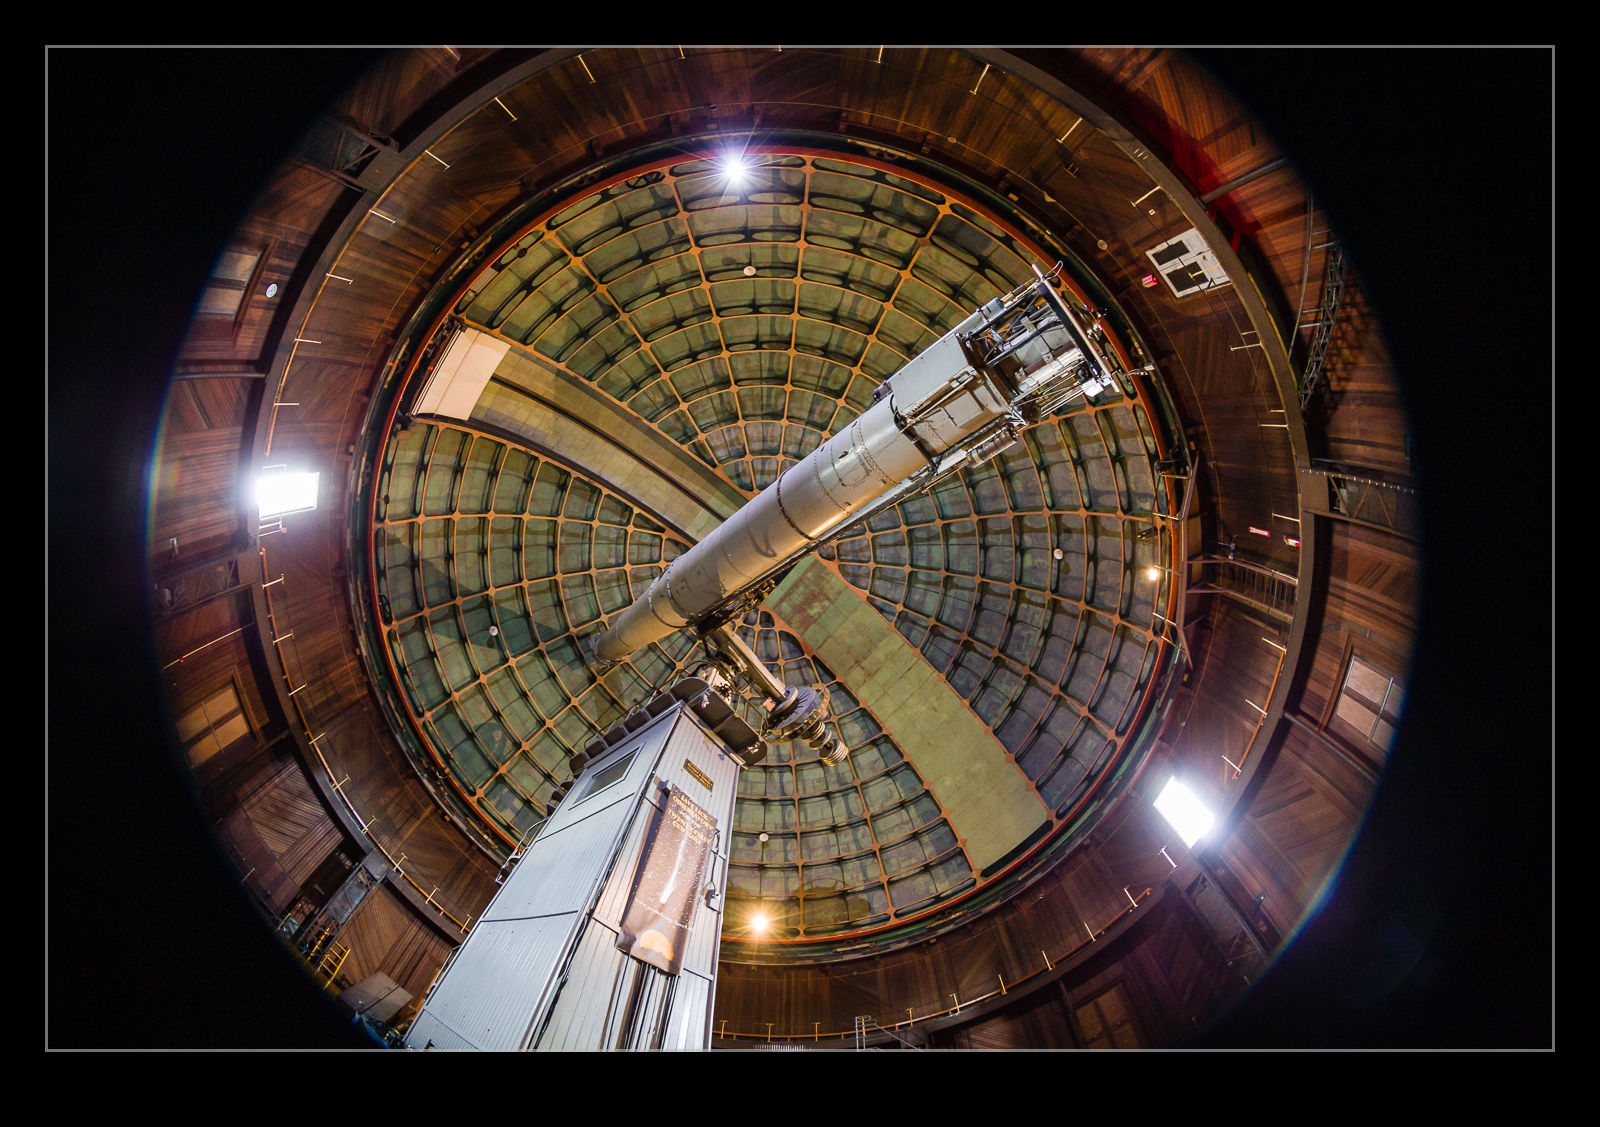
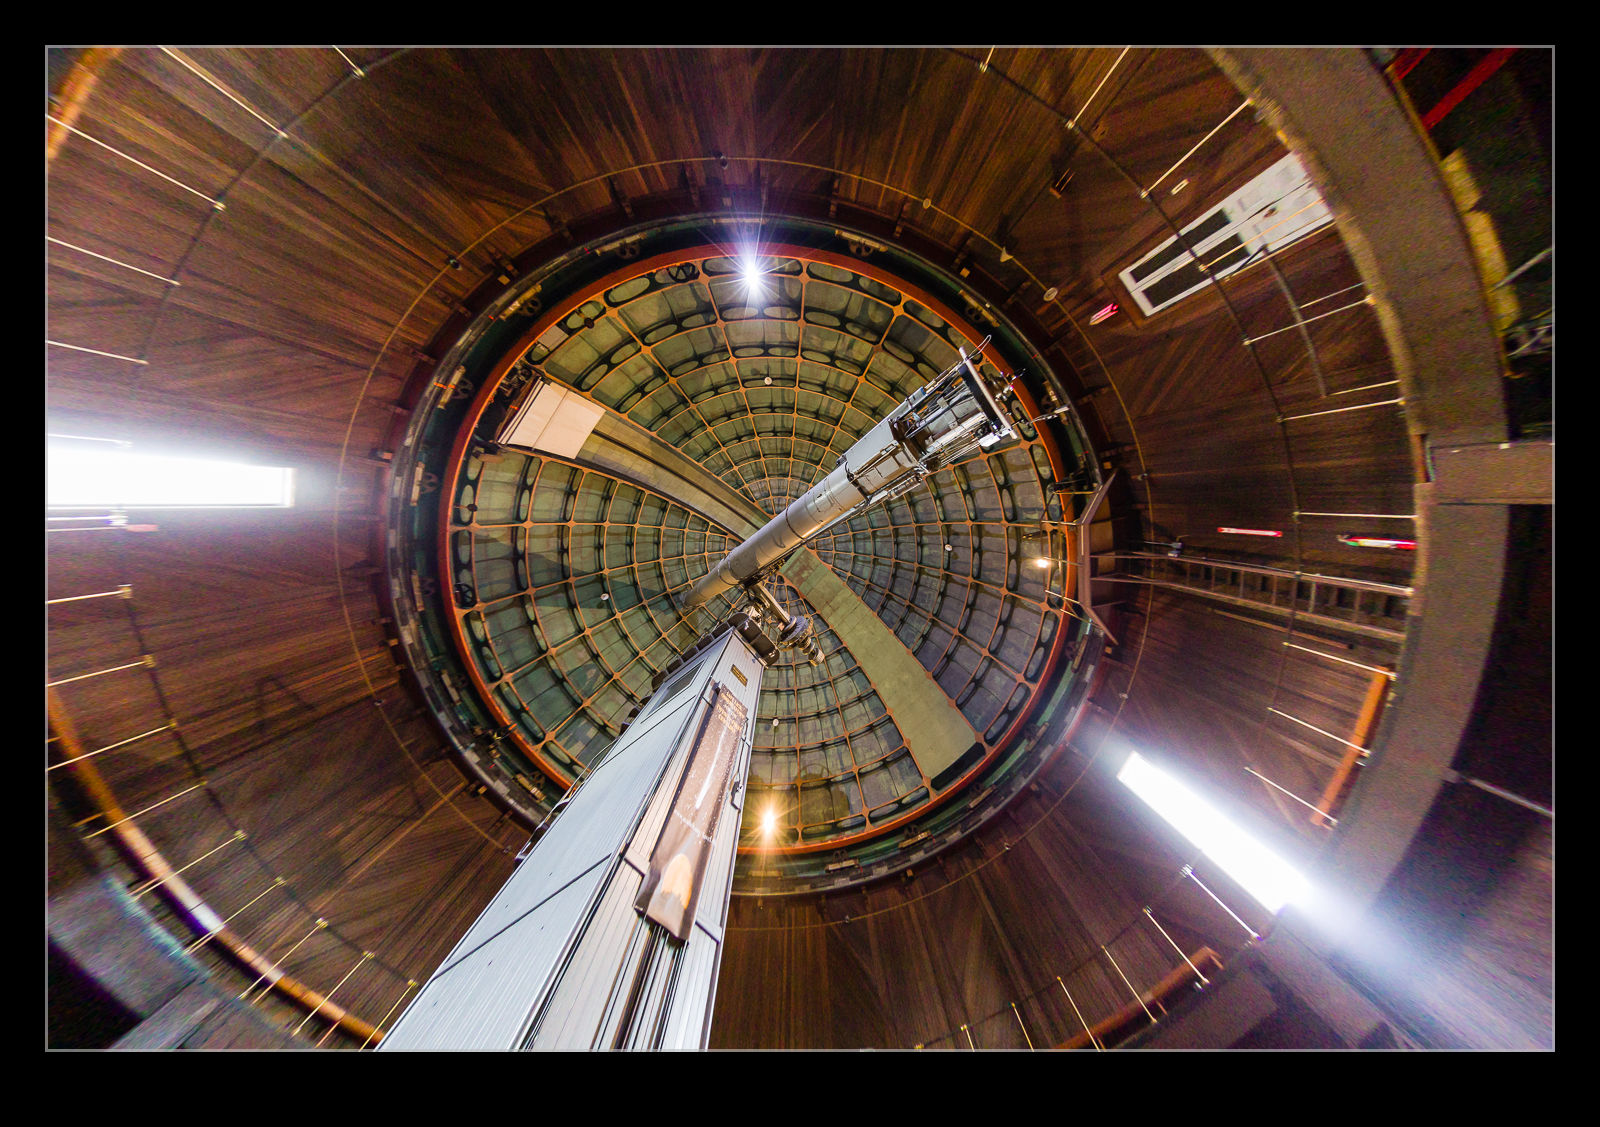 I discovered a more extreme version of this while processing some shots from the Lick Observatory. I had taken my 8-15mm fisheye zoom with me as I thought there might be some use for it in the telescope buildings. It turned out to be a good thing to have. When I first had the lens, Adobe had not created a profile for the lens so the shots came in uncorrected with the fisheye look I expected. More recently, Adobe have created a profile for this lens. It was added in one of the updates and, since I don’t use the lens all of the time, I hadn’t noticed.
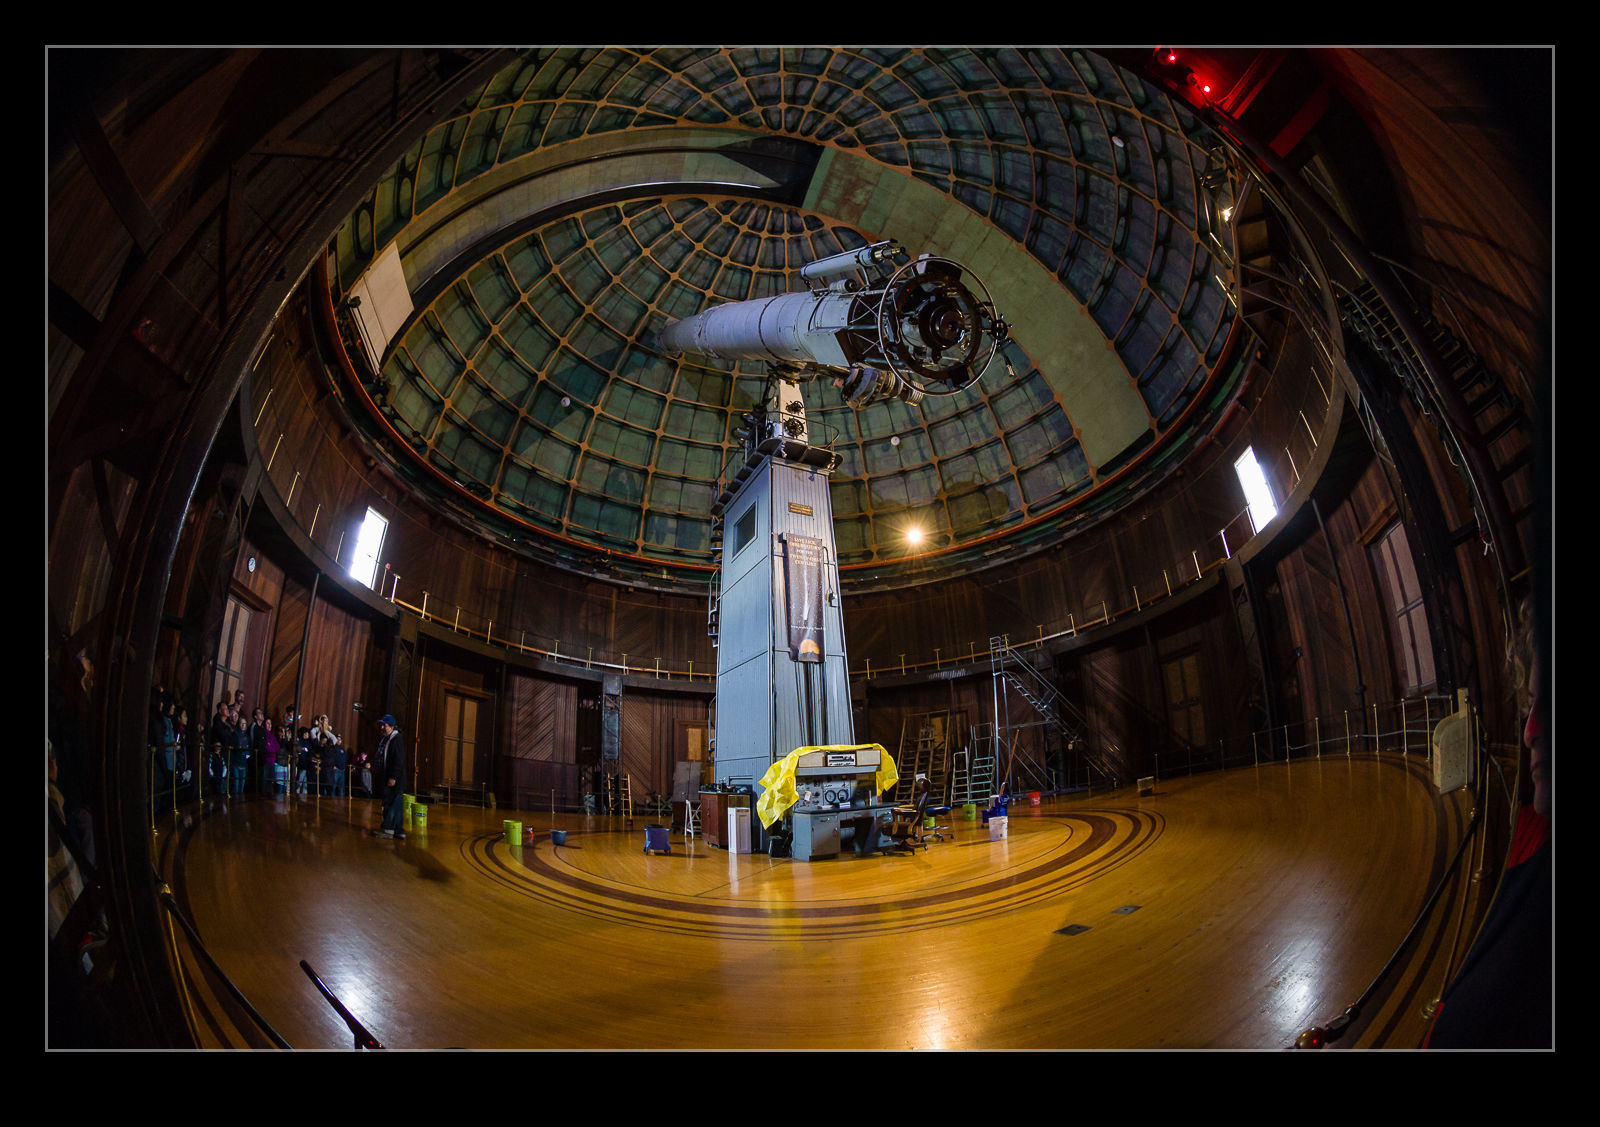
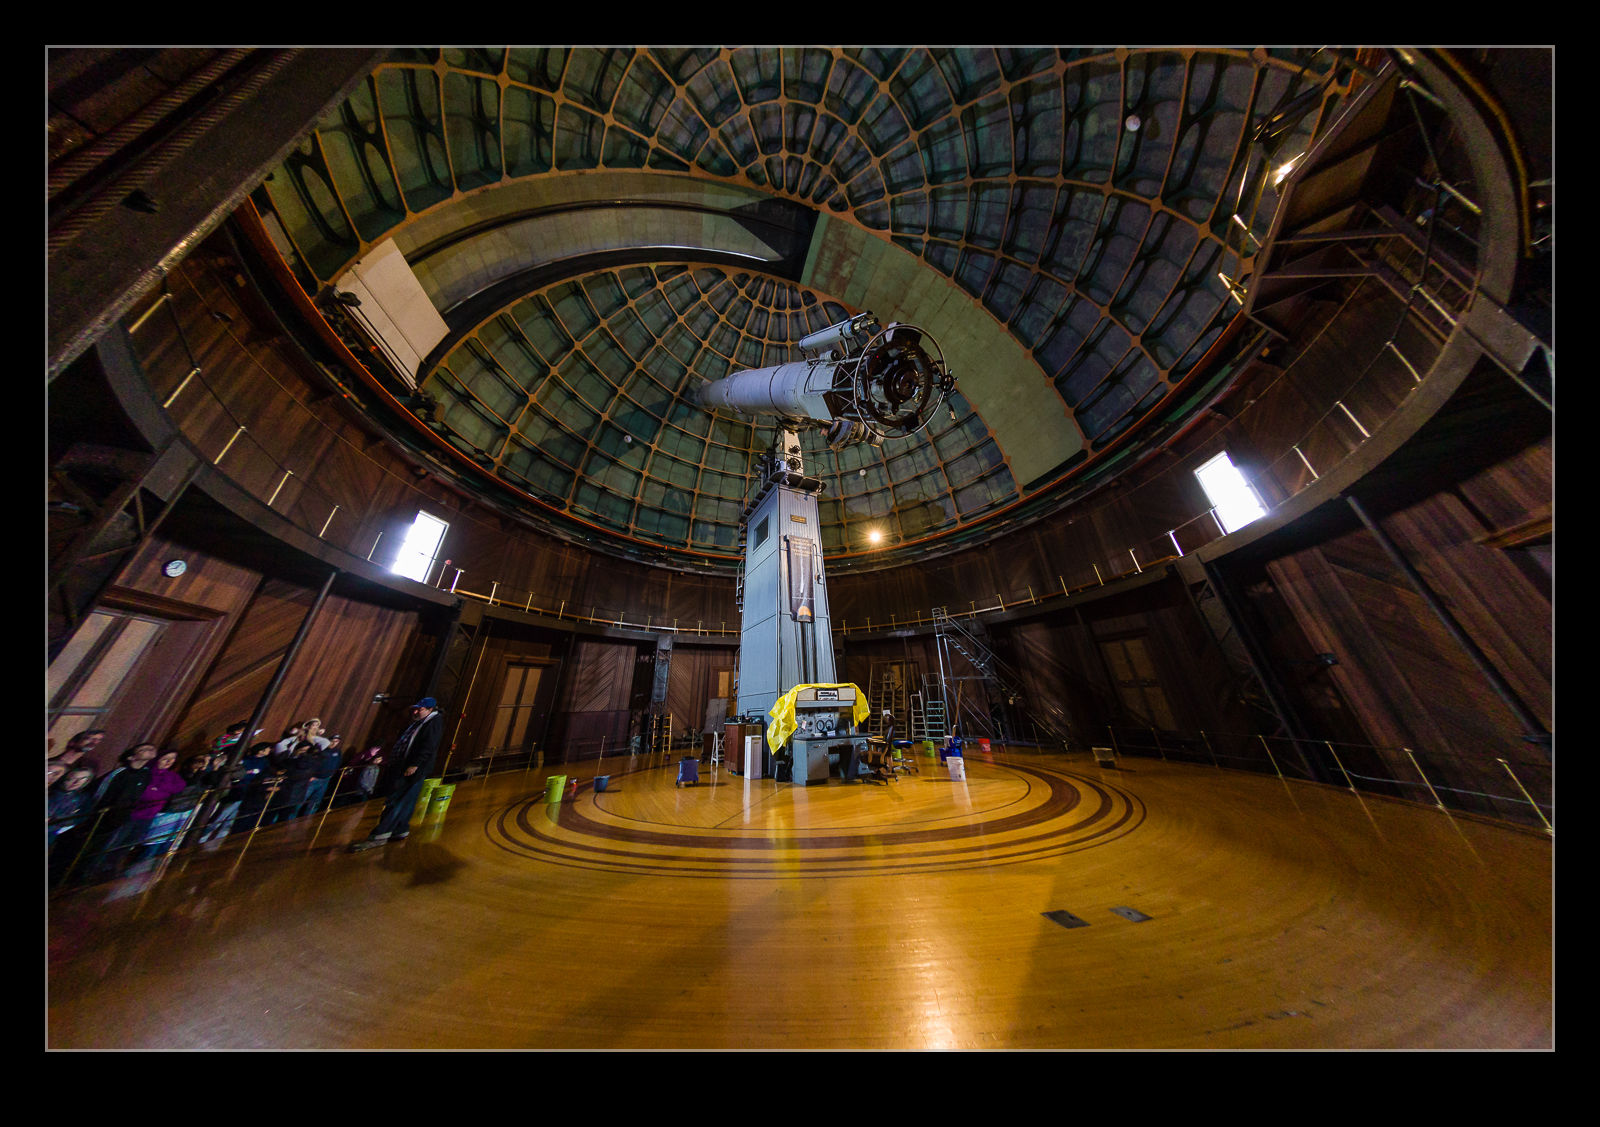 When I was going through the shots, I noticed the wide shots had some strange distortion at the edges. I was perplexed by this and also wondered where the circular fisheye shots were because I was sure I had taken some. Only then did I realize that these were those shots and the corrections were being applied. Here are some examples of the before and after with the correction to give you a idea of what the transformation is. A pretty dramatic change. I might make use of this sometimes but I shall also have to remember switching this off when shots with this lens are involved.
Haze Filter
The Creative Cloud version of Lightroom drops new features in to the software when the updates are installed. This is a nice thing to have happen but, unless you are paying attention, you might not be aware of some of the new features. It took me a while after the last update to learn that a new filter had been added that was designed to take haze out of images. This is a great idea. I have experimented with trying to remove the effect of haze in shots before but, because the effect varies by distance, it can be quite tricky to get something that doesn’t look totally wrong.
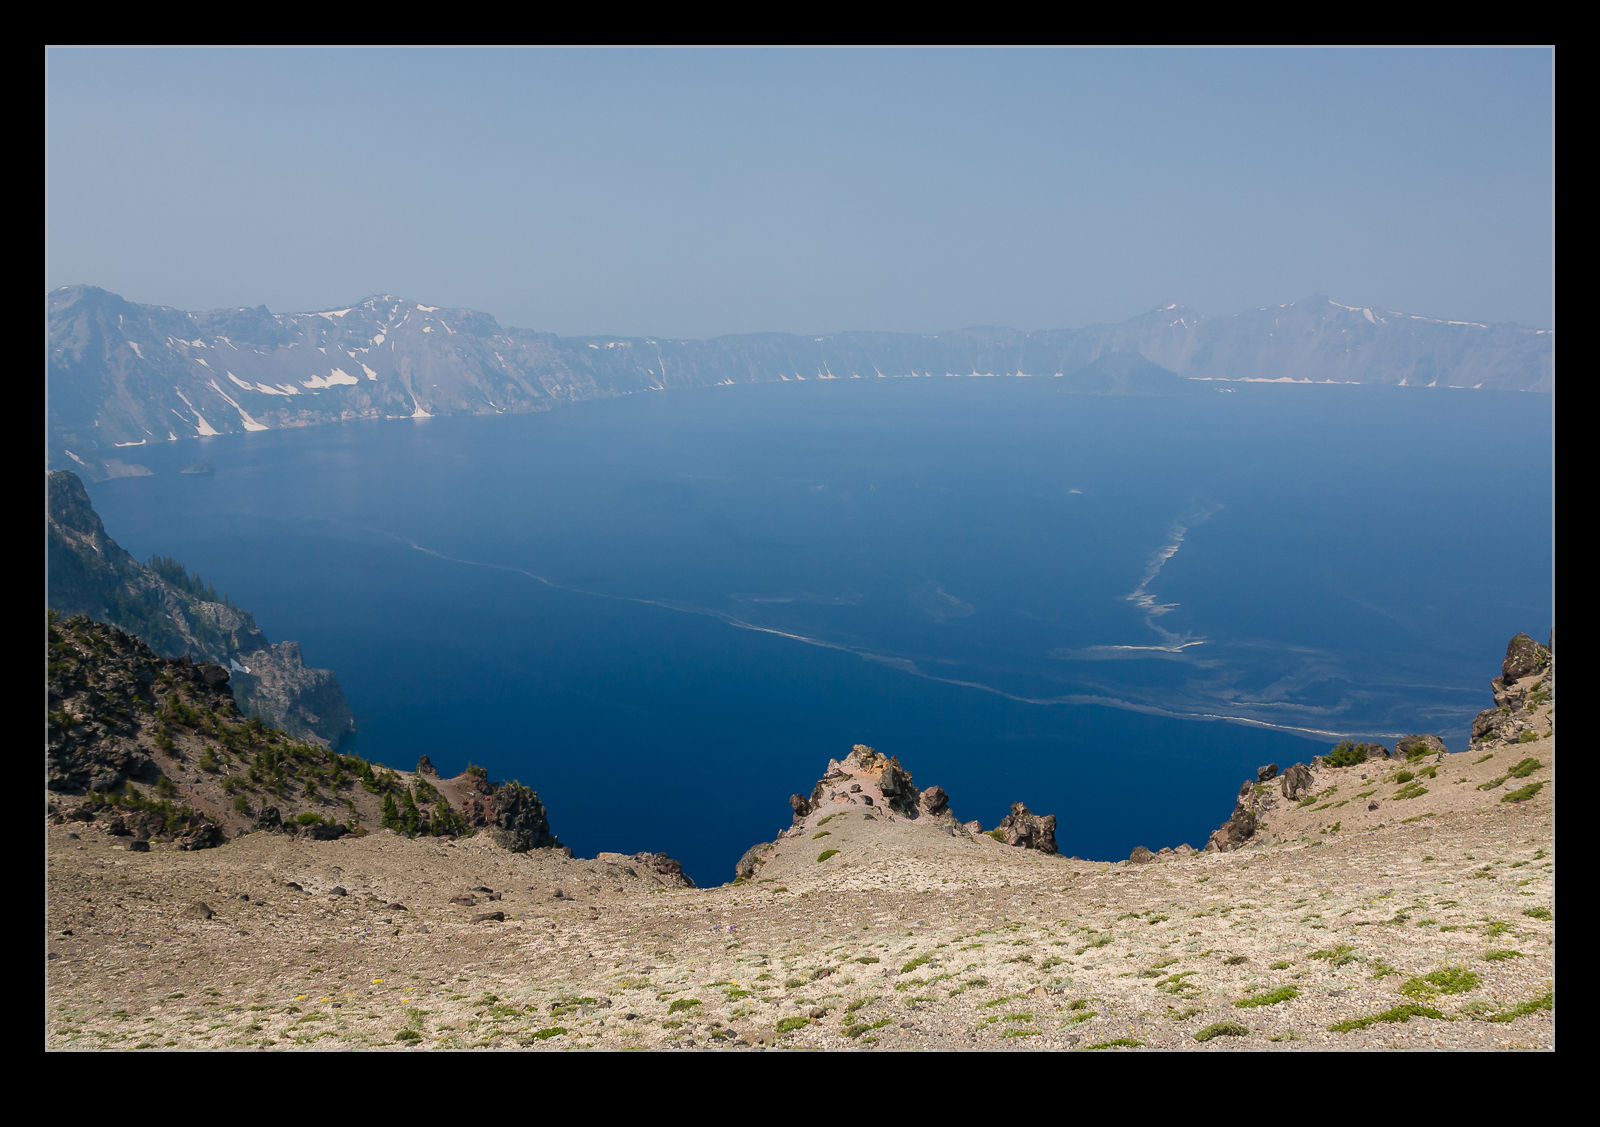
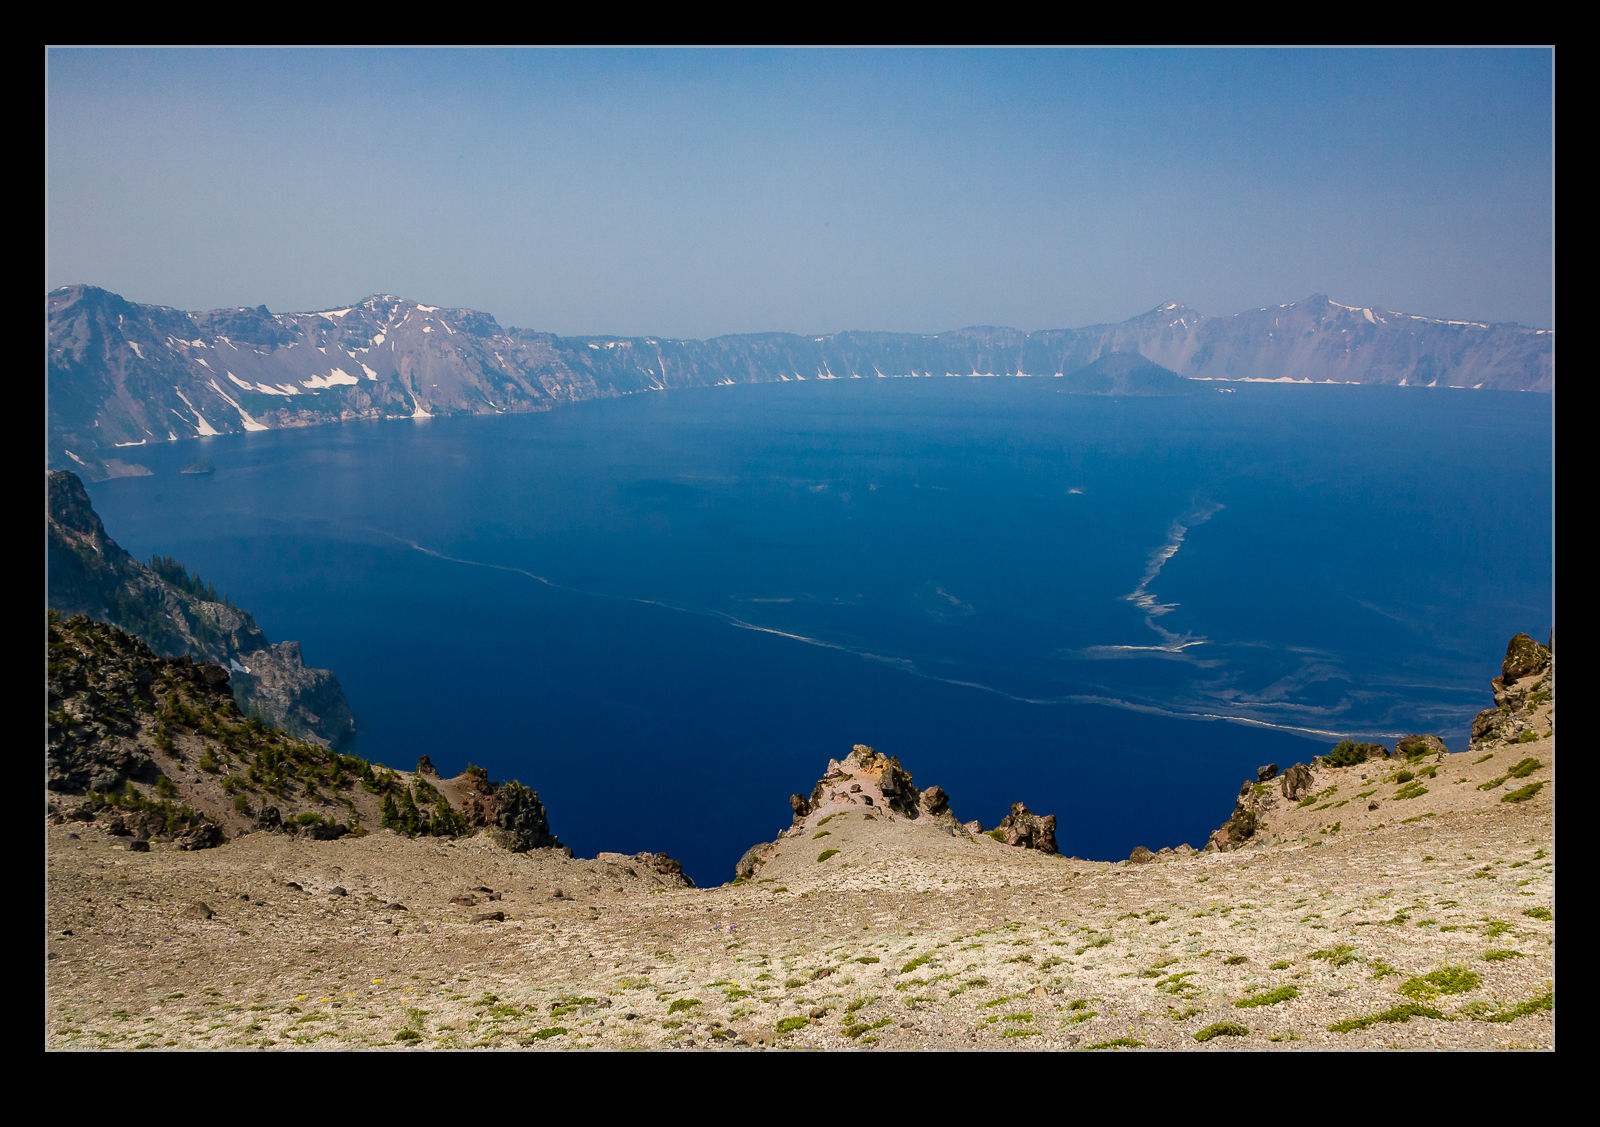 I have not played with the filter a lot but I did decide to try it out on a shot I took at Crater Lake a few years back. Wildfires had resulted in smoke in the air which meant the usual clear view across the lake was obscured. I thought I would see how the filter worked out. Above are the before and after shots. It is an improvement but obviously isn’t going to rescue a totally messed up shot. I did try a more aggressive setting but that looked wrong itself so this was the one I went with. We shall see if this has other uses for me over time.
HDR Within Lightroom
The changes in Lightroom CC that included the Photomerge also included a change to the processing of HDR images. Again, the functionality has been brought within Lightroom rather than requiring the move out to Photoshop and the output file is again a DNG file. This means a smaller file than the 32 bit TIF that I was previously getting. A while back I wrote about some of the odd experiences I was having with moving these high bit depth files between Photoshop and Lightroom so a new workflow is of interest.
According to some of the publicity at the time of roll out, the new processing approach does not require as many images to work with. I have been shooting five images for HDR to date. They say that only a couple are necessary. I have tried carrying out the processing with five and with two and there doesn’t appear to be an obvious difference in the output. There is a benefit in the time taken to process the images though so this does appear to be a good improvement.
You can either let the output be automatically toned using the normal Lightroom processing functions or do it yourself. I let it have a go at first but have not liked the choices it made so have reverted to carrying out the toning myself. It is not a time consuming process so seems worthwhile to me. While I felt that Photomerge was not as capable as using Photoshop, in to case I think it is a better solution and this will be part of my workflow. Now to reset the camera to shoot fewer bracketed images!
Interesting Landing Technique
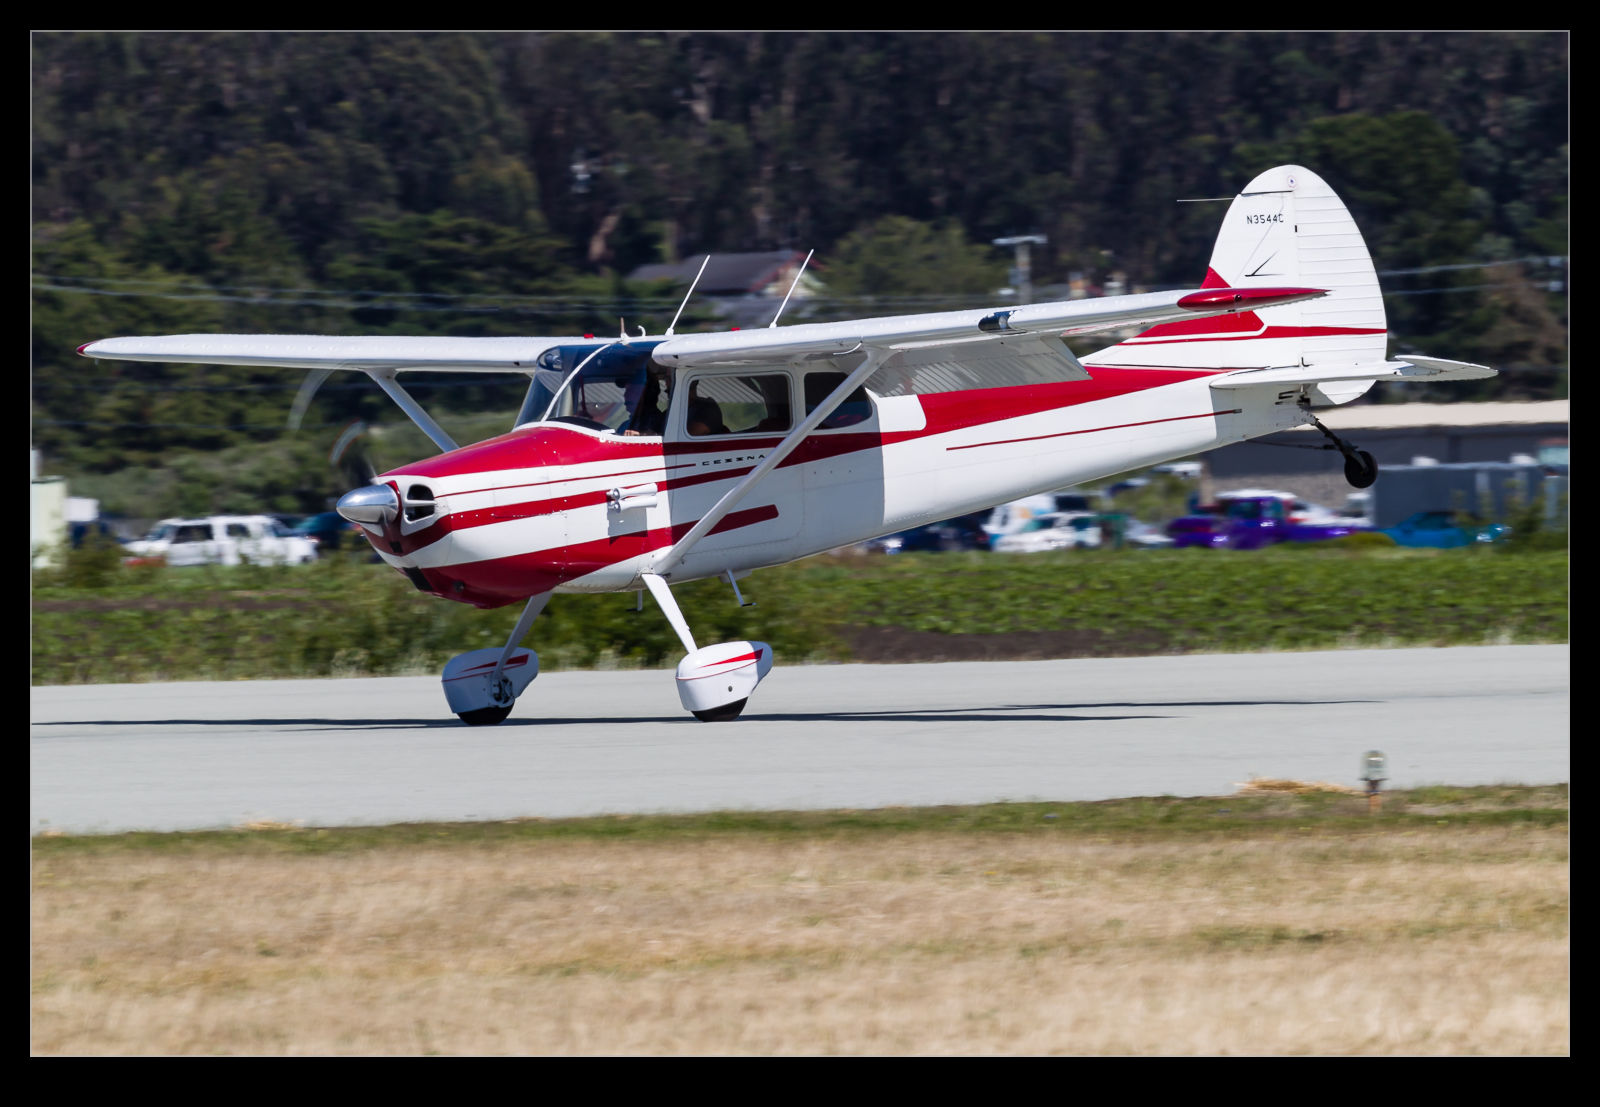 This guy landed at Half Moon Bay while we were there. I have to admit I thought I was taking pictures for the accident investigation at first. However, he maintained this pose all along the runway until he turned off and apparently had done it earlier. I guess he had a lot of elevator authority. However, whether it is a good idea is a very different question.
Time Lapse Tutorial
I have mentioned in the past some of my interest in time lapse. I recently posted a sequence on here and a friend of mine asked me to put together a guide to how I had gone about doing it so here you go.
When putting together a time lapse, the first thing is trying to establish what will be special about what you are shooting a sequence of that will make a time lapse more interesting than any other form of presentation. Usually this involves something that changes slowly in real time but becomes more dynamic in a time lapse such as a sunset or storm cloud development. Alternatively, it is something where a lot happens over a long time that isn’t terribly dramatic on its own but, when speeded up, becomes far more impressive. This could be a sequence of activities with multiple people or launching airplanes as was the case for the one I recently made.
Once you have established what it is that makes it interesting, then you have to decide how best to portray that. Choosing your location and your angle of view are the next challenges. I was shooting departing and arriving aircraft at SFO so I needed an angle that gave me a good view of them and a field of view that allowed plenty of the movement to be seen without everything being too far away to be noticeable. In this case, shooting at night works well because the lights stand out far more making the aircraft more conspicuous than would be the case during the day.
Now it is time to get into the technical issues. How long a clip do I want to make? Shooting time lapses means getting a large number of still shots which will each be a single frame of video. Video frame rates vary but I used 30fps for the sequences I make. Therefore, 30 shots will give me a second of video. If I want a minute of video, I need to shoot 1,800 shots. That’s a lot of shots. Also, figure on shooting more before and after the main action since it is nice to have some spare video at each end to play with in future editing.
You know how many shots you need but how long in real time do you want to cover? Are you starting before sunset and finishing well after sunset? Do you have a peak period of activity that you want to cover? Now you can see how many shots you need over a given amount of time so you will work out how long the interval between each shot can be? The interval between shots is critical but you must also factor in how long a shutter speed you want. This is where shooting at night is a lot nicer because you can get nice long shutter speeds. These make for smoother looking videos because there is no jerkiness. Shooting on a sunny day with a very short shutter speed and a few second interval will result in a jerkier output. The “rule” is to have the exposure time at least half the interval. Doing that during the day may require some neutral density filters. At night it is a lot easier to manage.
Now to mount and control the camera. Obviously a tripod is a necessity to make a stable platform for the shots. A cable release is a must have and preferably one with a timer built in so you can program the intervals. However, if you are shooting at night, you can get away with putting the camera on burst mode with a shutter speed to match your interval and then lock the shutter release open. It will then just keep shooting. The other camera thing to consider is image stabilization if you have long shutter speeds. IS can wander around for long exposures making everything blurred. Keep it turned off. I would also switch autofocus off once you are happy everything is sharp to avoid the focus getting changed by the camera. If the conditions are changeable, you might go with something like aperture priority to accommodate changing exposures. At night, manual might be your best bet. Always keep an eye on how the exposures are doing if in a programmed mode to ensure you aren’t exceeding your interval with your shutter speed. There are complex bulb ramping tools available to use if you want to get advanced. I haven’t tried these since they haven’t been necessary for my purposes so I can’t give good advice. I do have the functionality in a cable release device that connects to my iPhone called Triggertrap but I haven’t ever pushed it to its limits.
One thing you will discover is that fixed apertures are not fixed. Cameras will go to a slightly different aperture for each shot which can result in slight variations in exposure. This “flicker” can be managed by clever manipulation of the lens position but I prefer to use software to fix it. The software will also help if you end up tweaking the camera settings during the capture sequence.
Last piece of equipment advice is bring a chair. Once everything is at work, you don’t have much to do. You can shoot with a second body of course or you can sit back and relax. If you have a buddy along, that is not a bad thing! I shoot all of my sequences in RAW format. For night shoots this gives you a lot of latitude for tweaking the exposures. It does use up a lot of memory but storage is cheap these days. With charged batteries and big cards, you are good to go.
Once the shoot is done, you get home with a ton of images that look remarkably similar. First I import them into Lightroom. I will keyword them in the same way as anything else from a shoot including adding a time lapse keyword. Then I will make sure all of the time lapse shots are in one subfolder before jumping over the LRTimelapse. I am not going to try and write a tutorial on using LRTimelapse. The website for the software has far better guides to how to use everything. However, I will focus on the key elements I go for.
The main one is the Deflicker process. This is a routine that analyses each shot and applies little tweaks to the exposure to avoid any visible flicker. You can draw out a box in the image preview to tell it where to analyze. This means you can pick an area that is constant in the image as a reference and avoid areas where there is a lot going on. If the image exposure is gradually changing, it won’t affect that. It will just take out the individual variance. You can see a trace of how the overall exposure tracks during the sequence.
The other element I sometimes use is panning. You can define keyframes in the sequence and jump back into Lightroom to crop each one as you wish. Back to LRTimelapse and it will calculate the individual crops for each frame to make a smooth pan between your chosen keyframes. Quite nice to provide a little variety if you wish. I always crop the images to a 16×9 format since that works nicely for HD output formats.
When all of your tweaks are fixed, you save the metadata files and go back to Lightroom to reload them. (There can be a bit of back and forth like this throughout the process.) In Lightroom, there is an export dialog from LRTimelapse which then renders out the individual files from each shot. These will then be taken by LRTimelapse and rendered as a video clip.
Sounds really simple that way and, to be honest, it is pretty straightforward. A little practice helps of course. When it works out, the result can be very satisfying. Of course, a lot of times, you see something that you really wish you had done differently. That is something you will have to put down to experience and try to remember next time you are out shooting.
One last thought – if you are shooting something that involves light trails at night, consider making each image a layer in Photoshop and blending them together as a stack to see what happens. It can work pretty nicely sometimes. However, you can end up with a pretty huge Photoshop file so your computer may groan while processing it. Happy shooting!
HDR for Snapshots
While you always want to produce great photographs, sometimes you are just getting snapshots to remind you of places that you have visited. This blog is full of such shots that will never go anywhere further. One of the shortcomings of those shots is that they are taken at a time of day that is not ideal. If I am setting out on a photo trip, I can go at the time that suits the lighting. If we are visiting somewhere on our travels, I get the shots that are available at that time. That often means harsh lighting.
Here I have started to take a lesson from my friend Hayman. He was talking about using HDR to make something more interesting from an otherwise unflattering lighting situation. Consequently, I have been making a lot more use of HDR on my travels. While early processing techniques for HDR were focused more on the grungy style, the latest developments allow you to produce an image that is a lot more natural looking and is far closer to what you recall of the view when you were there.
When trying to provide a more interesting shot for sharing with someone who wasn’t there, this is a good option. The ability of raw processing to get a lot more out of a shot has certainly increased the potential of a single shot. However, as the contrast ratio gets larger, the limits of a single shot become apparent. An HDR image can cope with this situation a lot better.
I am now using the tone mapping in Adobe Camera Raw to work on the 32 bit file once Photoshop has created it. Then, once it is back in Lightroom, I can use the same sliders to further work on it. (I am currently unsure about how well the edits in ACR show up in Lightroom as I seem to lose some of the effects but will figure that out in due course.). The resulting images are still a little less than real but part of the purpose is to show more of the shot than the light would naturally have given.
The examples below are a bit of a sample. One of the middle range image as it was without any significant work. Next comes an edit in Lightroom to bring out a lot of the shot. The last is the HDR effort. Hopefully it shows the various results possible for the same basic shot. Interestingly, if the light is not totally harsh, the ability to get more out of a RAW file is not far short of what the HDR gives. It has less flexibility and is more susceptible to halos but it is a close second.
