Tag Archives: filter

Red Bark

The arboretum in Seattle is unsurprisingly home to many interesting varieties of trees and plants.  One tree that caught my eye was (perhaps) a type of willow that had bark that peeled to reveal an intense red coloration beneath.  Sometimes these colors don’t seem to show up as well in an image but I fortunately had a polarizer with me and that took out some of the reflection and glare and allowed the color to show up well.  Cropping in tighter seemed to make more sense, too.

Mistake with a Polarizer

I have been using the polarizer a lot during the summer with my photos.  The high sun provides harsh lighting and a lot of contrast and I have been using the filter to cut down the light and to try and reduce glare from white aircraft fuselages.  It has mainly been used on my longer lens also helping to get shutter speed down to provide some motion blur in backgrounds.  However, I did put it on a wider lens when some planes were taxiing past me.

This proved to be a mistake.  It did take out some of the glare and make things a little more balanced from a contrast perspective but, when used on a wide angle lens, it did result in some unintended effects in the skies.  The polarizer effect is quite varied depending on your angle relative to the sun and this results in quite a dark sky in one part of the shot and a brighter sky in the other.  The result is an odd effect which distracts from the plane itself.  Consequently, I have avoided using this filter for these shots more recently.

Should You Use a Polarizer When High Up?

When listening to photographers discussing equipment and technique, I have heard several times that polarizing filters should not be used when you are high up.  As you get higher, the skies get clearer and deeper blue and the idea is that the polarizer becomes too much.  I was pondering this when we were up in the Washington Pass along the North Cascades Highway.  We aren’t very high at this point but still a decent elevation.  I thought about taking the polarizer off but I felt like it really improved the colors and vibrancy of the images.  Maybe we weren’t high enough for it to matter or maybe some of you will look at these shots and think it is too much.  I’m genuinely interested to hear what you think.

Polarizer Effect on the Water

If I remember – which I frequently don’t – I take my polarizer with me when I am going to photographing scenery.  With our trip up into the Cascades, we went to the overlook of Diablo Lake and the sun was reflecting off the surface of the lake waters.  I took two shots – one with the polarizer rotated to remove the glare and one with the glare in full effect.  I was interested to see which of the shots I preferred when I got home.  The color of the lake is very nice but sometimes the reflections are more interesting.  I include both here to show just how much of a difference the polarizer makes and for you to decide which is to your taste.

Sunspots

It’s been a while since I posted my pictures from the eclipse.  This is a post of a sun picture taken on that day but I took this before the eclipse got started.  I was setting up the camera and the filters and I needed to get some shots to check everything was okay before things started to happen.  At the time, I noticed the sunspots on the shot but I was distracted by other things after them and forgot.  However, it was impressive to be able to see features on the surface of the sun as I was taking a shot.

My Revised Workflow

My approach to processing images after a shoot is something that constantly evolves.  I have written about how I do this in the past but a few things have changed since I wrote that so I thought I would write up the latest approach in case it is of any use/interest to any other shooters out there.  I should say at the start that my workflow is based around the use of Lightroom.  If you don’t use Lightroom, this might not be of any use to you although I imagine that a similar process could be achieved with other software.

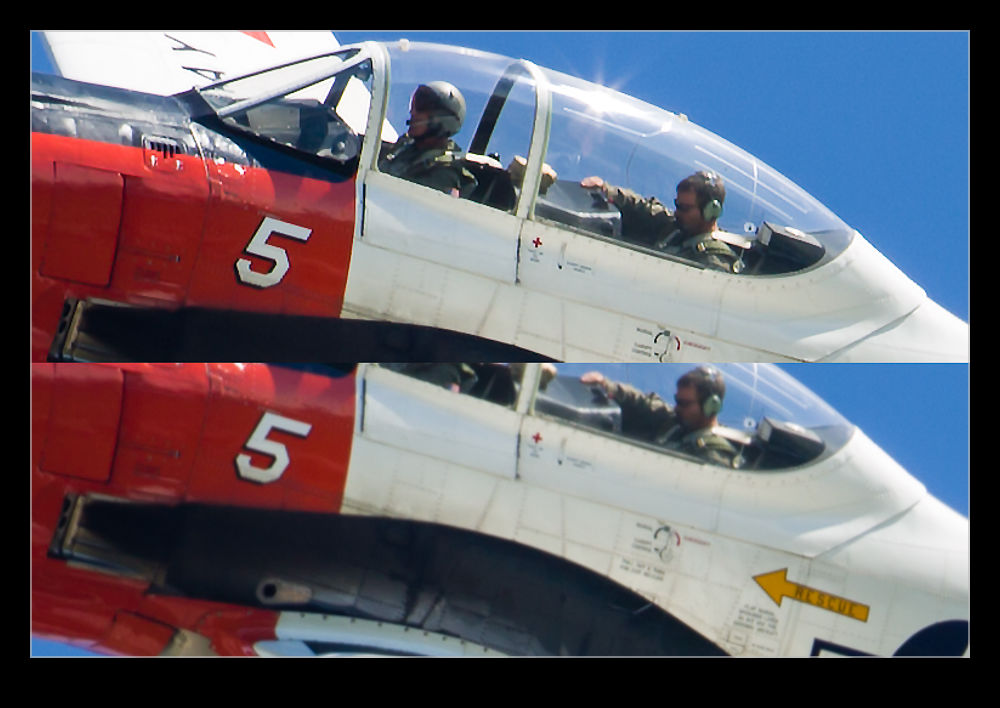
One thing to highlight at the start is that, when shooting aviation (and that is the majority of my photography), I aim to slightly overexpose my shots.  I have found that going a slight bit over and then bringing the exposure back down in post-production gives a better balance of exposure across the shots and also makes for more pleasing sky colors.  This is something I do when shooting RAW.  If you shoot in JPEG, this might still work but your latitude for adjustment afterwards is a bit reduced so you might not get the same effect.  I don’t shoot in JPEG so I can’t state what happens.

All the shots are imported in to Lightroom and I will form a Collection Set for the shoot.  I don’t have specific folders for shoots, nor do I have a renaming convention.  I keyword all shoots and this is how I manage files and find things later.  Keywording is a story for another day.  Within the Collection Set, I shall create a series of Smart Collections.  They vary depending on what I have shot.  There will always be Not Rejects, Rejects and Picks.  Then, depending on what else there is, there might be Videos, Time Lapse, Blend Stack, Pano Originals, Pano Edits, HDR Originals and HDR Edits.  I keyword any of these types of shot with that term so the smart collections will pick them up.  The Smart Collections may be looking for a date range or shoot specific keywords depending on what I have been shooting.

The aim for all of this is that I get a Smart Collection which is unrejected shots which doesn’t include and shots from HDRs, panos, time lapses or blend stacks.  I don’t want to get rid of those shots by mistake and I want to be able to edit those shots at a convenient time.  Then the Not Rejects folder becomes my focus.  I am aiming to get all of them roughly corrected for exposure so I can make decisions about which shots to keep.  I will be looking for sharpness/focus issues and exposure variation can really mess with how you perceive sharpness.  I will open a shot up in the Develop module and I will have the Grid view on the second monitor.  I can now select shots with the same exposure and choose Auto Sync.  Then a change to one shot will be reflected in all of them.

It used to be that I would select the shots by eye.  Then it occurred to me that the Metadata filter is powerful here.  I select the filter of shutter speed and then I can select each shutter speed in turn.  Now it is easy to select the similar shots and edit together.  This really speeds up the quick edit process.  I know tweak whatever needs tweaking and get everything basically okay.  I won’t bother with detailed editing unless a shot is going to be used for something further.  Now I select all files and, in the Library module, select Render 1-1 Views.  Then I head off to do something else for a while.

When the rendering is done (I don’t try and do anything else while it is underway because, while you can do other Lightroom tasks, everything gets pretty sluggish.  It is easier to wait.  I may even shut Lightroom down and restart it after the rendering is done because it seems to like the chance to clean itself up.  Then I go to the first of the Not Rejects shots.  I have it full screen on the main screen and then zoom to 100% on the second screen.  The Smart Collection is set up to show any file that is not marked as a reject (or all of the other stuff I mentioned earlier) so now I can click through the shots.  If a shot is good, I Right Arrow to the next one.  If it is bad, hit X and it disappears.  Now I can run through the whole shoot and quickly get rid of all shots that are not good, be they unsharp, chopping off a bit of something or just clearly useless.

When this first pass is done, I am now left with a bunch of shots, many of which are very similar.  Since I know they all are basically acceptable, I can now select all the ones that I won’t have a need for and hit X.  Very quickly I am down to a far more manageable number of shots.  Then I can pick which ones I want to do something with.  Hit P for those and they will automatically appear in the Picks Smart Collection and I can come back to them at any time.  If I have shots that will be used for a specific piece, I may create a Collection specifically for that publication and just drag the shots in so I can deal with them at any time.

That pretty much sums up how I handle a shoot.  Some will have pano shots, some will have HDR, occasionally there will be time lapses and often videos.  Sadly, the integration of video between Lightroom and Photoshop is non-existent so I have yet to have a good process for video editing.  Maybe one day Adobe will fix that.  They tempted us by having video in Lightroom but they never took it any further despite the fact that the opening in layers option for stills would be ideal for video editing.  One day…
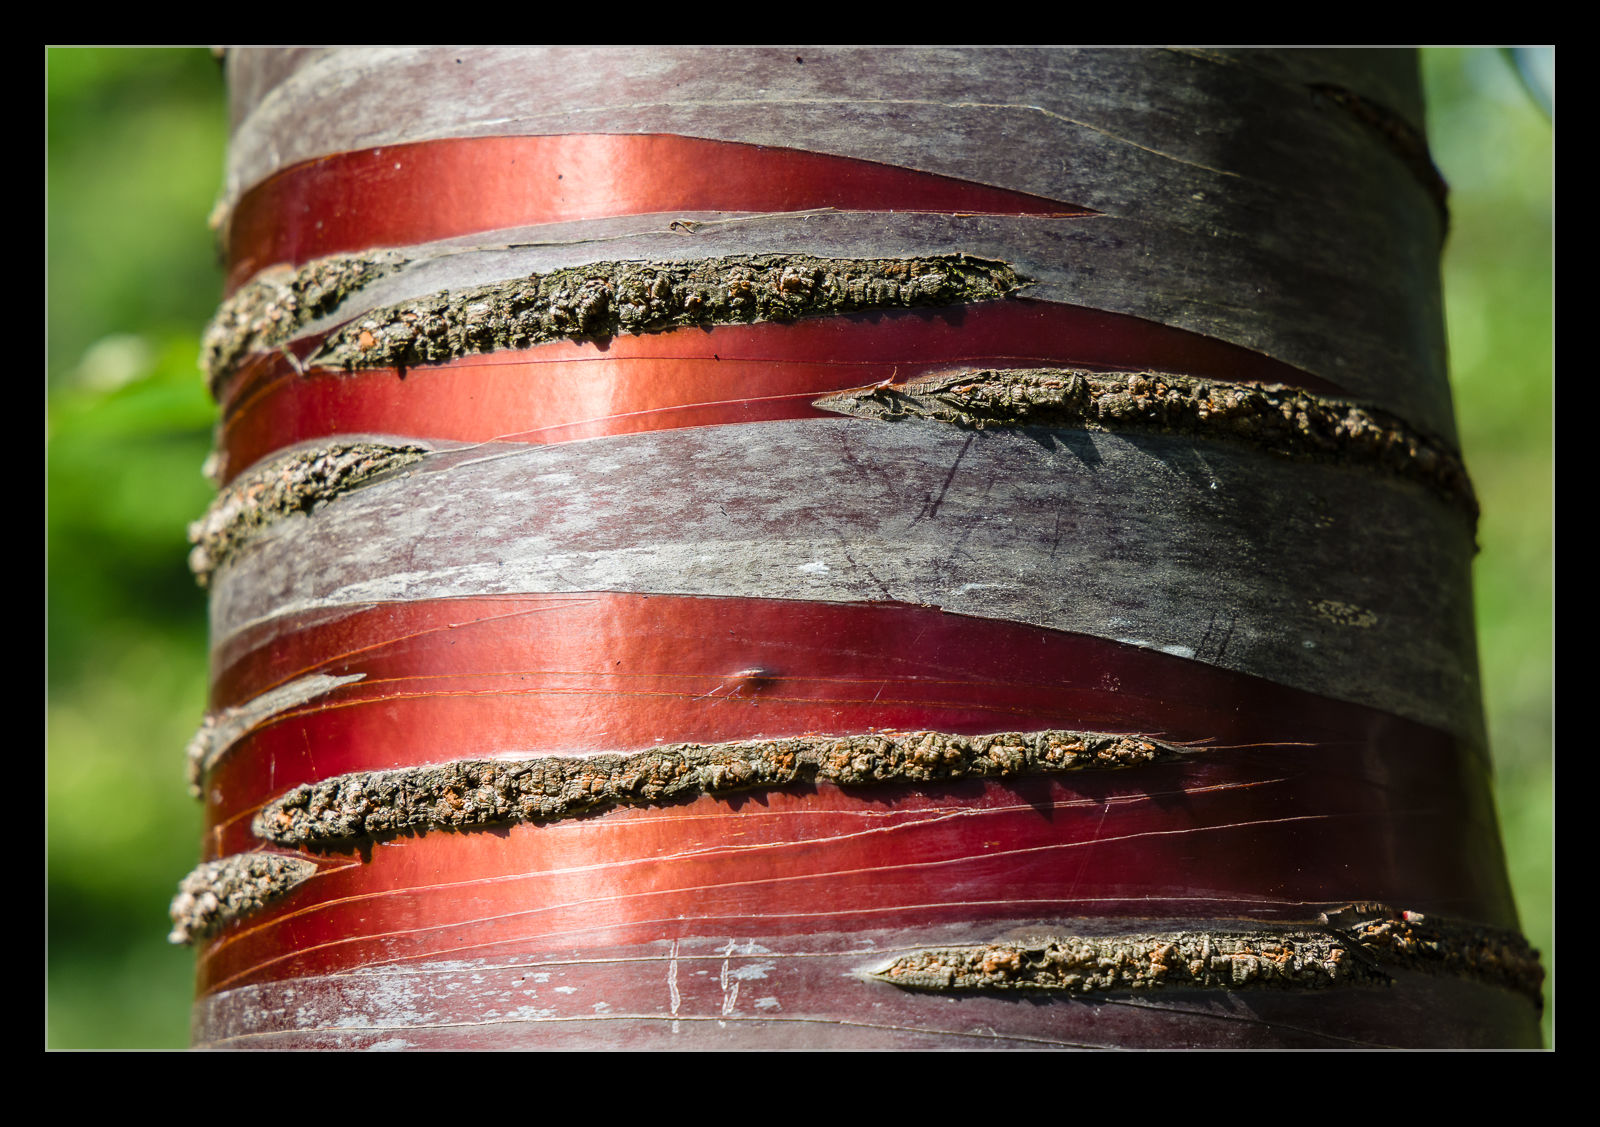
Polarizer Comparison

When I changed bodies, I had to update some of my accessories too.  My old filter system was fine on a cropped body but with full frame, the filter holder encroached on the corners for the wide angle lenses.  I took the opportunity to change my polarizer set up.  I used to use a polarizer on my Cokin holder.  This was a bit inconvenient when I was using lens hoods.  Instead, I decided to get a screw in polarizer.  Since most of my lenses have the same filter size, this gives me more flexibility.

B11I7923.jpg B11I7922.jpgI took the polarizer with me on vacation.  One place where I made good use of it was in the rain forest.  While it was pretty dark in the heavy forest cover, there was moisture everywhere and this meant a lot of reflections and glare.  Consequently, I went with the polarizer most of the time.  While I was there, though, I decided to do some experimentation by repeating some shots without the polarizer to see how much of a difference it made.  You can see the with and without shots here and judge for yourself what a difference it makes.

Haze Filter

The Creative Cloud version of Lightroom drops new features in to the software when the updates are installed. This is a nice thing to have happen but, unless you are paying attention, you might not be aware of some of the new features. It took me a while after the last update to learn that a new filter had been added that was designed to take haze out of images. This is a great idea. I have experimented with trying to remove the effect of haze in shots before but, because the effect varies by distance, it can be quite tricky to get something that doesn’t look totally wrong.

QB5Y5727.jpg QB5Y5727-2.jpgI have not played with the filter a lot but I did decide to try it out on a shot I took at Crater Lake a few years back. Wildfires had resulted in smoke in the air which meant the usual clear view across the lake was obscured. I thought I would see how the filter worked out. Above are the before and after shots. It is an improvement but obviously isn’t going to rescue a totally messed up shot. I did try a more aggressive setting but that looked wrong itself so this was the one I went with. We shall see if this has other uses for me over time.

Variable Neutral Density Filter

Two of my shooting requirements have led me to the world of neutral density filters. Getting a low shutter speed on helicopters often results in very small apertures which can be a pain when it comes to sensor dust. Also, when I am shooting video I also want to be able to slow down the shutter speed. This can sometimes be hard to do and again shows up the sensor dust if it is there and dealing with it on video is a bit more effort.

Consequently, I decided to try out a variable neutral density filter. There are plenty on the market but I decided to go cheap! Why not? I never spend too much cash on photographic equipment!! This was from Amazon and was only about $40 so I wasn’t going to lose sleep if it turned out to be a bust. When the time came available, I decided to do some testing. I shot a clear sky with the filter set to varying levels of light reduction. I then imported these images into Lightroom to see how they looked. The answer was not good. In the mid range, things were actually reasonable. At the low and high ends, there was a significant variation in brightness across the image. This was not going to work.

I then decided to keep things simple. I already have a filter holding system for my old Cokin filters. I decided to buy a couple of neutral density filters for this. Then I can use either of them or both if the circumstances require. Not quite as flexible as a variable filter but pretty close and certainly more reliable without going to the expense of one of the top of the line variable models. We shall see how I get on.

Photoshop CC Shake Reduction

While a lot of people have been quite vexed by the introduction of a subscription based approach to the Adobe software suite including Photoshop, I decided to get over it and upgrade to Photoshop CC.  One of the features introduced in CC is Shake Reduction.  This is an effort at dealing with motion blur in images.  It isn’t going to rescue a crappy shot but it is potentially able to to take an almost good shot and rescue it.  I decided to experiment with it on an image I recently took.

wpid7287-C59F2218-Edit-2.jpgThe image above is a combination of the original image without sharpening and the filtered version.  (It is recommended that you turn off sharpening before running the filter or it will make things break up more.)  The effect actually seems to be quite useful.  I should note that I tried it on several shots and they didn’t all respond as well to the filter.  However, it did make quite a good upgrade to this image.  I shall potentially use this again if there is an image I really like that is not quite as sharp as I would like.  Another tool to potentially use but not one I think I can rely on.