Tag Archives: layers

Cliff Fall and Rock Strata

While staying in Norfolk, we took a walk along the beach at Hunstanton.  We parked up on the top of the cliffs and walked down the path to the beach.  Once down there, we were able to see the cliff rocks and they were pretty interesting.  The rocks had been laid down in strata are a gentle angle and looked really cool.  I guess they were eroding since we came upon what looked like a recent rockfall.  Of course, rocks do things in a lot slower time than us so it is entirely possible that these rocks had been lying there for ages but they did look pretty recent.

SFO Night Time Lapse Take 2

wpid13560-C59F6490.jpgLast summer my friend Paul had been across and we had hatched a plan to shot some time lapse and night streak shots of SFO from a hill that overlooks the airport. The plan seemed like a good one but it was thwarted by two things. First, there was some cloud in the area which obscured some fo the view. Second, it doesn’t get dark until late in the summer and Paul was on UK time so was pretty worn out by the time we could do anything.

Instead, we concluded that a second attempt would be made when he was over during the winter. So it was that we found ourselves back up on the hill. We had come well prepared this time with sturdy tripods and good cable releases. The only thing I had forgotten was the chairs since you have a lot of time to hang around on a dark hillside taking shots like this. I took a long sequence of shots that would be edited into the time lapse. When I got home, some quick work in LRTimelapse and the video was together as you can see below. I also decided to see how well the sequence would blend together to get a streak image. I have never tried to work with quite so many layers in Photoshop before. It certainly struggled with it but it did work. Unfortunately, there must have been some very slight movement on the tripod because the ground lights did not exactly align which made for a blurry foreground when using the Lighten blend mode. To counter this, I duplicated one of the base layers and masked that back in to give the ground a clearer image. The blended version is the one at the top of the post.

Boeing 777-300ER Main Gear

AU0E5067-EditWhen Boeing launched the 777-300ER, they took the stretched fuselage of the 777-300, a model that didn’t sell particularly well and married it to the updated wing that made use of the fuel capacity of the outboard portion of the wing that had been left when the original concept of a folding wing was contemplated.  The increased the weights of the jet, added far more powerful engines and, with the increased fuel capacity, came up with a winning formula that has done a very effective job of killing off the 747.

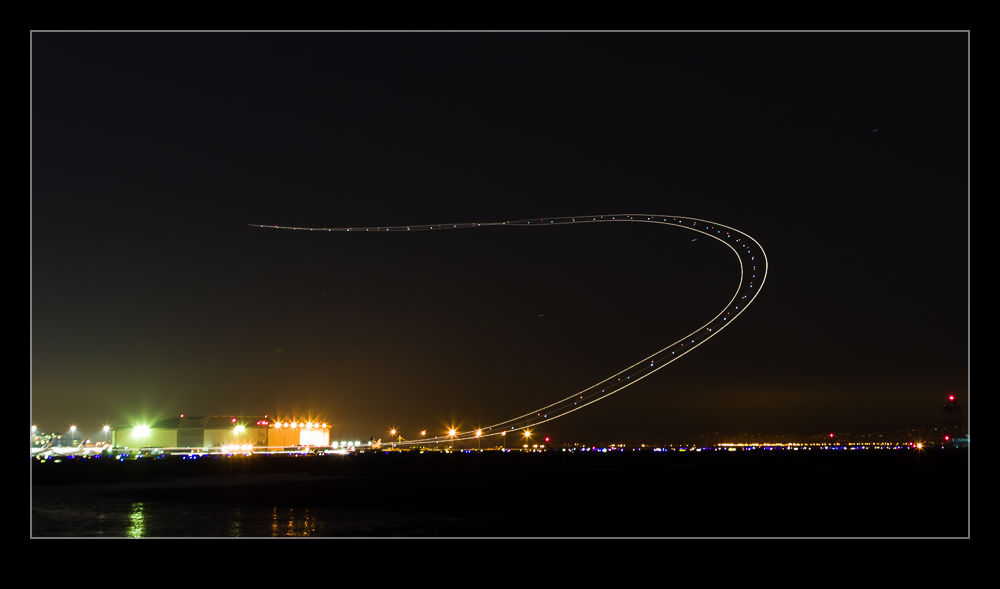
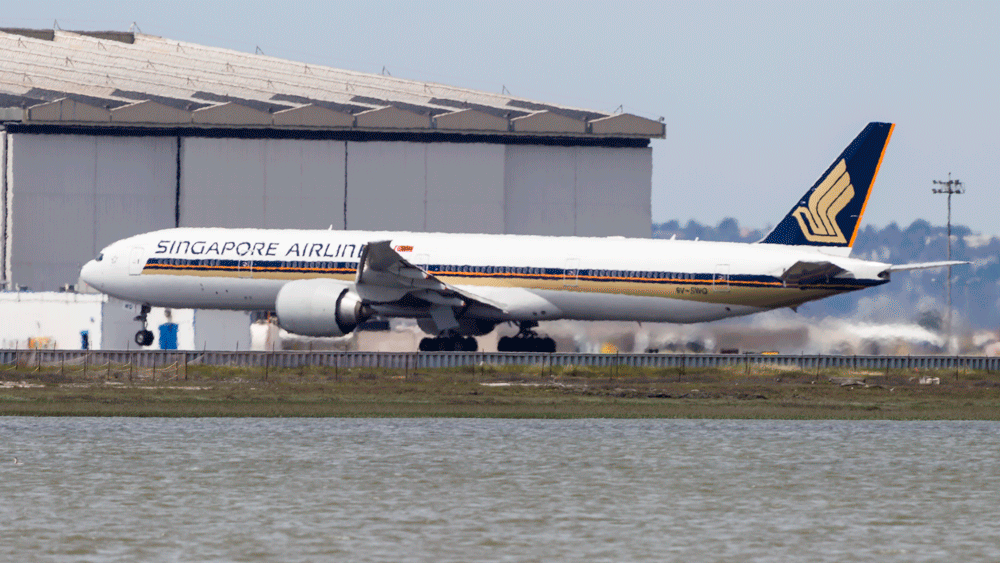
One problem that they had to deal with during development was runway length requirements for takeoff.  Even with the bigger engines, the long fuselage limited rotation angles at takeoff and meant a higher takeoff speed was required which meant a longer runway requirement.  Boeing came up with an interesting solution (after dumping some slightly more curious ideas).  The main gear on the 777 has a triple axle bogie.  Previously this had rotated about the pin attaching it to the main gear leg.  Boeing’s solution was to lock the bogie level during takeoff.

The result of this is to have the rotation of the jet at takeoff to take place around the rear wheels of the bogie rather than the gear leg pin.  The slight aft movement of the rotation point allows the aircraft to rotate slightly more nose up and gain a greater angle of attack.  This gives slightly more lift for a given speed.  This means an earlier takeoff and a shorter runway requirement.

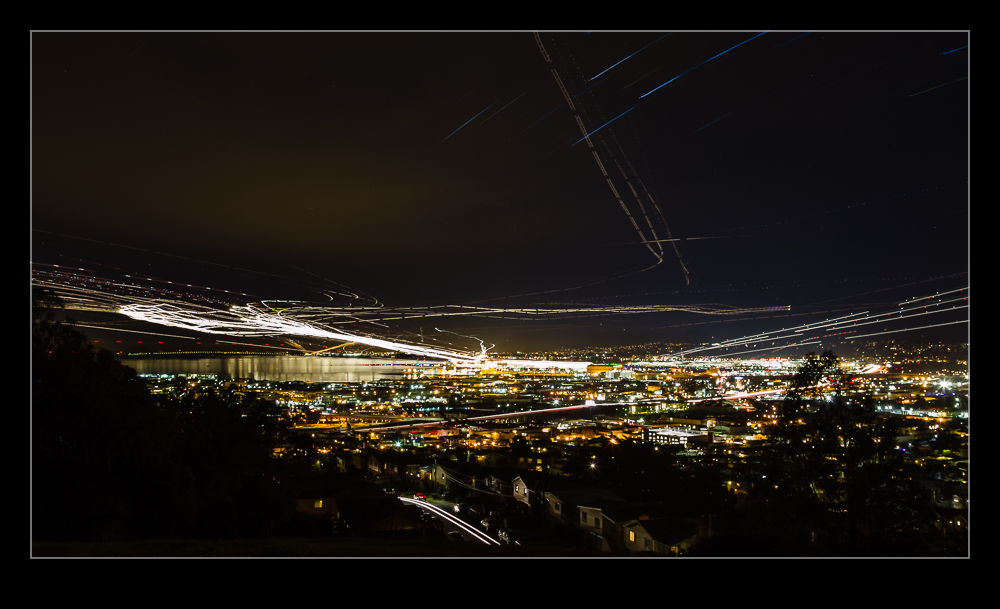
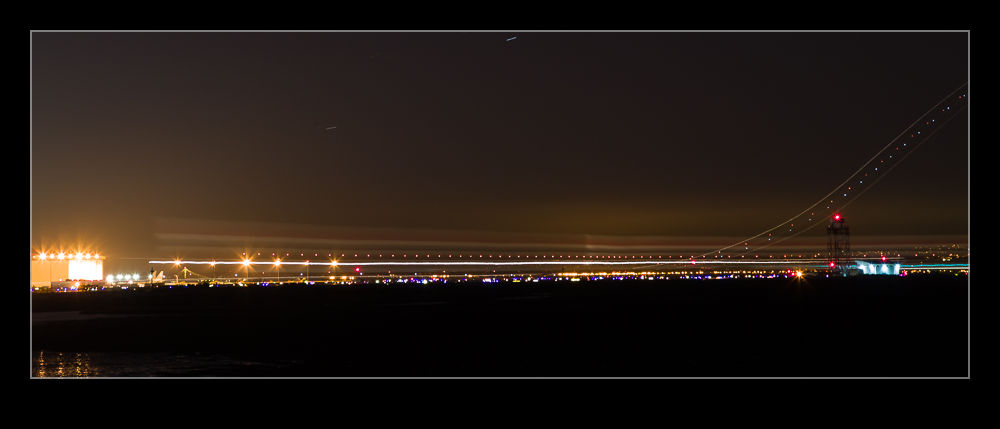
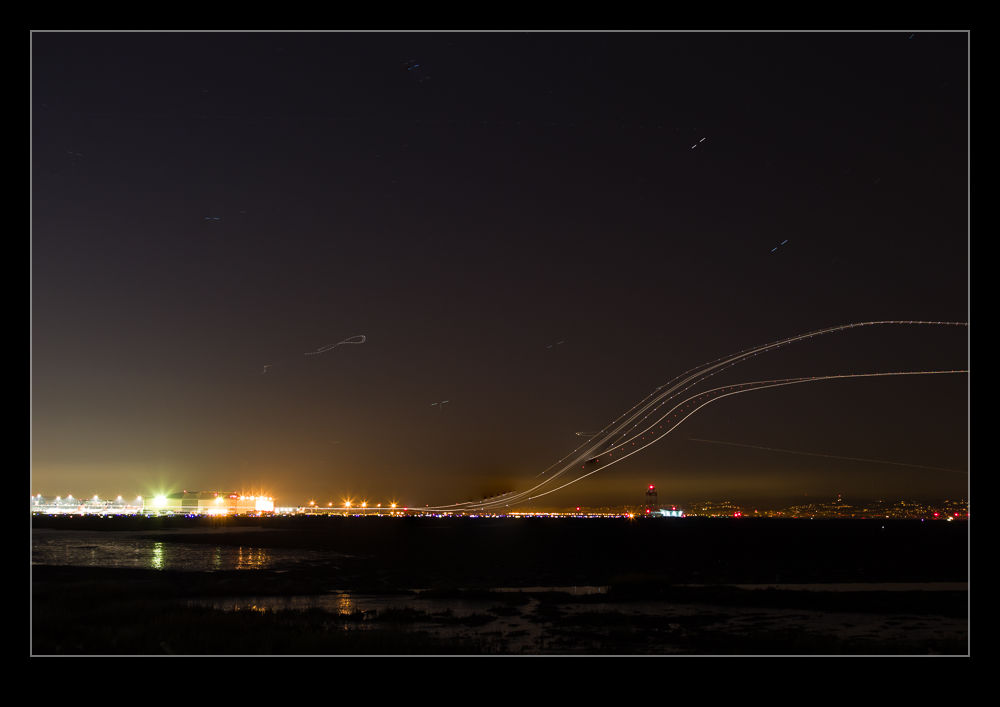
I have tried many times to witness this at work.  First, it happens pretty quickly.  Second, I am often in a poor position to see the rotation point.  Recently I was at SFO to pick up some people.  I was getting a few shots prior to their flight arriving and a Singapore 777-300ER was taking off.  The rotation point is quite far away (although, if you are in the terminal, you might have a good view) and the heat haze is a problem.  However, I decided to get a sequence of shots anyway.  Now, how to use them.

Heat haze is crappy on stills but less of an issue with moving images so I decided to animate the sequence.  I imported all of the shots into Photoshop as layers in a single document via Lightroom.  The hardest part was aligning them.  I started at the bottom layer and then progressively made each layer above visible.  I then changed the latest top layer blend mode to difference.  This makes aligning them a lot easier since everything is black unless it is different.  I was focused on the gear so used that as the reference as the fuselage rotated.  Once each layer was in place, I changed the blend mode back to normal and moved to the next layer up.

Once they were all aligned, I used the animation timeline to make frames from each layer (and reversed the order since every time I do this they seem to be the wrong way around).  Then I could crop in to get the overall view I was after and save the file.  A Save for Web allows the generation of the animated GIF and we are done.  The image at the top is the final result.  It does allow you to see a bit of what is going on if you look closely although it is still a bit hard given the distance, the angle to the ground and the heat haze.  I guess I will have to find a location closer next time.
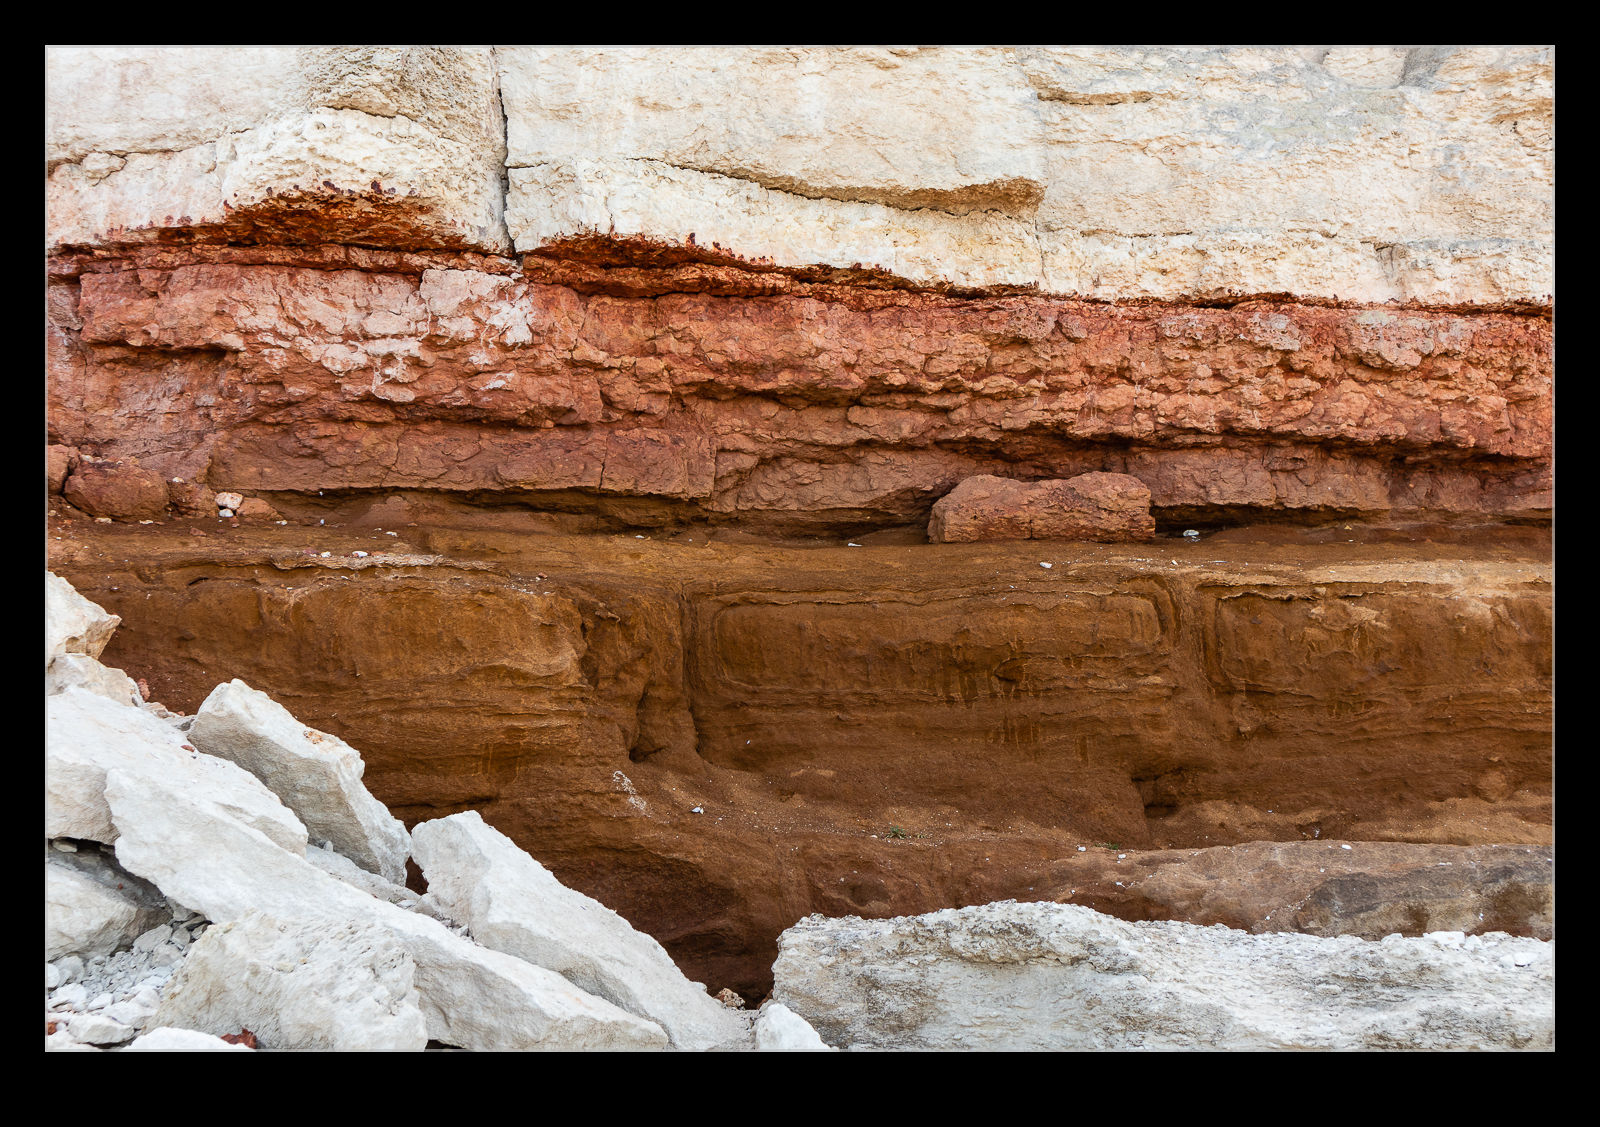
Night Shoot at SFO

wpid8773-AU0E0813.jpgOne idea that Paul had was for us to have a go at shooting some light trails at SFO after it got dark.  This sounded like a good plan.  Unfortunately, we didn’t have any tripods or cable releases with us.  No matter.  Target was around the corner so we popped in there and bought a couple of $15 specials.  Hmm, these were quality items indeed.  Given how much a good tripod costs, can you imagine what a $15 tripod is like?

wpid8769-C59F4390-Edit.jpgHowever, we made the best of it.  Getting perfect alignment was tricky so some post processing cropping to level stuff up would be required.  The camera wobbled a lot on the tripod when touched so I chose to trigger it with the shutter button on a 2 second delay.  This allowed some wobbling to stop and, on a long exposure, any lingering wobble would be lost.

wpid8777-AU0E0811.jpgWe got some stuff but it wasn’t brilliant.  However, a short while later, I had to go to SFO to pick up some family members arriving on an evening flight so I decided to go a little earlier and try again, this time with some more appropriate kit in the form of a decent tripod and a cable release.  This time, I was able to control things a bit better and get a few shots of interest.  There wasn’t a huge amount of traffic so I didn’t get too many trails but I did get a slowly taxiing British Airways 747 which left an interesting smear across the frame.

wpid8771-AU0E0793-Edit.jpgThe alignment with the moving planes is not fantastic from where I was but it was okay.  Coyote Point looks like it might be better but I think it closes at sunset so I’m not sure whether that will be possible or not.  We shall see.

Playing with Blending Layers

I have been making some shots with multiple exposures to overlay.  This is something I have posted about before and the shots here are similar to those from before.  However, this post is less about the shots and more about the post processing I used.  Previously I opened up all of the shots as layers in a single file and then auto-aligned them.  Once done, I then used the Auto Blend functionality to show each shot o the aircraft in place.

This was a lot quicker than my previous approach and was something I picked up from posts on photographing star trails.  However, recently, I have not been as happy with the results as I should have been.  Some of the planes, particularly those near to the edges, had some odd artifacts appearing.  Also, if there were any overlaps, the blending masks could give some weird effects.  Therefore, I have taken a different approach for a while.  This is slower, I admit, but I think it gives a better result.

Once the alignment of the images is done, I hide them all except the bottom layer by Alt clicking on the eye beside the last layer.  Then I add the next layer up back in but mask it out completely.  A white brush on the mask then allows me to paint back in the new aircraft positions.  This is a bit laborious but it does allow you to decide exactly what you want in and what you don’t.  if one file is not helpful to the composition, you can easily ignore it.

If the layers are not all exactly aligned from shooting on a tripod, you will also get gaps at the edges on different layers.  You can also fill these in by brushing in the layers that provide the right coverage and get a complete image.  Once you are happy, flatten the whole thing and you are done.

Changing My Approach to Panoramas

Ever since Adobe got their act together with the Photomerge function in Photoshop, it has been my default for creating panoramas.  Previous versions were a little unreliable but they cracked it a few versions back and I have not changed my approach since.  However, a recent bit of YouTube exploring has changed that again.  Russell Brown had a series of videos on making panoramas from aerial shots and, while I was watching them because they were aerials, the stuff he came up with on stitching panos was actually more useful to me.

Instead of using Photomerge, he uses the same functionality of Photoshop but in individual steps.  The technique involves opening all of the shots as layers in a single file (something you can do straight from Lightroom which maintains the re-import linkage that I like about Photomerge).  Then you select all layers and use Edit>Auto Align Layers.  This gives you the same options as Photomerge.  Apparently, according to Russell, if you have a series of shots where you have rotated position but are looking horizontally, Spherical works best.  If you are looking up or down, use Circular.

The result can be quite distorted if you use Circular but it will all get better soon.  If you aren’t happy, you can undo the step which is a lot easier than starting from scratch which is what you would have to do in Photomerge.  Once the alignment is done, Edit>Auto Blend Layers while take care of the rest of the stitching and blend everything together nicely.  It defaults to a Panorama blending option.

With the blend done, flatten the layers and open Filters>Adaptive Wide Angle.  This will default to a panorama setting and, if you have the distorted output from the Circular settings, now you will suddenly see everything come back to what it should be.  You can tweak this filter to get verticals and horizontals aligned as you wish and then you end up with a good pano output.  Some cropping and filling of blank areas with Content-Aware fill and the job is done.  I shall be taking this approach for all my panos from now on.  If you don’t use this approach already, you might want to give it a try.

Also, you can go to the original source on this and check out Russell’s videos on YouTube.

Experimenting with Multiple Exposures

Right away I must admit that this is not my idea.  I know that is true of many photographic tools but I once saw someone do something just like this and I wanted to try it out myself.  The question was how to go about it.  I improvised a bit and trusted the camera to do what I wanted which it didn’t always do so I have learned some lessons already.

The idea is to take multiple exposures of aircraft on the approach and then combine them into one image in which the aircraft appear multiple times.  I would set myself up in a position and then take a sequence of shots as the aircraft moved through the frame.  My first mistake was that, because I was taking the same shot each time, I thought the exposure would not change.  Not true!  The camera will make some minor tweaks and this will make the whole thing less easy.  White balance may also vary but I shoot in raw so syncing that afterwards is no problem.

Since I was not using a tripod, the shots are not all perfectly aligned.  I took all the images in Lightroom and used the Open as Layers option to Photoshop.  Then I used the auto align layers option to get everything perfectly in place.  It is surprising just how much you move doing something like this!  I originally thought I could just set every layer above the base one to Difference blending mode and everything would pop right out.  However, that didn’t work as I had hoped.  The aircraft all had an odd color cast.

Instead, I put a layer mask on each upper layer and then painted in the aircraft one layer at a time.  This is more time consuming but it did the trick.  Of course, if the exposures are perfectly matched, you don’t have to paint too accurately.  if not, the sky color is different so a far more accurate painting on the layer mask is required.

This was a fun thing to experiment with.  SFO is a great spot since you can get parallel approaches in one direction and parallel departures on the cross runway.  This puts lots of aircraft in a single shot which makes it more interesting.  Another time, I will take the lessons from this time and try and get them a bit better.