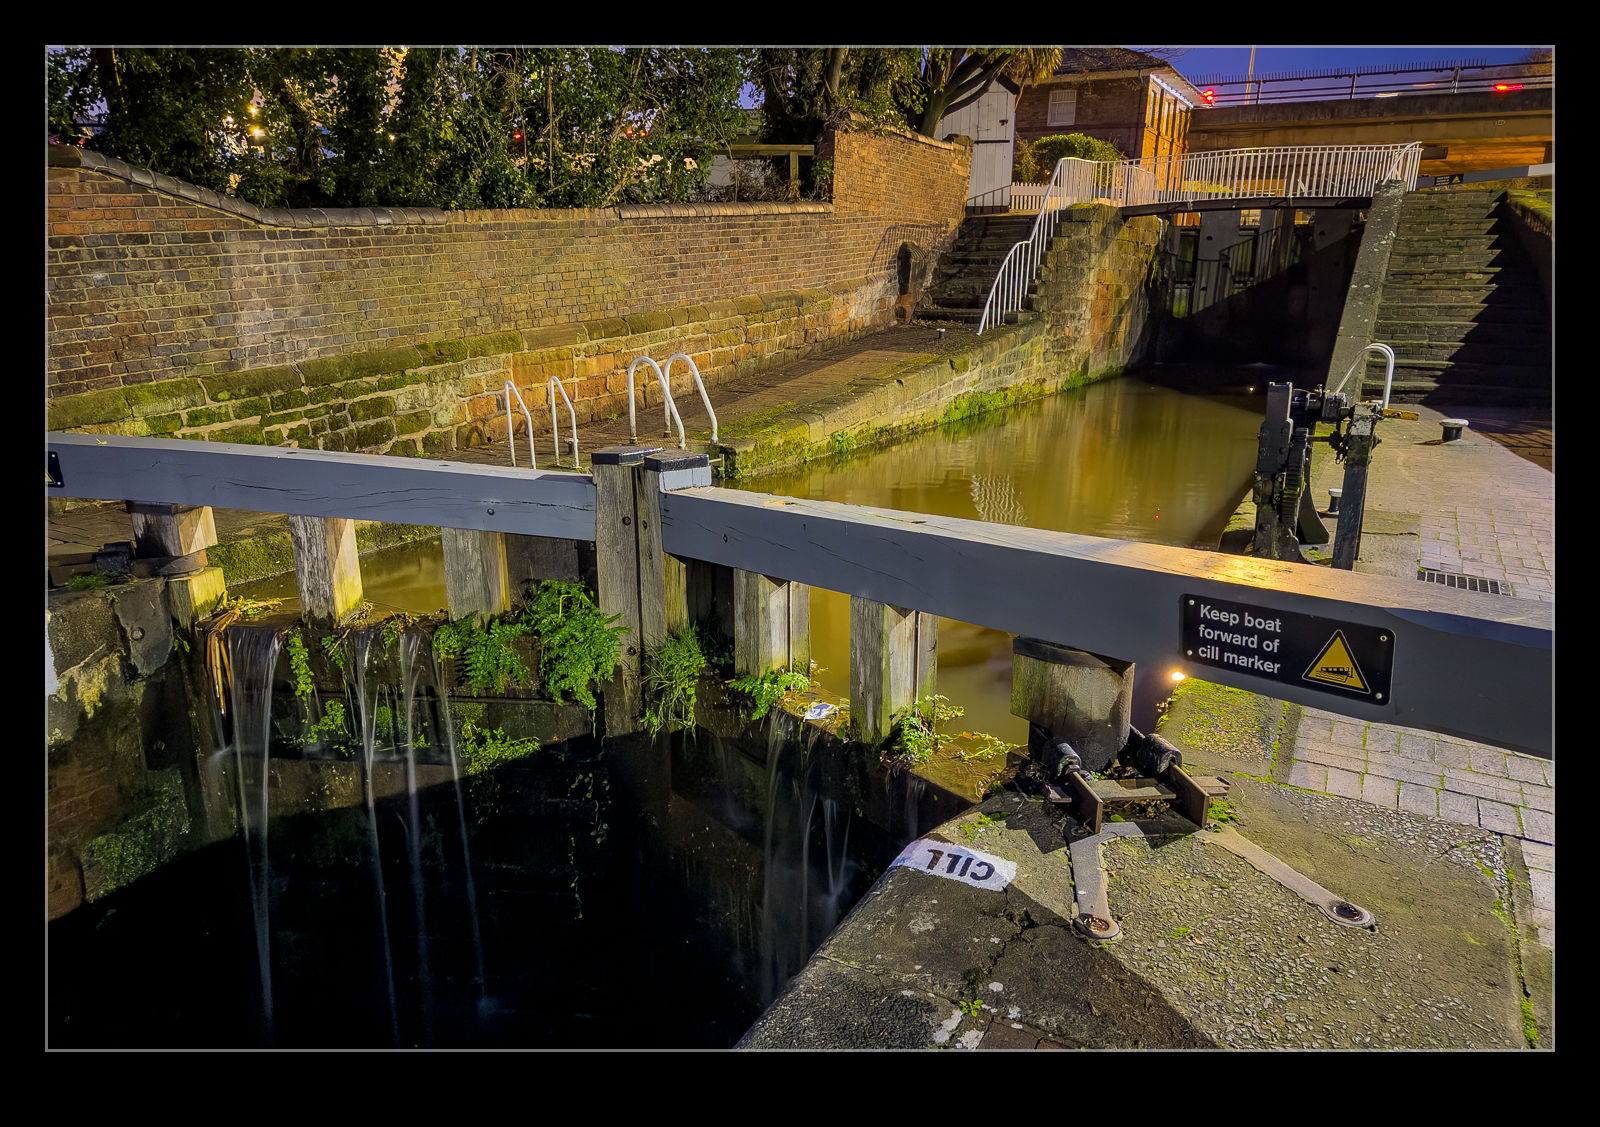
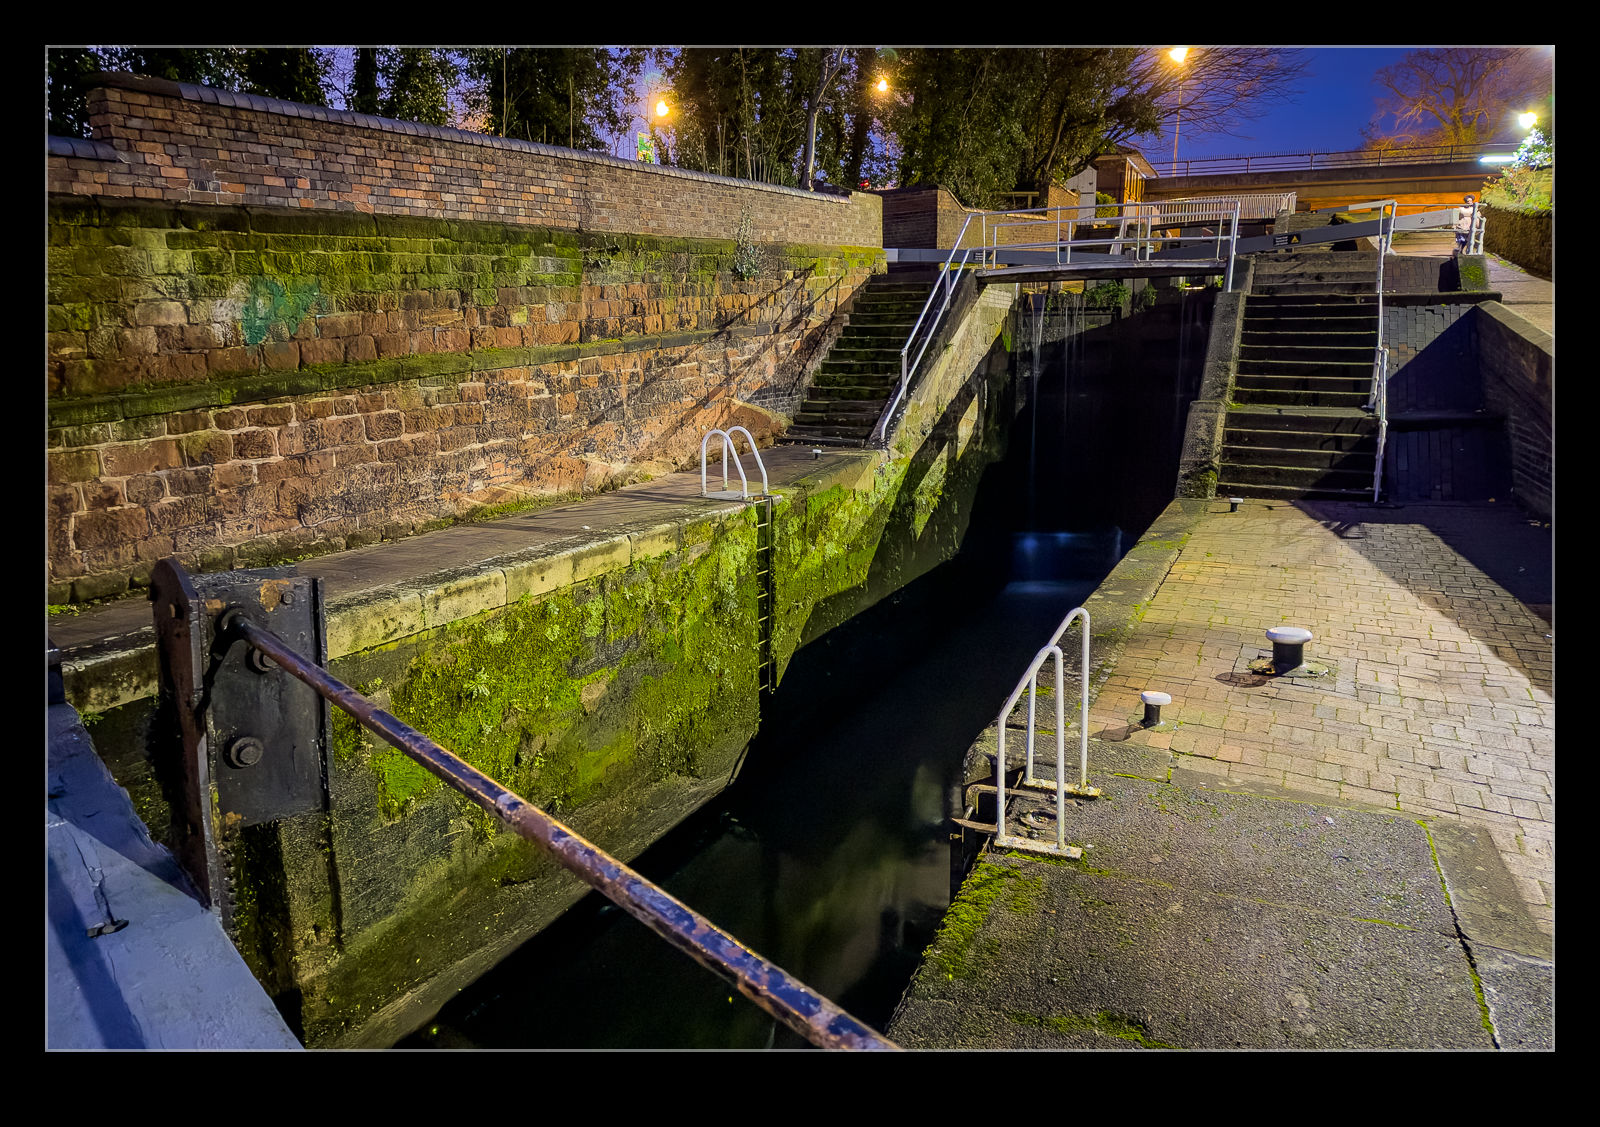
Category Archives: technique

Taking a Chance With the T-38 Landing

The T-38 chase planes that Boeing operates from Boeing Field did not fly as often as I would have liked. I’m sure they got plenty of use out of them, but it seemed to be a lucky break if one was up – particularly if I was in any place to see them. Consequently, I was always wondering whether I should make sure to get a sharp shot or take a chance on getting a more interesting look to the image. On this occasion, I decided to go with the latter. I dropped the shutter speed down to 1/100th of a second and hoped. A few came out okay. The cluttered background at Boeing Field is always a problem so a bit of blur helps put the focus on the plane.

Stormy Sunday Atlas 777F

A stormy sky doesn’t immediately inspire you when going for some aircraft photography but, if the light on the subject can end up being okay, a dark background can suddenly seem like a great option. One Sunday an Atlas 777F was up on test at Paine Field. The sky was dark and gloomy but not a solid cloud background. Instead, the clouds were stratified so there was more detail and texture to see.

As the 777 came down the approach, it was not brightly illuminated but it was picking up a good amount of light compared to what I had expected to be the case. This did require some thought about the camera settings. When the sky is dark, I often significantly over-expose. This is because the clouds will dominate the metering response and the subject – which is usually quite dark – really disappears. In post processing I can then bring the exposure back down but there is sufficient light on the subject to get a good image of it against the sky.

In this case, I had to be more careful. With good light on the subject, the dark sky would result in blowing out the plane. Therefore, I had to keep the exposure compensation off to allow the subject to not get too overexposed and not leave enough latitude for processing it to where I wanted it to be. The results came out okay. This was more important for the longer shots. Once the plane was close in, it started to dominate the metering response and, once on the ground, the illumination was more balanced.

Once they touched down and brought in the reversers, you could see that the conditions had not long ago been wet as the runway still had plenty of water on the surface and the reversers kicked it up in the air.

More Super High Frame Rates for the Red’s Syncro Pair

A bit of a theme for me recently has been playing with the super fast frame rates on my camera. Last year I tried this out with the Blue Angels and posted on here about that. It worked well but they were rather distant. At RIAT, I decided to try again but with the Red Arrows this time. The syncro pair will make many crosses during the course of the show so I had a few opportunities.

First, let’s talk about what didn’t go so well. When you select this mode, it will fire off a bunch of shots – I set it to the maximum at 50 – and, when it has taken them, the camera will be effectively locked up until they finish writing. It doesn’t take long, and it shouldn’t matter because not much is happening for a while. However, if you are a dope and forget you have selected it and then take a shot of a plane coming around the turn towards you, you will get a lot of shots you didn’t intend and you may still be writing them when the cross actually happens. I am speculating, of course. No way I would make such a mistake.

The other issue I had was one of choosing focal length. On some crosses I zoomed out quite wide and the jets ended up being further away than expected and quite small in the frame although it gave me multiple framing options. This had been an over correction after having been too tight on a previous cross. Basic stuff but, at least with a bunch of crosses, I had more chances to sort things out.

Then we come to the crux of it. Did I get stuff I liked? Absolutely. I was always tracking the plane coming from the right so my left eye could see enough of the opposite jet, so I did run the risk of having the background jet in focus, but it all worked out fine. The biggest issue is that you end up with a ton of shots to work through. Then again, that is my story of RIAT as a whole! I have included so of the stills here but also an animated GIF of a sequence so you can see how close the frames are to each other. Please forgive the crappy colour space of the GIF.

After Sunset at SEA as Well

The light at sunset can make for some of the most pleasing shots and I did used to take the time to go to Burien when SEA was on a northerly flow to get some of the heavies departing in the best light. Once the sun goes down, it is tempting to head home but I would hang around a bit longer. The blue hour could make for some pleasing shots too and even when it was getting pretty dark, the amazing low light performance of a modern camera meant you could get something different. Combine that with the super noise reduction capabilities of current processing software and you can achieve shots that would have been impossible a few years ago.

Experimenting With Sport and Silly Frame Rates

I recently wrote about spending a bit of time at a local cricket club watching a couple of games for a while. I haven’t really photographed cricket much so didn’t have strong ideas about what to try and get with regard to angles and action. I was just playing around, really, to see how things came out. I ramped up the frame rate for some of the shots that the batsmen were making. I was interested to see how I might miss the critical moments and how far the ball had moved between frames.

Now, clearly getting the shot is something that technique and skill should deliver. Compensating with the tech is not ideal but I wasn’t trying to prove anything to anyone. Instead, I was just out having fun. Consequently, I decided to use a feature on the R3 that I only occasionally drag out and that is the super fast frame rate of 194fps. This will not use autofocus or auto exposure once the sequence starts, but that isn’t a problem in the 0.2 seconds that it takes to shoot the 50 raw frames that are the limit.

It is amazing that, even with such a high frame rate, the ball still can move quite a distance between shots. You do end up with a ton of frames that are going straight in the bin. Since the ball either hasn’t arrived in frame or it has gone. That is a pretty easy process of culling of course. You also never know whether a given delivery is going to result in anything. You can get 50 frames as the batsman lets the ball through. Those are even easier to cull! Did I get anything I really liked? No, to be honest, I wasn’t too excited by any of them. However, it has got me thinking about what would make for a better shot. I shall have to work on that and head back to see if I can improve things.

Getting the Shutter Speed Wrong Makes Editing Quicker

I have made this mistake before and, no doubt, I shall make this mistake again. Setting up the camera for one shot and then not changing the settings before shooting something else. I had the 200-800 lens on the camera, and I dropped the shutter speed down to 1/100th of a second for some take off shots. This is where I left it while shooting the flying display of a couple of aircraft. A long focal length and moving target with a slow shutter speed means that there are a ton of shots that are totally unusable. That really does help in the process of deleting shots. Most of them are toast. A few did survive and that was quite a relief!

Weird Prop Vortex Effects on the Background

The aerodynamicist in me gets a little happy when I see shots that have the visible effects of the flow fields around a plane. Shock waves will be the most obvious example, but a trailing vortex can also cause some interesting refraction. The propeller produces a strong vortex from each blade and every once in a while, you can get a shot where the background provides enough of a pattern to allow the prop vortices to show up. I was reviewing some shots from Boeing Field of a Malibu Mirage with the PropJet turboprop conversion when I saw exactly this. Head on it can show quite well but getting it from more of a side on position was a nice surprise. Thankfully, the hangar doors in the background have vertical corrugations and this allows the flow to be seen in both directions due to the upward and downward moving blades.

Messing Up the F-35B Departure

Since I switched to my R3 bodies, I have been playing a lot more with low shutter speeds to emphasise speed in images. This has been a topic in multiple posts on the blog in recent years. However, it doesn’t always work out well. I know that the keeper rate will fall when shooting fast moving objects at low shutter speeds, but you hope/expect that you’ll get something worthwhile from the ones you take.

However, that doesn’t always happen. During Seafair last year, the US Marine Corps F-35B departed Boeing Field for its display. I decided to go low with the shutter speed from my location up on the tower with the aim of having the airfield background blurring out and leaving me with the plane as the dominant element in the shot with little distraction. However, when I came to go through the sequence of shots that I took, I had some sharp ones as it approached me and as it flew away but nothing that really pleased me as it was closest and alongside me.

Some of them weren’t terrible but it was a huge disappointment as I clicked through the images and came to the realisation that I had blown it. You can’t always get lucky, and I knew what I was doing so I can’t be totally surprised that it didn’t work out, but it was still a bit galling. Does this mean I won’t do it again? No. Getting the record shot is fine, but I am more bothered about having a shot I really like these days. Might as well give it a go!

Reflection Removing – Choose Settings Wisely

A previous post had looked at what was, at that time, a development feature in Photoshop that removed reflections from images. Adobe puts development items in Photoshop first to get user experience with them before rolling them out to the software suite. Since Camera Raw and Lightroom’s develop module are basically the same, once it becomes a production item, it also makes it into Lightroom. Such is the case with the reflection removal tool.

I have used it a few times on shots, and it does work pretty well. It isn’t perfect but can be effective. I tried it out on a Typhoon that was refuelling from a Voyager. Shooting through the windows of the Voyager can be a bit tricky and the reflection removal tool can really help. I gave it a go, and the reflection was swiftly taken out. However, when I checked the rest of the image, I saw that a lot of detail in the shot was gone. It was at this point that I realised that the tool has three settings. I was on Preview. I switched to Best and, while the processing took a lot longer, lo and behold the detail was restored.

I have the overall photo above with the before and after versions for a comparison. Beneath I have two crops of the larger image with the Preview and Best settings. I won’t say which is which, but I think it should be pretty obvious. The tool defaults to Preview when you use it so, if you give it a try, don’t be put off if the initial results are disappointing. Make sure to experiment with the settings.

What a Difference the Angle Makes

I shared some shots from a brief visit I made to Feltham to get some airliner departures from Heathrow when they were on an easterly flow. Some of the planes turn to the south shortly after takeoff giving you a view that is not quite a topside but is close to it. When photographing them, you are naturally shooting them at an angle as they are climbing quite steeply. However, if you want to play around with the shot afterwards, you can change the impression of the shot quite a lot. Rotate the fuselage until it appears horizontal in the shot and now it looks a lot more like you are flying alongside the aircraft. This is cheaper than sorting out and air to air sortie! Here are a couple of before and after shots to show what I mean.