Tag Archives: processing

How Low Can You Go?

The high ISO capabilities of modern cameras are a constant source of discussion whenever a new camera comes out.  It was quite funny to see everyone get so excited about the multi-million ISO range on the Nikon D5 when it was announced, only to see that the high ranges were nothing more than moose with a bit of an image overlaid on them.  Not a big surprise but still funny to see how much everyone was going nuts about it before the reality set in.

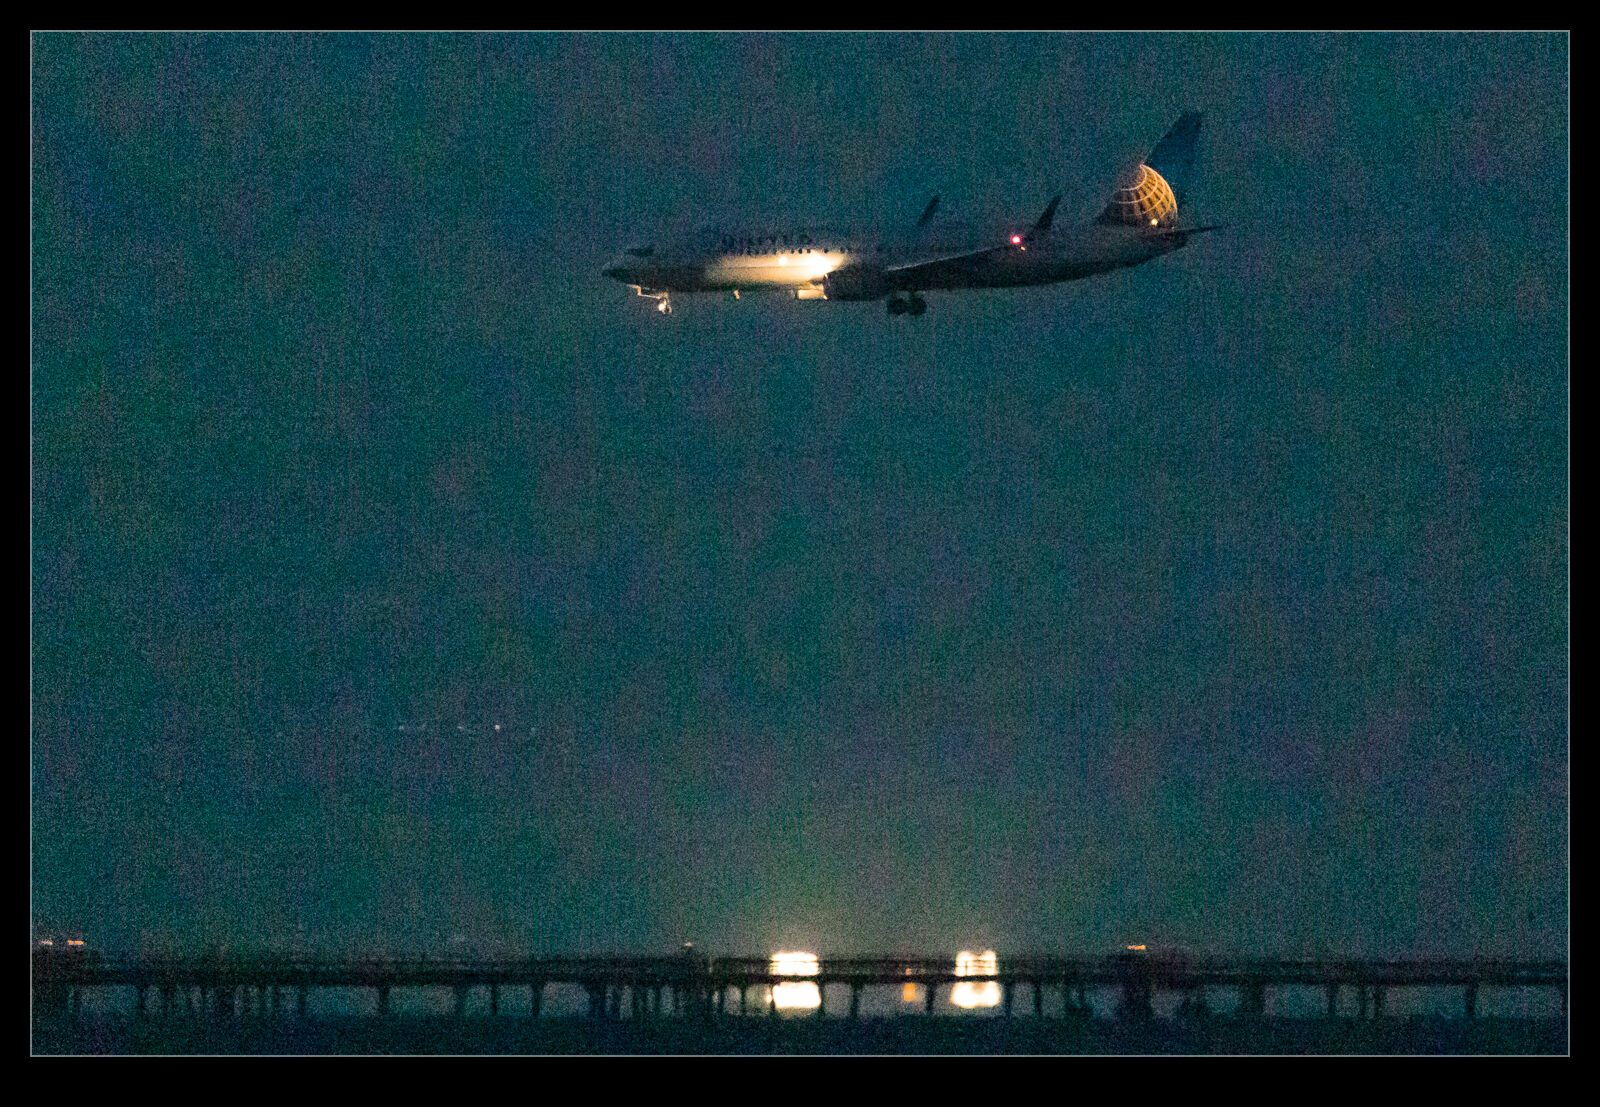
Consequently, I was interested to see what the new bodies I bought were really capable of.  I have already posted a little about some of the shots I took as the light faded at SFO.  I was shooting with a tripod and a gimbal mount to make things easier but I was also working within the ISO range of the camera.  I went with auto ISO and exposure compensation while shooting in aperture priory and wide open to get what I could.  However, I really wanted to see what was possible so I changed to manual mode, exposure compensation and auto ISO to see what could be done.  Auto ISO is not going to use the extended ranges of ISO.

AE7I2701.jpgAE7I2701jpeg.jpgI don’t know about the Nikon cameras but the Canon cameras tend to have three extended range ISO settings at the high end.  There is the highest ISO setting that it recognizes and then there are H1, H2 and H3.  They don’t name them with the actual ISO settings but you know what they are based on what you see on the camera.  The manufacturer does not label them as normal ISO settings because they do not stand behind them as a capability.  There is a good reason for that.  They are just like the highest Nikon settings.  Useful if you have no option but not very good otherwise.

The same was true with my older bodies.  They had a very high ISO range that was not great but it would do in a pinch.  At the Albuquerque Balloon Fiesta I shot an Aero Commander in the pitch black that flew over and I saw stuff in the shot I couldn’t see with the naked eye.  This is with a camera that is ancient by modern standards.  I expected a bit more with the latest generation.  Certainly, there is more to be achieved with what we have now. However, post processing becomes a part of the story.

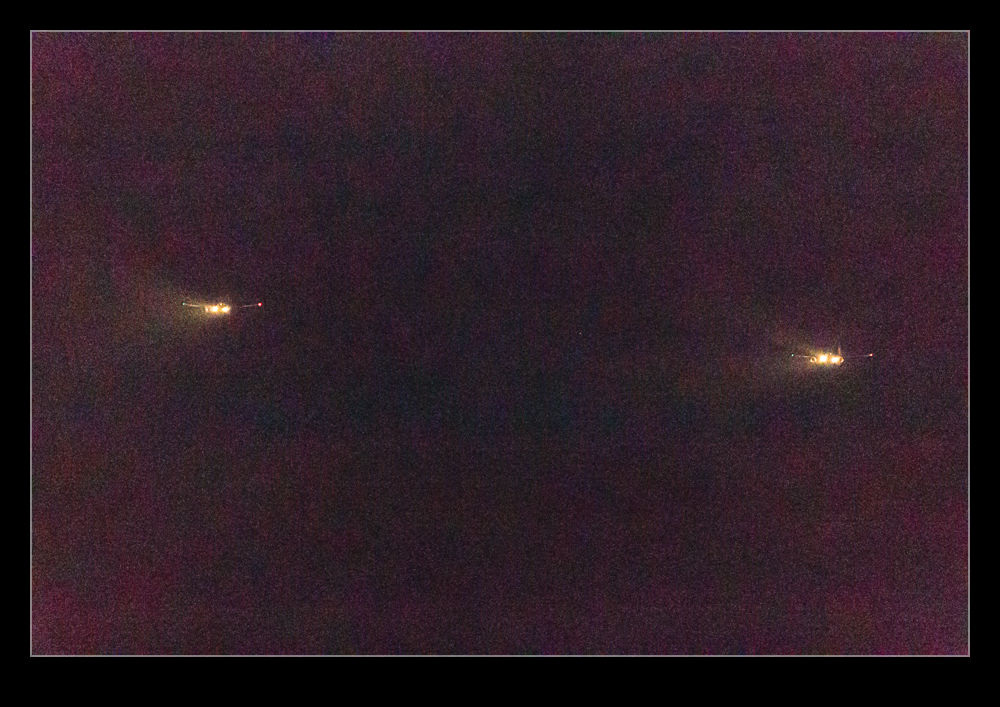
My first experience with these shots was in Lightroom.  The shots did not look good at all.  However, there was a clue in all of this.  The first view in Lightroom is based on the JPEG that is baked into the raw file.  It looked okay until it was rendering by Adobe at which point it looked a lot worse.  This piqued my interest.  Sure enough, at the extended ISO ranges, the shots looked pretty awful.  Lots of purple backgrounds.  These were not going to be any good.  However, the initial preview had looked good., is this a case of Lightroom not being able to render the shots well?  I figured I should try going to the source.

AE7I2747.jpgAE7I2747jpeg.jpg
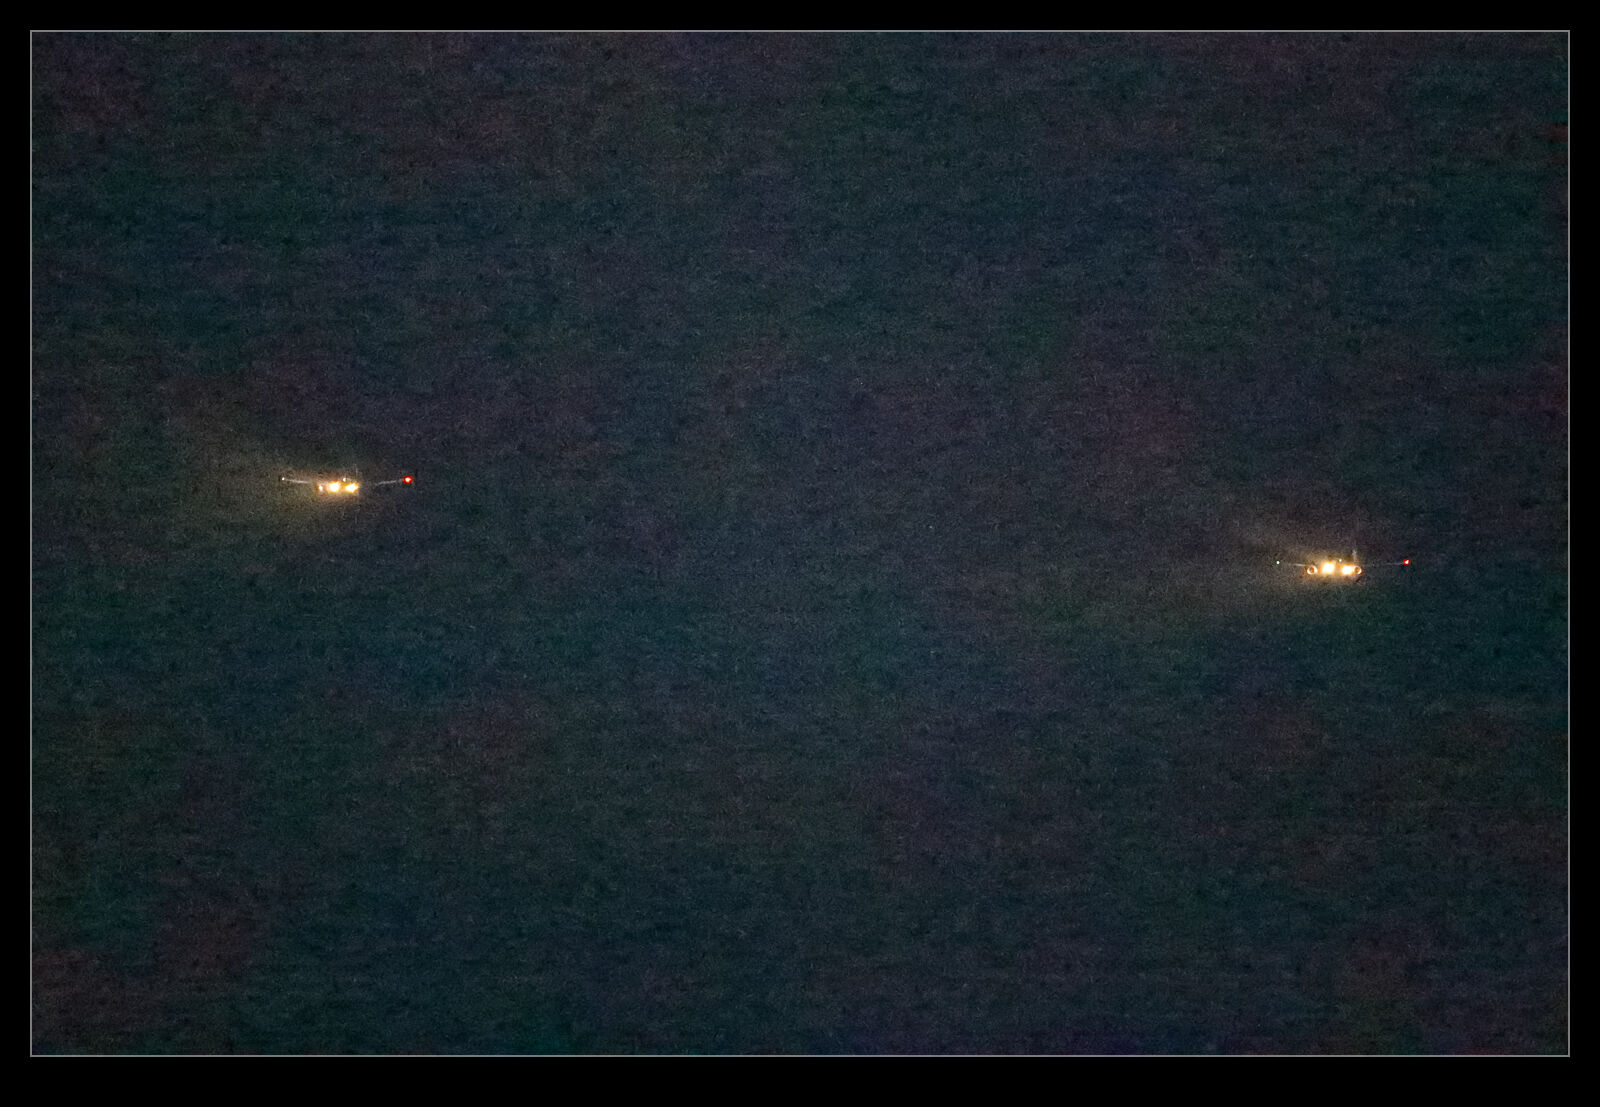
At various ISAP symposiums, the Canon guys have talked about how their software is the one that you should use since only Canon know how to decode their shots properly.  They have the recipe for the secret sauce.  Since Digital Photo Professional (DPP), Canon’s own software for decoding raw files, is so terrible to use, I never bother with it.  The raw processing in Lightroom (and ACR since they are the same) is so much easier to use normally and works really well. DPP is just awful in comparison.  However, we are now dealing with the extremes of capabilities of the camera.  The embedded previews seemed better so maybe it is possible that DPP will be able to do a better job.

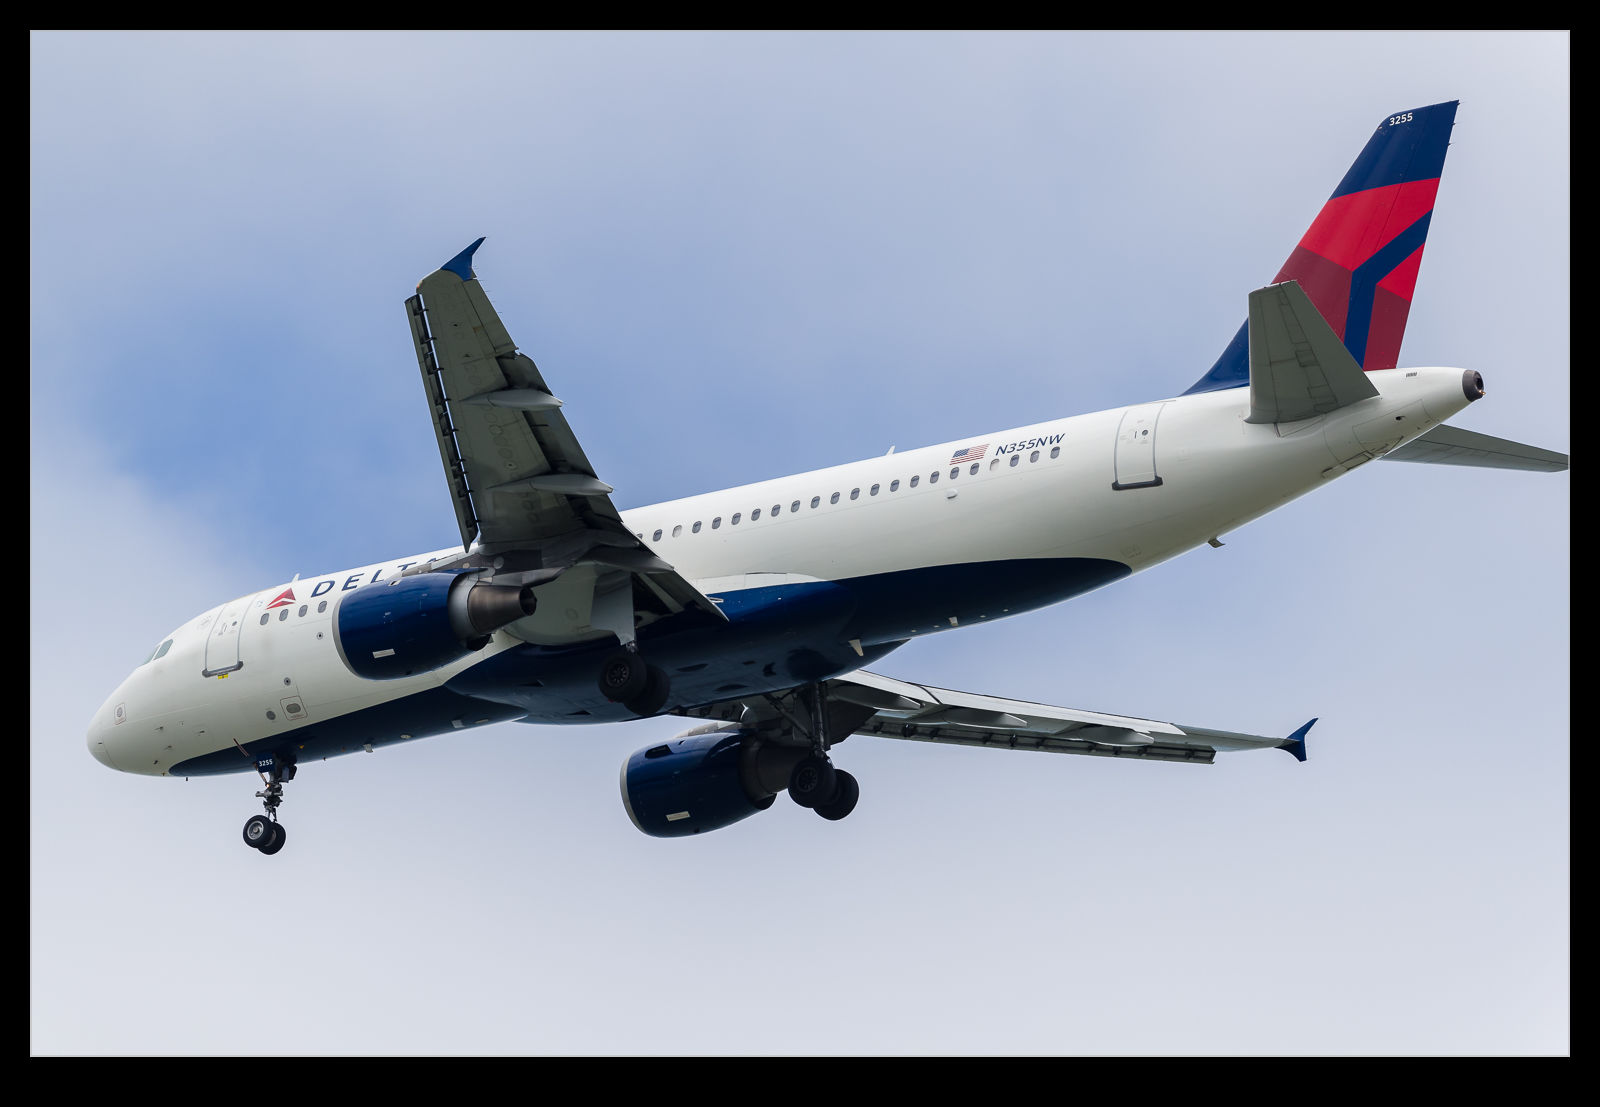
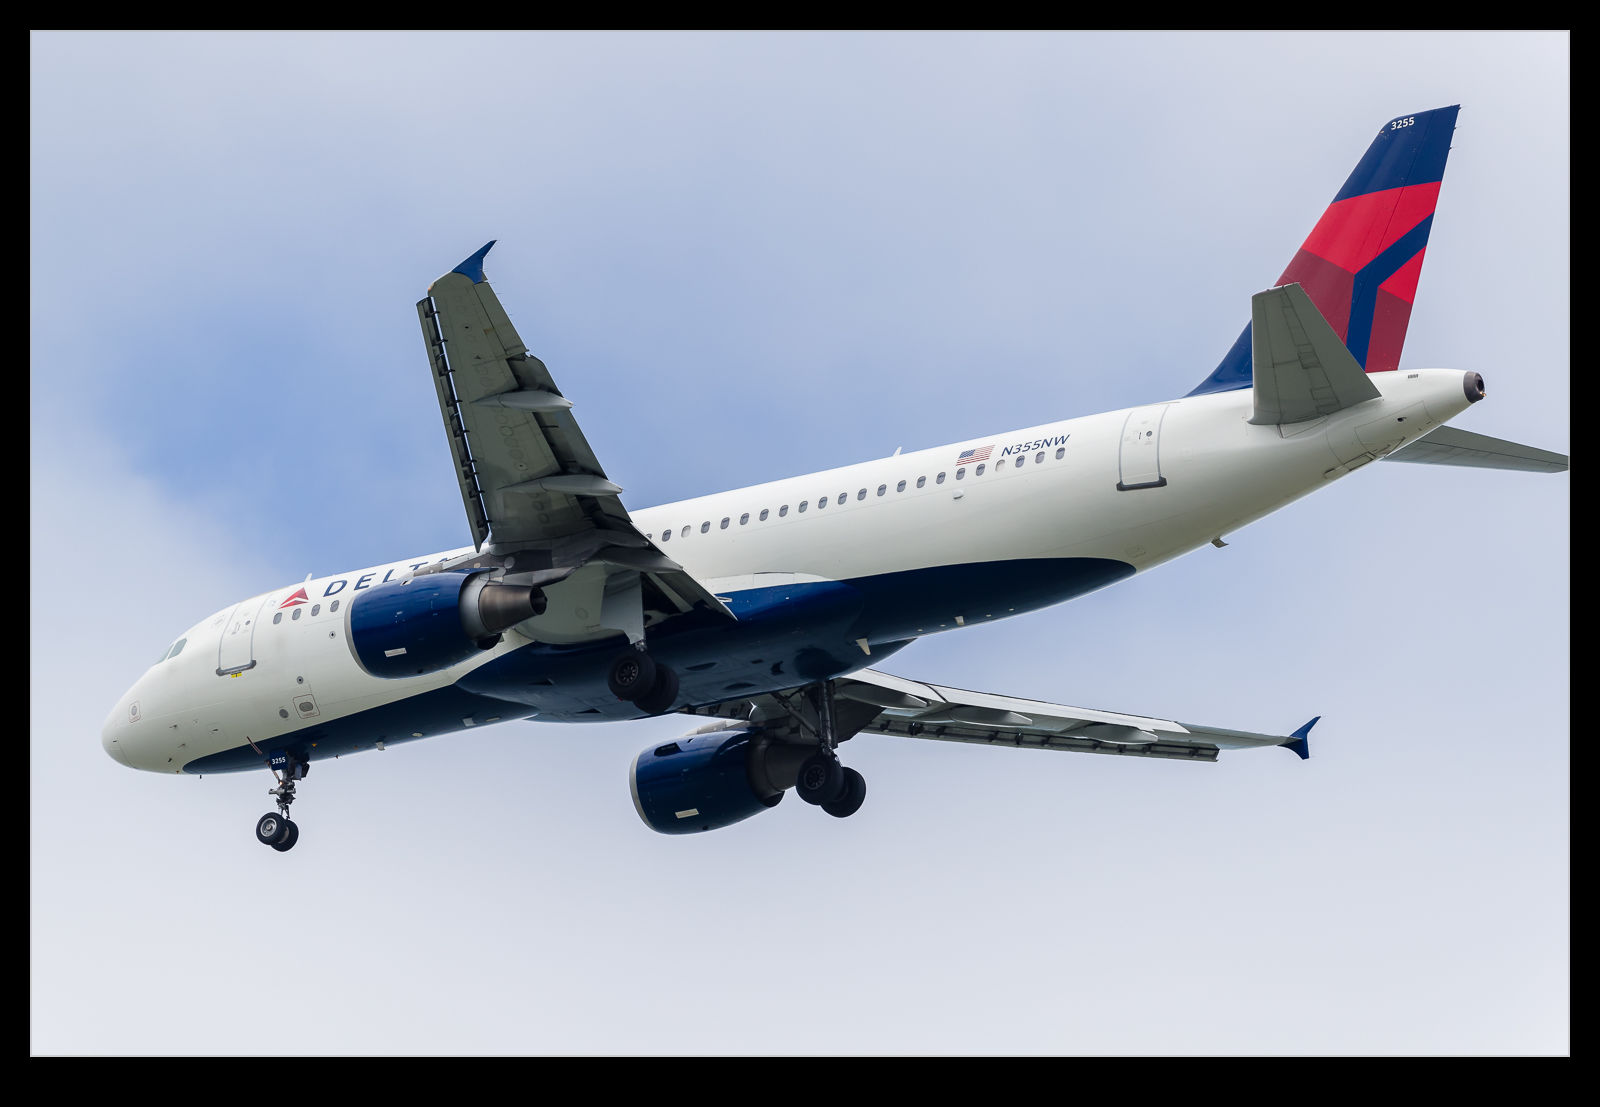
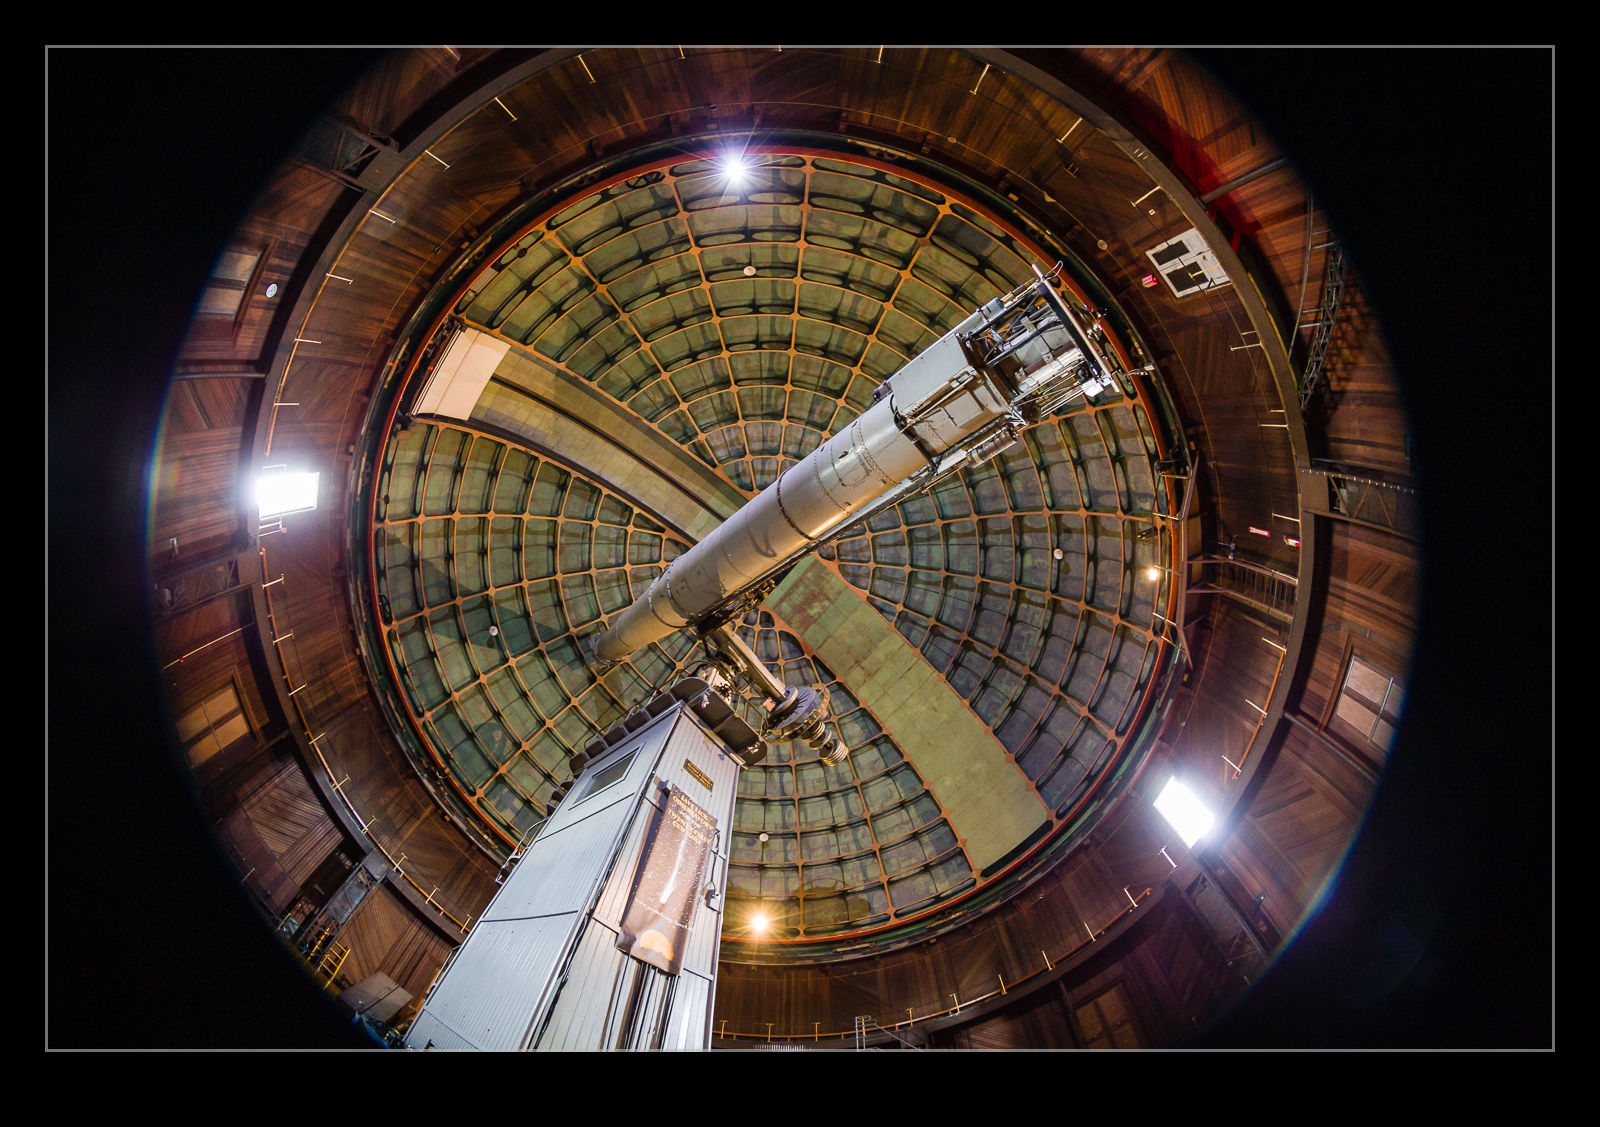
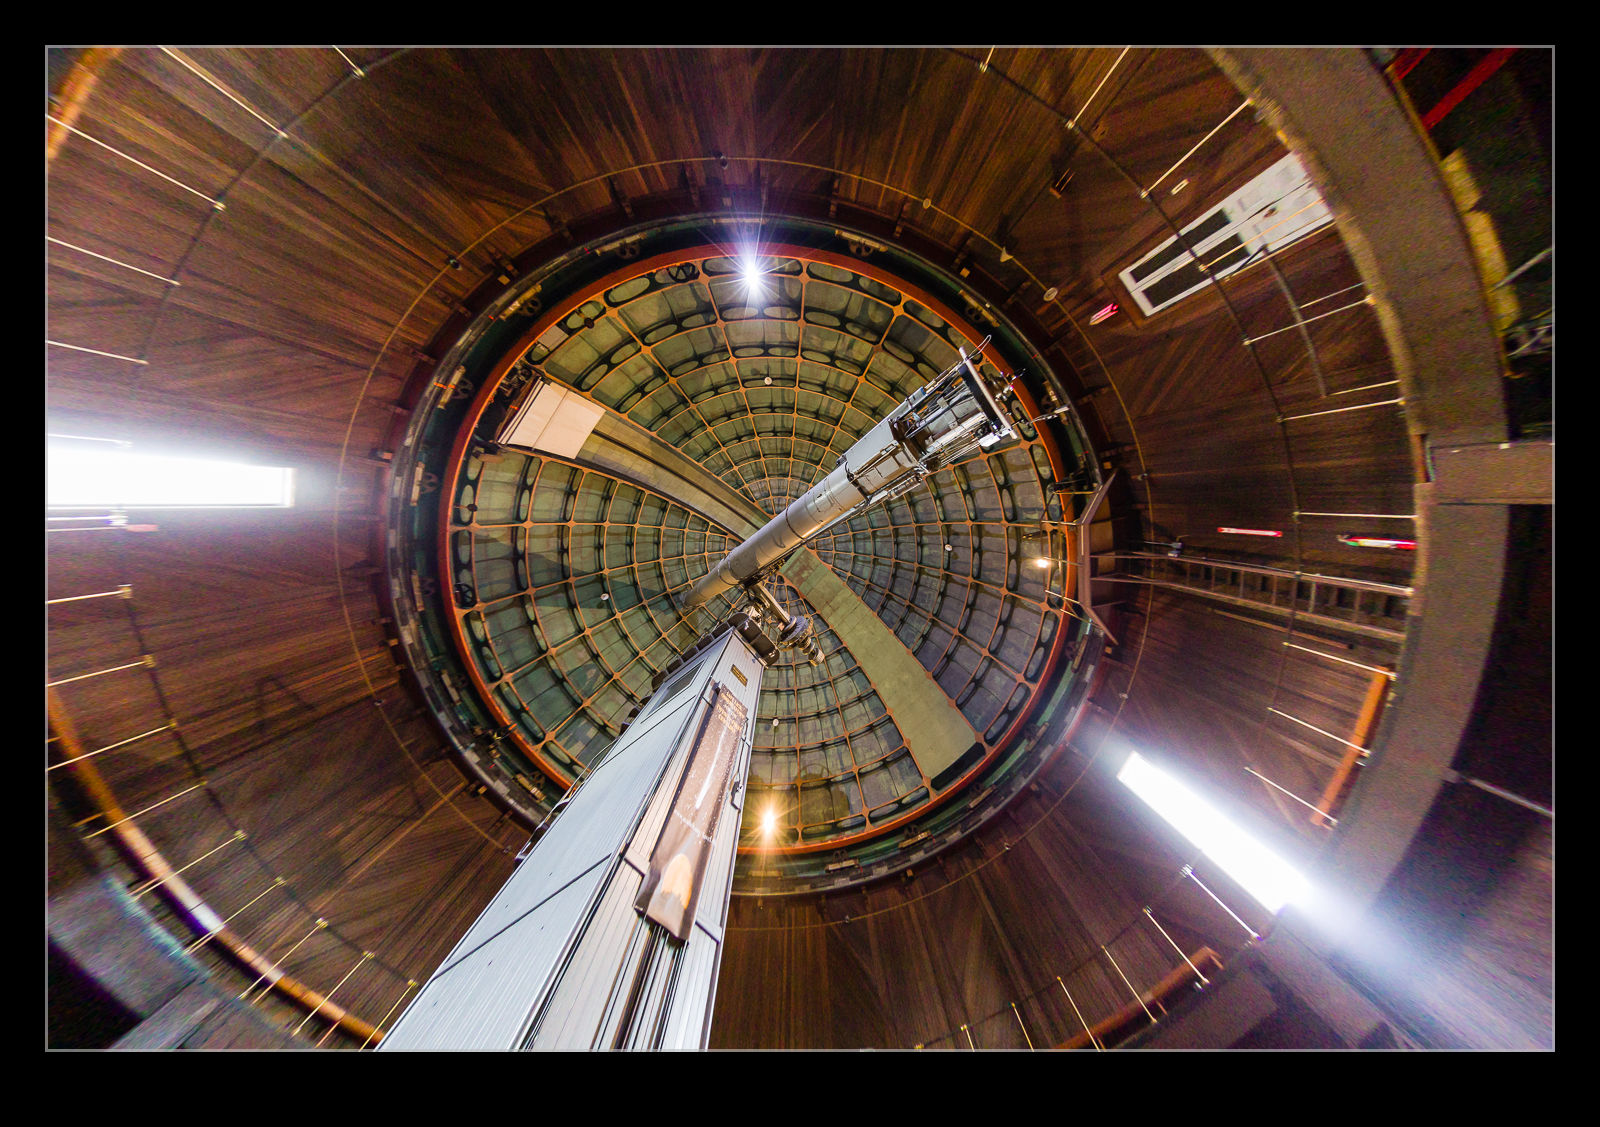
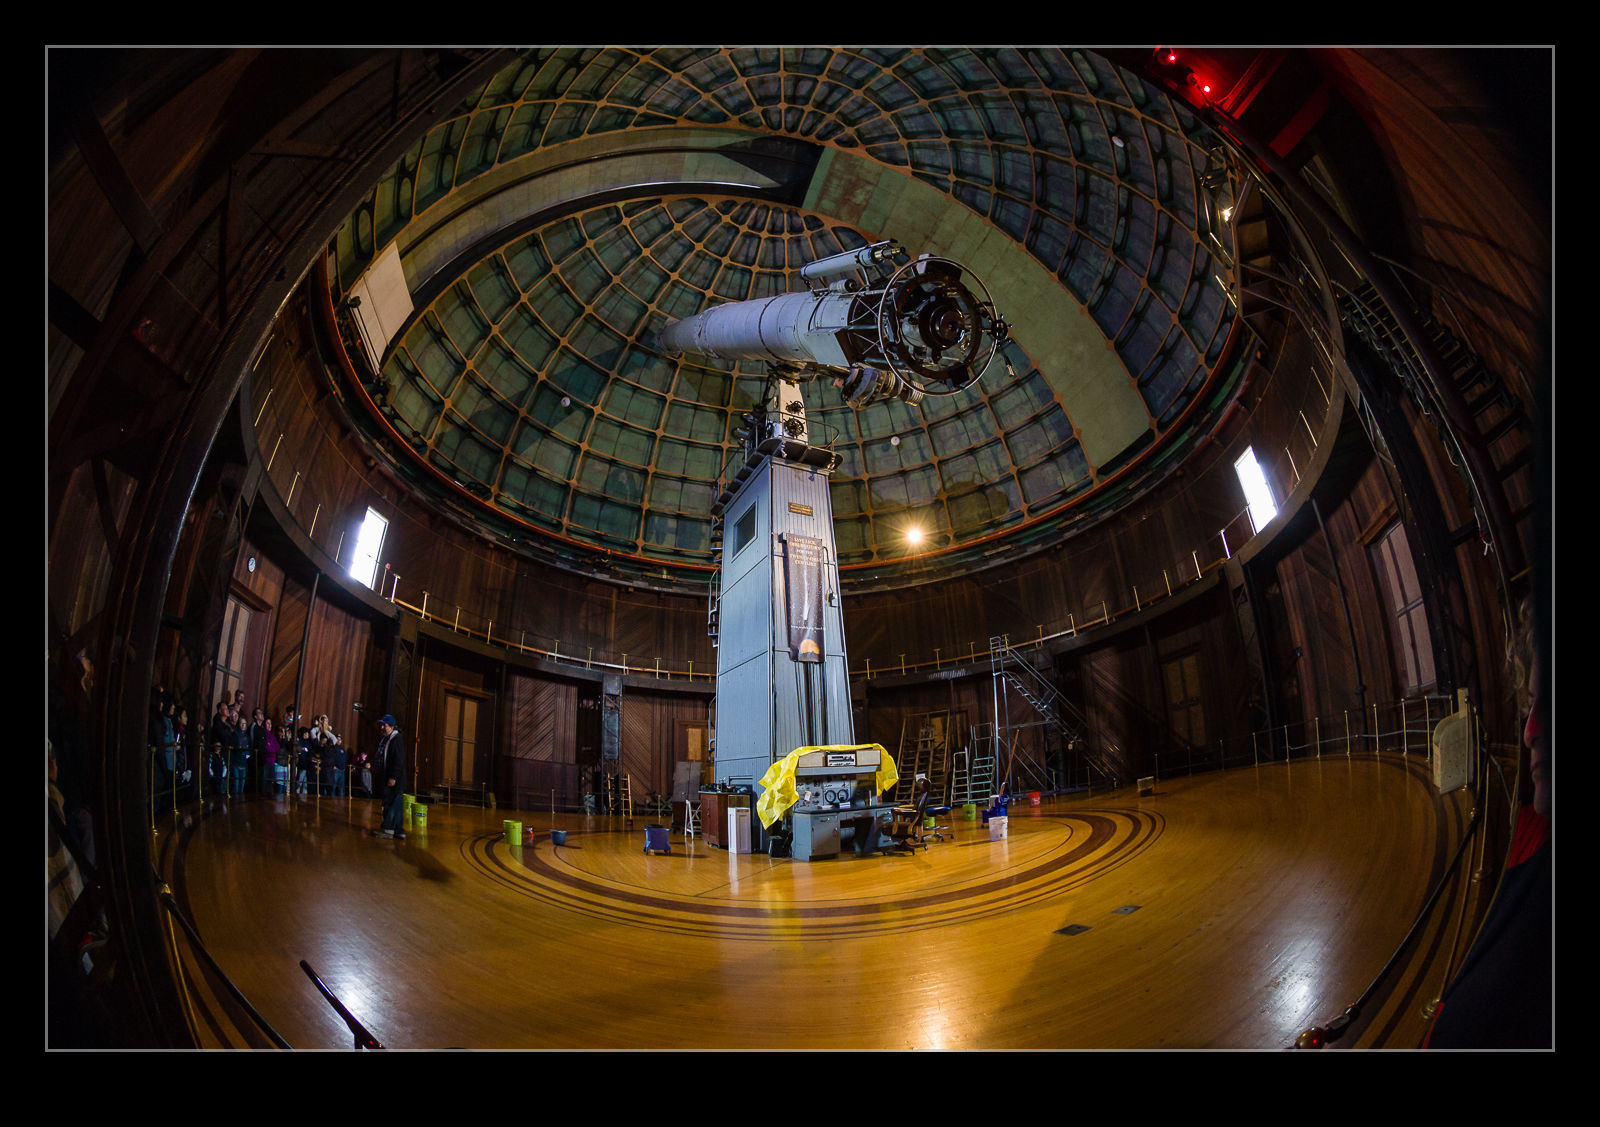
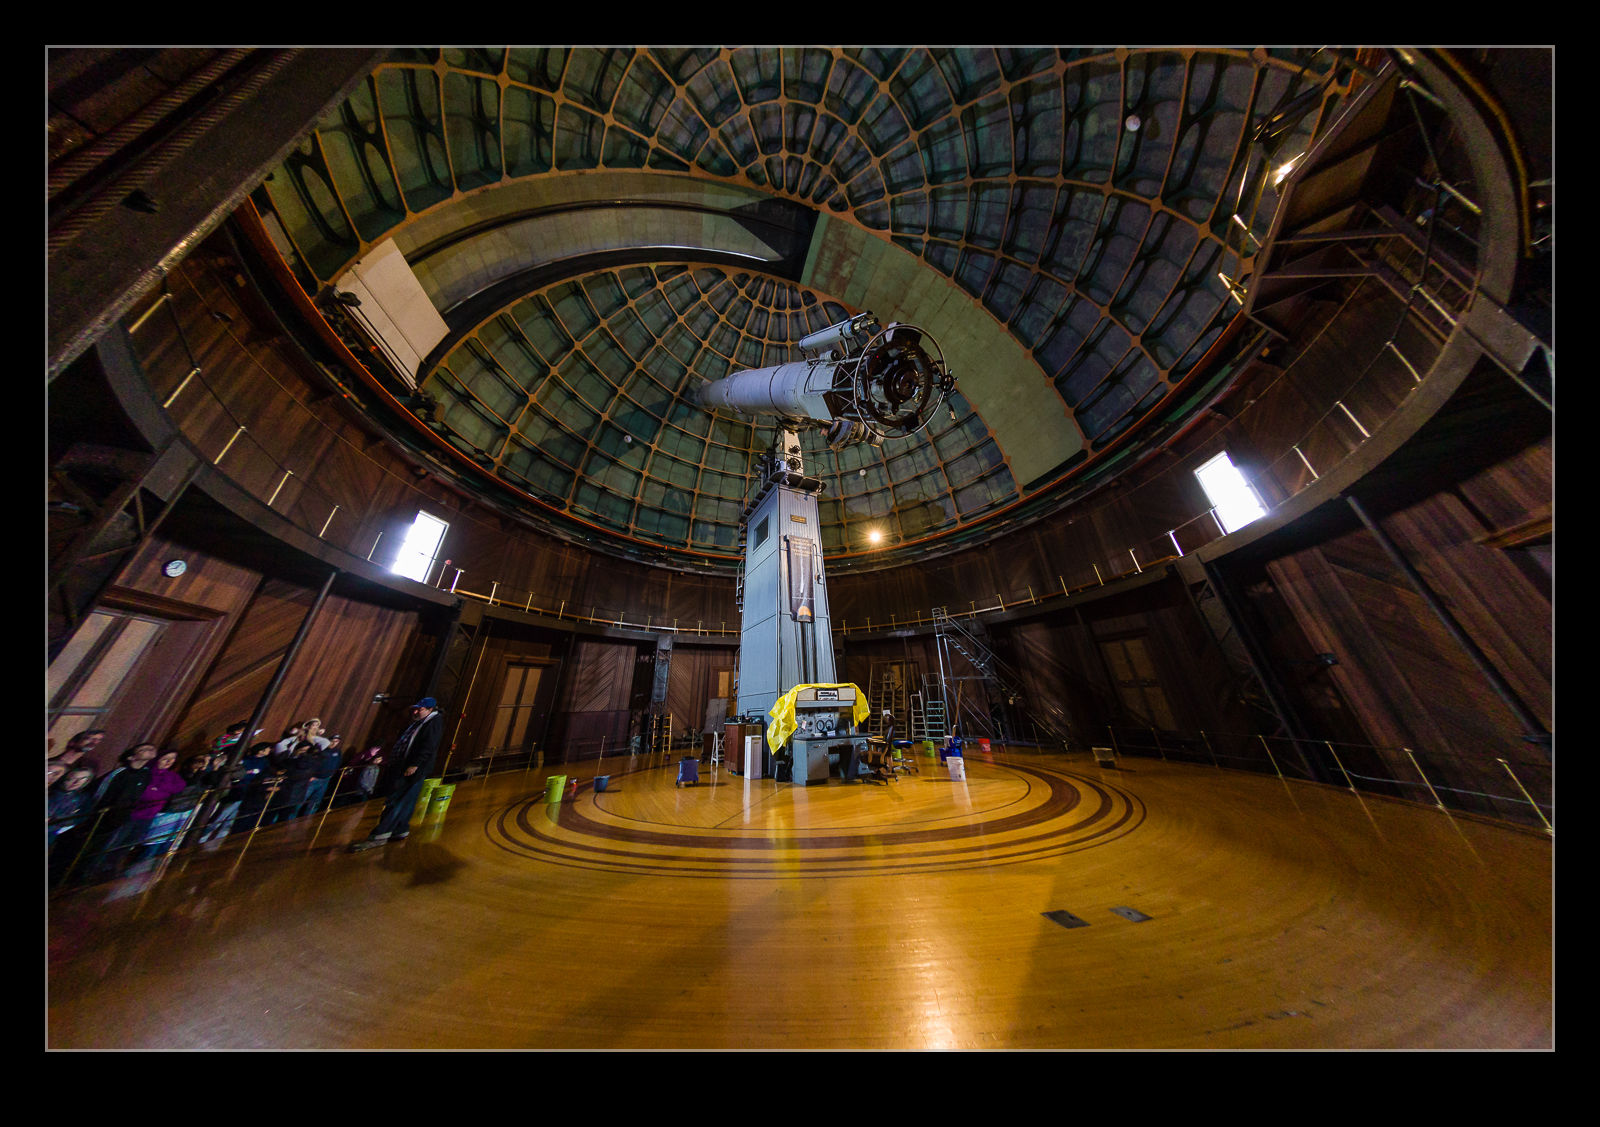
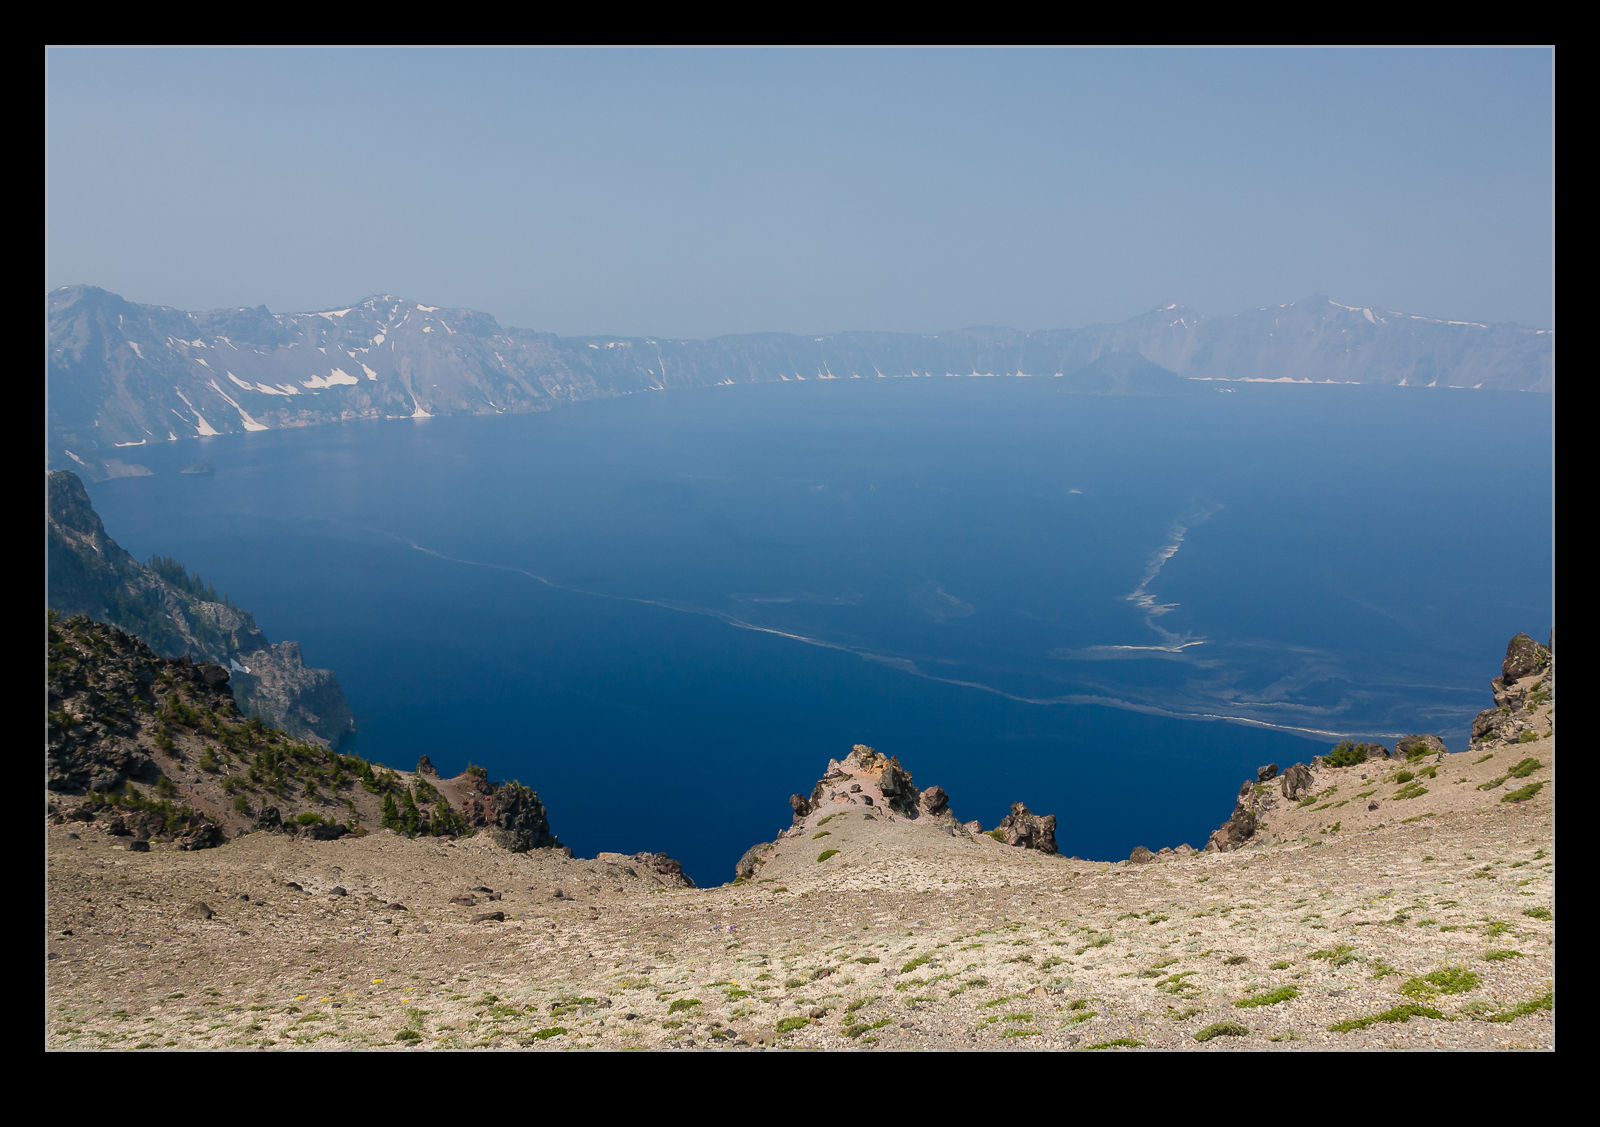
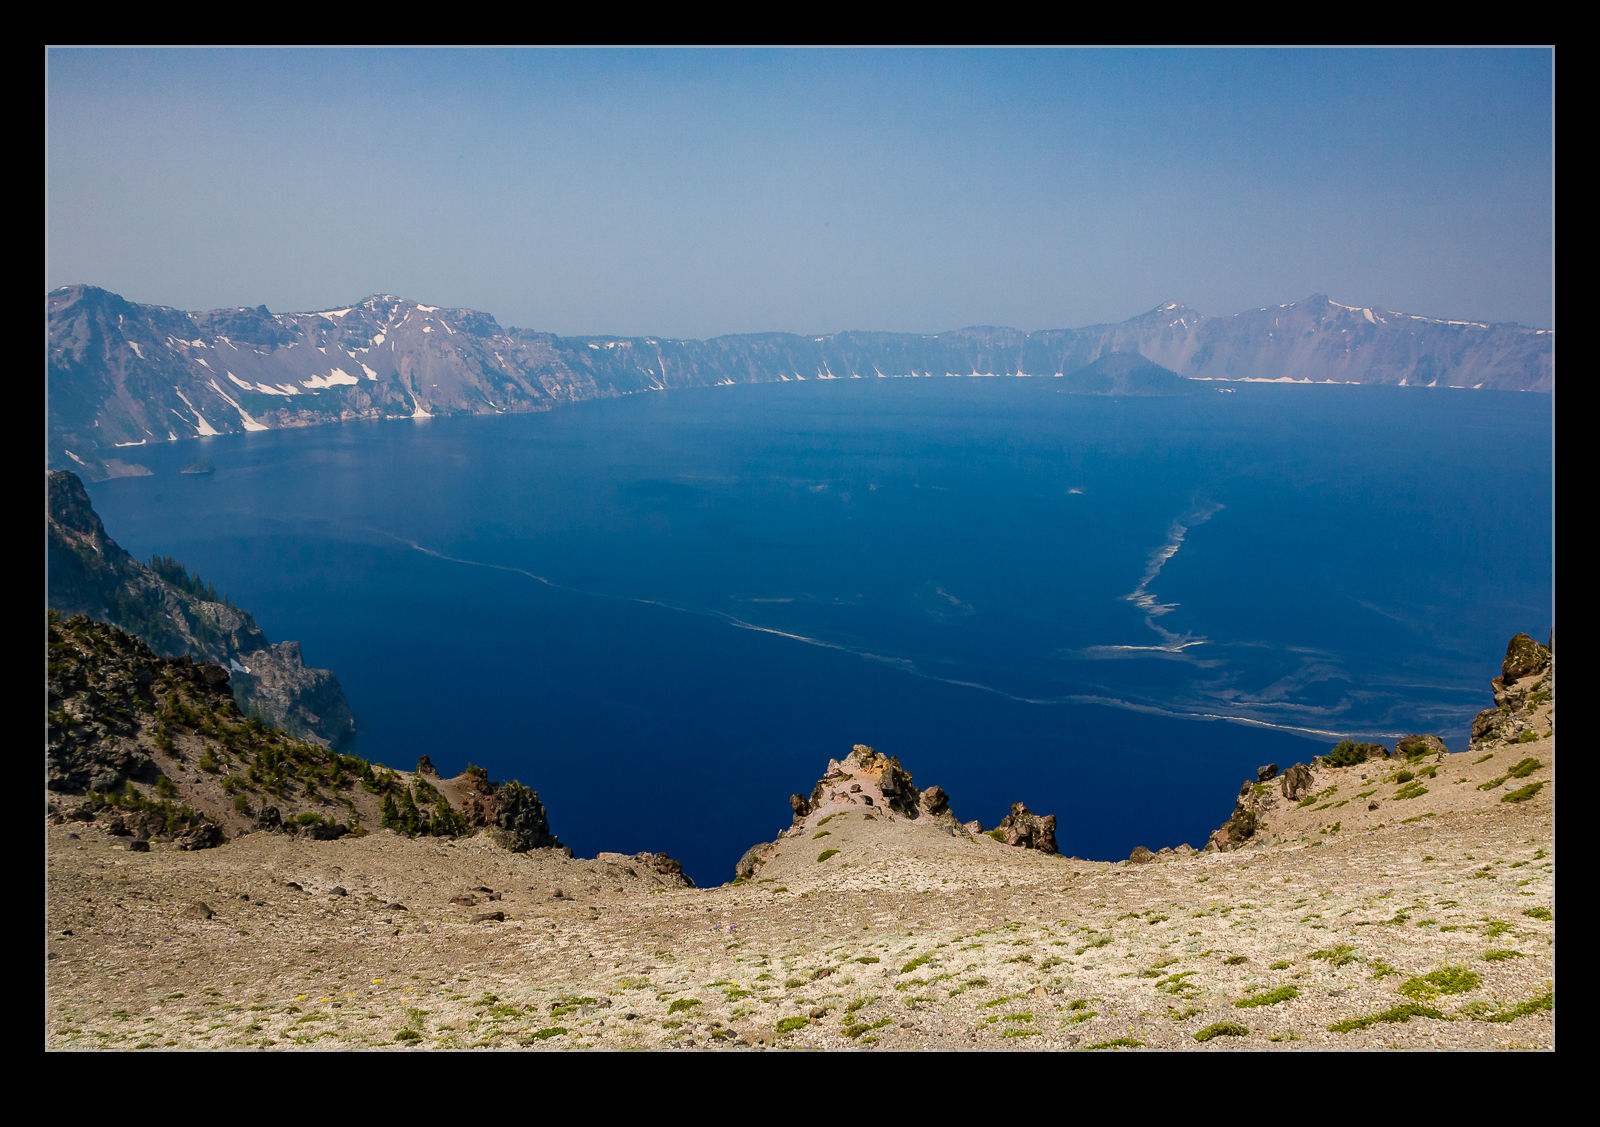
You can now be the judge.  Here are some pairs of shots.  They are the same shot in each case.  The first is processed in Adobe Lightroom and the second is processed in DPP.  I think it is clear that DPP is better able to work with the raw files when it comes to extreme ISO settings.  The shots certainly have a more normal look to them.  The Lightroom shots look really messed up by comparison.  It doesn’t mean I will be using the extended ISO ranges on a regular basis.  Jumping to DPP for processing is not helpful on a regular basis.  However, if the need arises, I know that I can push the camera a lot further and use DPP to get something that is okay if not great.  This could be handy at some point.

Camera Profiling

AE7I0561-2.jpg AE7I0561.jpgFor all of my previous cameras I have created profiles.  When I got the new cameras I decided not to bother and to go with the profiles that are built in to Camera Raw/Lightroom.  This was working okay for a while but there were some shots where I felt like the adjustments were having slightly odd effects.  It was almost like the files had less adjustability than my old Mark IV files.  This didn’t seem likely.  I figured I would have a go at creating profiles and see whether that made any difference.

AE7I0336.jpg AE7I0336-2.jpgThe profiles are relatively easy to create.  I have a color card that has twelve different color squares.  You take a shot of it in RAW mode.  Then comes the slightly annoying step.  You have to cover it to a DNG file.  Not sure why, since this is all Adobe software, they can’t combine the steps but never mind.  Then you open the profiling software.  Pull up the DNG file, align the four color dots with the corner color squares and let it do its thing.  Choose a name and the profile is saved on your computer where the Adobe software can see it.

AE7I0439-2.jpg AE7I0439.jpgIt does make a difference.  The thing I found most interesting was that the profiles for the two cameras were quite different.  It shows up most in the blues for my bodies which, given I shoot aircraft a lot, is no small deal.  The shots here are versions of the same images with the default profiles and the new profiles for comparison.  Everything else is the same so the difference is purely profile related.

AE7I0619-2.jpg AE7I0619.jpg

Speeding Up Lightroom

YouTube is a fantastic way to lose track of time.  It may well have an abundance of crap but it also has lots of informative material.  More importantly, watch one thing and you get recommendations of other things, many of which are actually quite useful.  I was watching a video by Tony Northrup on building a computer for photo processing and he was talking about putting the Lightroom catalog on an SSD.  This got me thinking about something.

When I built my system, I installed an SSD to be the drive on which the OS is installed along with the applications.  I have traditional hard drives for the data storage.  One of these was set up with the Lightroom catalogs keeping them separate from the image files to make the response time better.  At the time of the build, a 250Gb SSD was affordable but not cheap so that was what I went with.  With everything installed, that doesn’t have enough space for the catalogs.

I never thought more about it until after this video.  I started thinking about some old SSDs I have and looked at whether the catalogs would fit on either of them.  It turns out that, with all of the preview files, the SSDs were not big enough.  However, I did then have a look at the price of a drive that would be large enough such as another 250Gb drive.  That would have plenty to spare to account for future needs.

While looking at these, I was also able to see 500Gb drives and they are only about $150.  I was unaware just how much the price had fallen.  Consequently, a spare drive bay now holds my Lightroom catalogs.  I only have a relatively small amount of experience with the new configuration but it is safe to say that things are positively zipping along compared to where they were before.  I was wondering whether the system might be in need up upgrade or replacement but this one change seems to have made things significantly better.  I will report further if I discover more but, if you have a similar configuration, this might be the upgrade that makes things noticeably better.

Fisheye Correction in Lightroom

I have a pretty well defined routine for importing and processing my images in Adobe Lightroom. I have presets for importing images that put them in the right folders, apply copyright information and apply development presets. I can then edit from there as I go. One of the settings I have set as a default is the application of the lens correction settings. This setting deals with any natural vignette in the lens as well as some distortion. Occasionally this can be tricky if you have something close to the edge of a wide lens and it gets slightly chopped by the correction.

AU0E3419-2.jpg AU0E3419.jpgI discovered a more extreme version of this while processing some shots from the Lick Observatory. I had taken my 8-15mm fisheye zoom with me as I thought there might be some use for it in the telescope buildings. It turned out to be a good thing to have. When I first had the lens, Adobe had not created a profile for the lens so the shots came in uncorrected with the fisheye look I expected. More recently, Adobe have created a profile for this lens. It was added in one of the updates and, since I don’t use the lens all of the time, I hadn’t noticed.

AU0E3382-2.jpg AU0E3382.jpgWhen I was going through the shots, I noticed the wide shots had some strange distortion at the edges. I was perplexed by this and also wondered where the circular fisheye shots were because I was sure I had taken some. Only then did I realize that these were those shots and the corrections were being applied. Here are some examples of the before and after with the correction to give you a idea of what the transformation is. A pretty dramatic change. I might make use of this sometimes but I shall also have to remember switching this off when shots with this lens are involved.

Blog Image Upload Using WP/LR Sync

Providing a review on something you haven’t had a lot of use of doesn’t seem like a good plan. This is something I have been using for a while and, now I have had a bit of time with it, I thought I would share what it is like. Uploading images to the blog is obviously a big part of the preparation of posts since, at the end of the day, this is primarily a photographic blog. When I first started out, I would create the images I wanted and then upload them manually. That was time consuming but was soon superseded by an alternative.

I started using the LR/Blog plugin to Lightroom. This would create a version of the file including any formatting, borders and conversion to the right color space and would then upload it to the blog. This worked okay for a long time but it had one significant limitation. If I tried to upload too many shots at once, it would fail and then lock me out of the blog for a while. I started searching for an alternative when my efforts to solve this problem went nowhere fast.

If you Google this topic, almost everything brings you to LR/Blog. However, recently I came across WP/LR Sync. It is a Lightroom plug in that makes use of the Publish services in Lightroom. Rather than uploading the images one time, you add the files to a collection that is then published to your blog. If you change the image, you can have the online version amended in sync with the original. If you go to http://apps.meow.fr/wplr-sync/ you can read more about it.

I decided to give this a go. However, in the guidance, Jordy provides a piece of information for people like me who have problems uploading lots of images. Apparently, my hosting service treats too many upload attempts in a short time as an attack and you get locked out. This was what was happening before. WP/LR Sync has a field that allows a small time delay between images which, if set just long enough, will prevent you getting treated as an attack. Something like this would also cure my LR/Blog issues I guess but that ship has sailed.

I am very happy with the new plug in. It works well and allows the same edits of the image before uploading as before. A benefit is that, if you drag images to the sync collection and they were already in there, you don’t end up with duplication on the blog. The one you previously uploaded is there. You just might have to scroll down a bit to try and find it. If you want to have a go with this add on to Lightroom, visit http://apps.meow.fr/wplr-sync/ and check it out.

Haze Filter

The Creative Cloud version of Lightroom drops new features in to the software when the updates are installed. This is a nice thing to have happen but, unless you are paying attention, you might not be aware of some of the new features. It took me a while after the last update to learn that a new filter had been added that was designed to take haze out of images. This is a great idea. I have experimented with trying to remove the effect of haze in shots before but, because the effect varies by distance, it can be quite tricky to get something that doesn’t look totally wrong.

QB5Y5727.jpg QB5Y5727-2.jpgI have not played with the filter a lot but I did decide to try it out on a shot I took at Crater Lake a few years back. Wildfires had resulted in smoke in the air which meant the usual clear view across the lake was obscured. I thought I would see how the filter worked out. Above are the before and after shots. It is an improvement but obviously isn’t going to rescue a totally messed up shot. I did try a more aggressive setting but that looked wrong itself so this was the one I went with. We shall see if this has other uses for me over time.

Clever Feature of Lightroom CC

This one is something that I can attribute to the Kelby media juggernaut. I did not discover this myself but, if you are a user of Lightroom CC and use either the HDR or the panorama functions, this could be of interest. One of my issues with them was that they took a while to bring up a preview. Once you had got this, the processing would work in the background.

It turns out, if you don’t need to tweak the settings and are happy with what you used previously, you can hold Shift and Ctrl and press either M for panorama or H for HDR and it will launch right into processing the whole thing in the background. You can set multiple versions off if you wish and they will all get to work out of sight while you do something else. While my feelings on the outcome of the processing are not universally great and I covered this in some previous posts, it does a reasonable job most of the time and this is an even better feature that is well concealed!

Experiences with Lightroom CC

I have discussed some of the new functions of Lightroom CC here and here. Aside from those changes, how have things been with the program overall? To be honest, I am a bit underwhelmed by the new version. There have been a few minor functionality upgrades but nothing huge. I do like the ability to add images to a collection when importing them since that has saved a step for me. However, the presets do not seem happy remembering which collection it is so that is rather buggy. Many of the bugs in the previous version also exist so, if they have really recoded a lot, they have still reused a lot of the code.

The new version also seems to have a fair few bugs of its own. The crop tool seems to have developed some new quirks that result in it deciding you have finished selecting the area a short while after you actually do so, if you have moved the cursor away, you get some very odd effects. I still can’t get it to stop trying to create a backup copy of my files when I import new images. Nothing new was added for video which I think is daft. They give you the capability to import video and even trim and edit clips. However, with Photoshop having the ability to be a basic video editor (and now my default), there is no way to connect videos in Lightroom with Photoshop in the same way as you do for stills. That baffles me.

The big benefit is in processing speed. My workflow involves rendering 100% views to speed me through the culling process. The new version certainly renders them a lot faster. I did have to upgrade my graphics cards though. My vintage cards did not have the necessary version of OpenGL to let Lightroom take advantage of them. It also has lens profiles for two of my lenses that were not in the previous version which is nice to have.

Overall, I am okay but a bit underwhelmed. Since I pay for the subscription, I am paying for it but it does have the feel of being free so I am less concerned even if I can understand the truth. What I am hoping for is a bit more frequency in fixes to deal with the bugs and maybe bring some extra capabilities.

HDR Within Lightroom

The changes in Lightroom CC that included the Photomerge also included a change to the processing of HDR images. Again, the functionality has been brought within Lightroom rather than requiring the move out to Photoshop and the output file is again a DNG file. This means a smaller file than the 32 bit TIF that I was previously getting. A while back I wrote about some of the odd experiences I was having with moving these high bit depth files between Photoshop and Lightroom so a new workflow is of interest.

According to some of the publicity at the time of roll out, the new processing approach does not require as many images to work with. I have been shooting five images for HDR to date. They say that only a couple are necessary. I have tried carrying out the processing with five and with two and there doesn’t appear to be an obvious difference in the output. There is a benefit in the time taken to process the images though so this does appear to be a good improvement.

You can either let the output be automatically toned using the normal Lightroom processing functions or do it yourself. I let it have a go at first but have not liked the choices it made so have reverted to carrying out the toning myself. It is not a time consuming process so seems worthwhile to me. While I felt that Photomerge was not as capable as using Photoshop, in to case I think it is a better solution and this will be part of my workflow. Now to reset the camera to shoot fewer bracketed images!

Lightroom’s New Panorama Feature

Lightroom CC comes with a number of new features. High on the list is the new panorama feature. Previously, if you wanted to stitch a panorama, you would select the shots in Lightroom, make sure you had them synced up for any exposure edits and white balance corrections and then send them to Photoshop. Photoshop had a Photomerge function that you could use or you could open them as layers in a document and carry the merge out yourself with a bit more control. This was the approach I used and I wrote about the technique here a while back.

The new Photomerge in Lightroom CC is designed to do without Photoshop. It takes your original files and then makes a new DNG file which is the stitched panorama but, as a RAW format, it still allows you to edit the image using the normal editing tools. I had to give this a go so, how well does it work?

The answer is a mixed one. In many cases, it works just fine. It stitches together the shot nicely and you can go on your way. While the initial preview process takes up a little time, the processing of the final stitch is done in the background so you can get on with something else – something I find very handy. However, it does have some shortcomings.

First, it doesn’t always find the way to stitch the shots. I have had a couple of times when it couldn’t work out the alignment. When I tried the same shots in Photoshop, they worked just fine. Not sure why these didn’t work but the algorithms must have some limitations. Next, it doesn’t always deal well with curvy edges. I have had a couple of stitches that I tried where the aircraft fuselage, although a smooth curve, ended up with some kinks at the area where the stitch took place. Photoshop never caused me trouble with these either. Big panos also seem to make it unhappy with some very odd alignments being chosen (after a long time processing) so they may have to stay in Photoshop for now.

The last problem is cropping. You have the option to have the whole stitch or to have it crop in automatically (or you could crop manually afterwards). Cropping pulls you in to the shot more aggressively to get rid of any blank pixels. You can fix this by shooting a lot wider to have more to work with. However, having been used to being able to fill odd little gaps using Content-Aware Fill in Photoshop, not being able to do so in Lightroom is a limitation. I can, of course, open the file in Photoshop and do just that. However, if I do so, I might as well use Photoshop to do the merge in the first place.

Overall, it is pretty good. I suspect there will be some tweaks behind the scenes as CC gets updated progressively so I might not even know that Adobe have fixed some of the issues. The Fill issue will be more obvious though. I shall probably keep using it unless I feel the Photoshop is merited and it is a good addition but I hope they take it further so I don’t have to consider Photoshop in the future. We shall see because the new update of Photoshop is out and includes Content Aware Fill of the gaps in panos which might be enough to sway me back.