Tag Archives: Focus

Which Do You Prefer and Do You Care?

As mentioned in other posts, I have been playing around with lower shutter speeds when photographing planes at Boeing Field.  Getting a blurry background to emphasize the speed of the plane is the goal and it also removes some of the annoying distractions that a cluttered airfield can provide.  I use filters to reduce the light in order to get the shutter speed down without having ridiculous apertures.  Naturally, I end up with a bunch of blurred photos which get deleted but the selection process for the keepers is what this post is about.

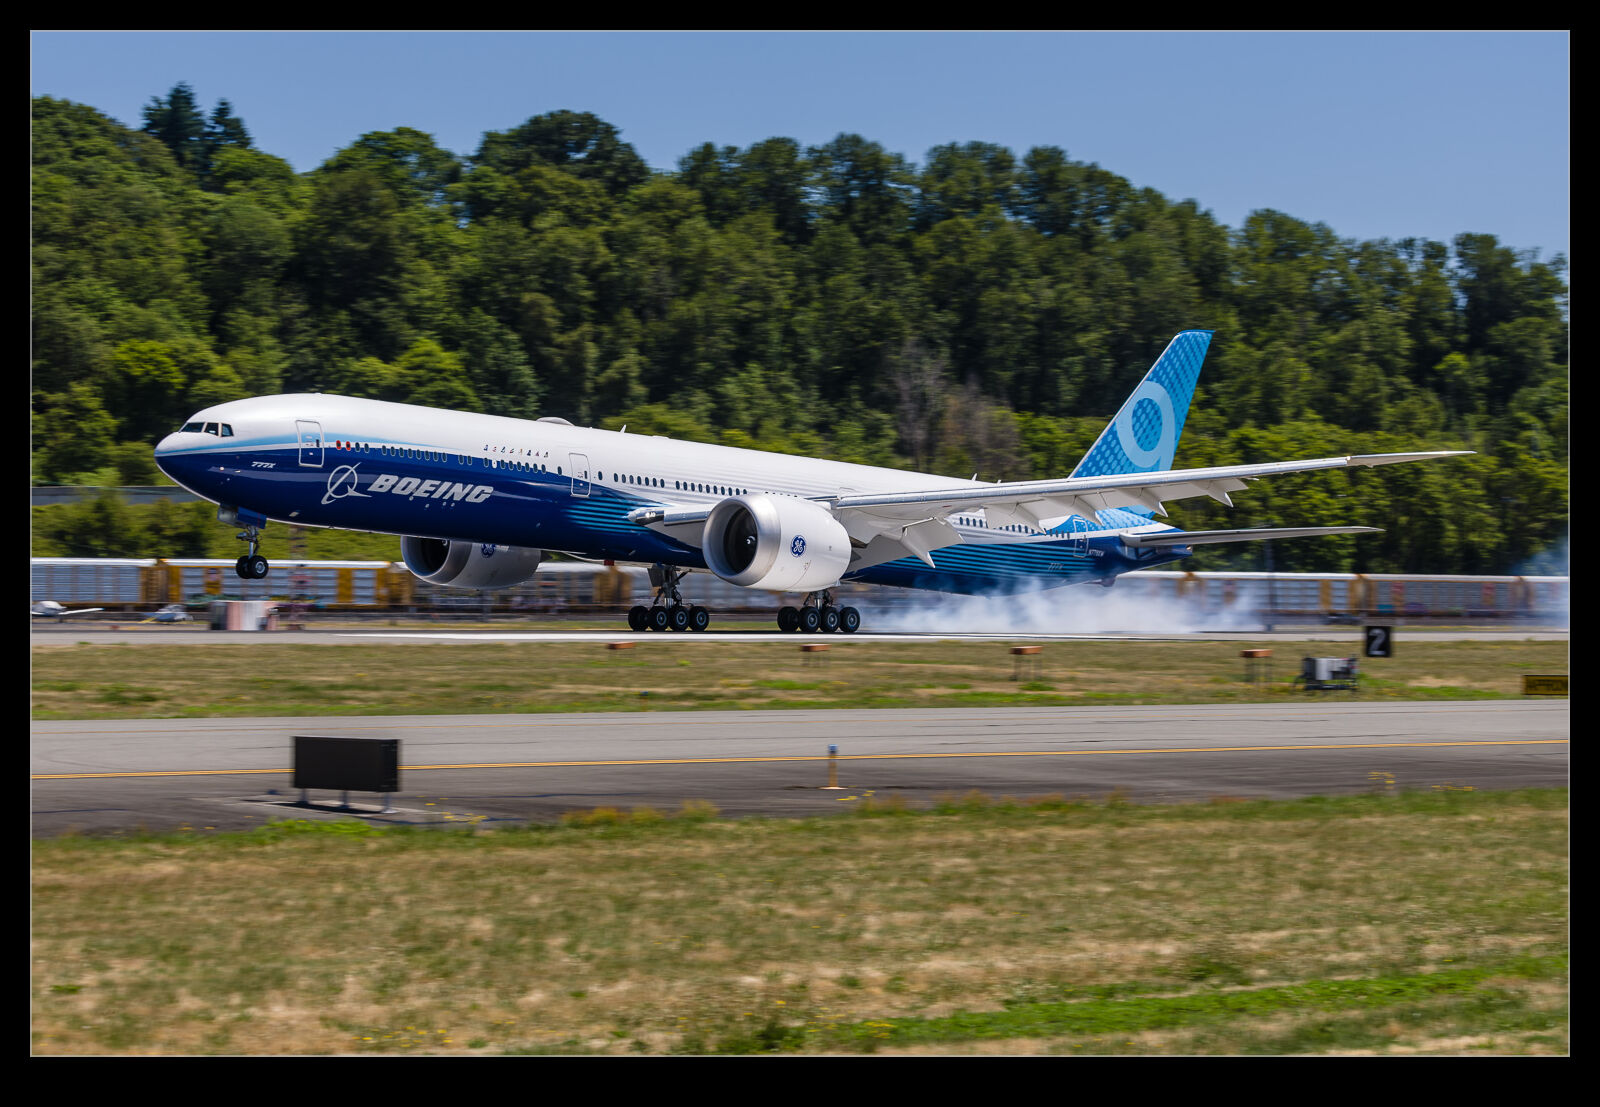
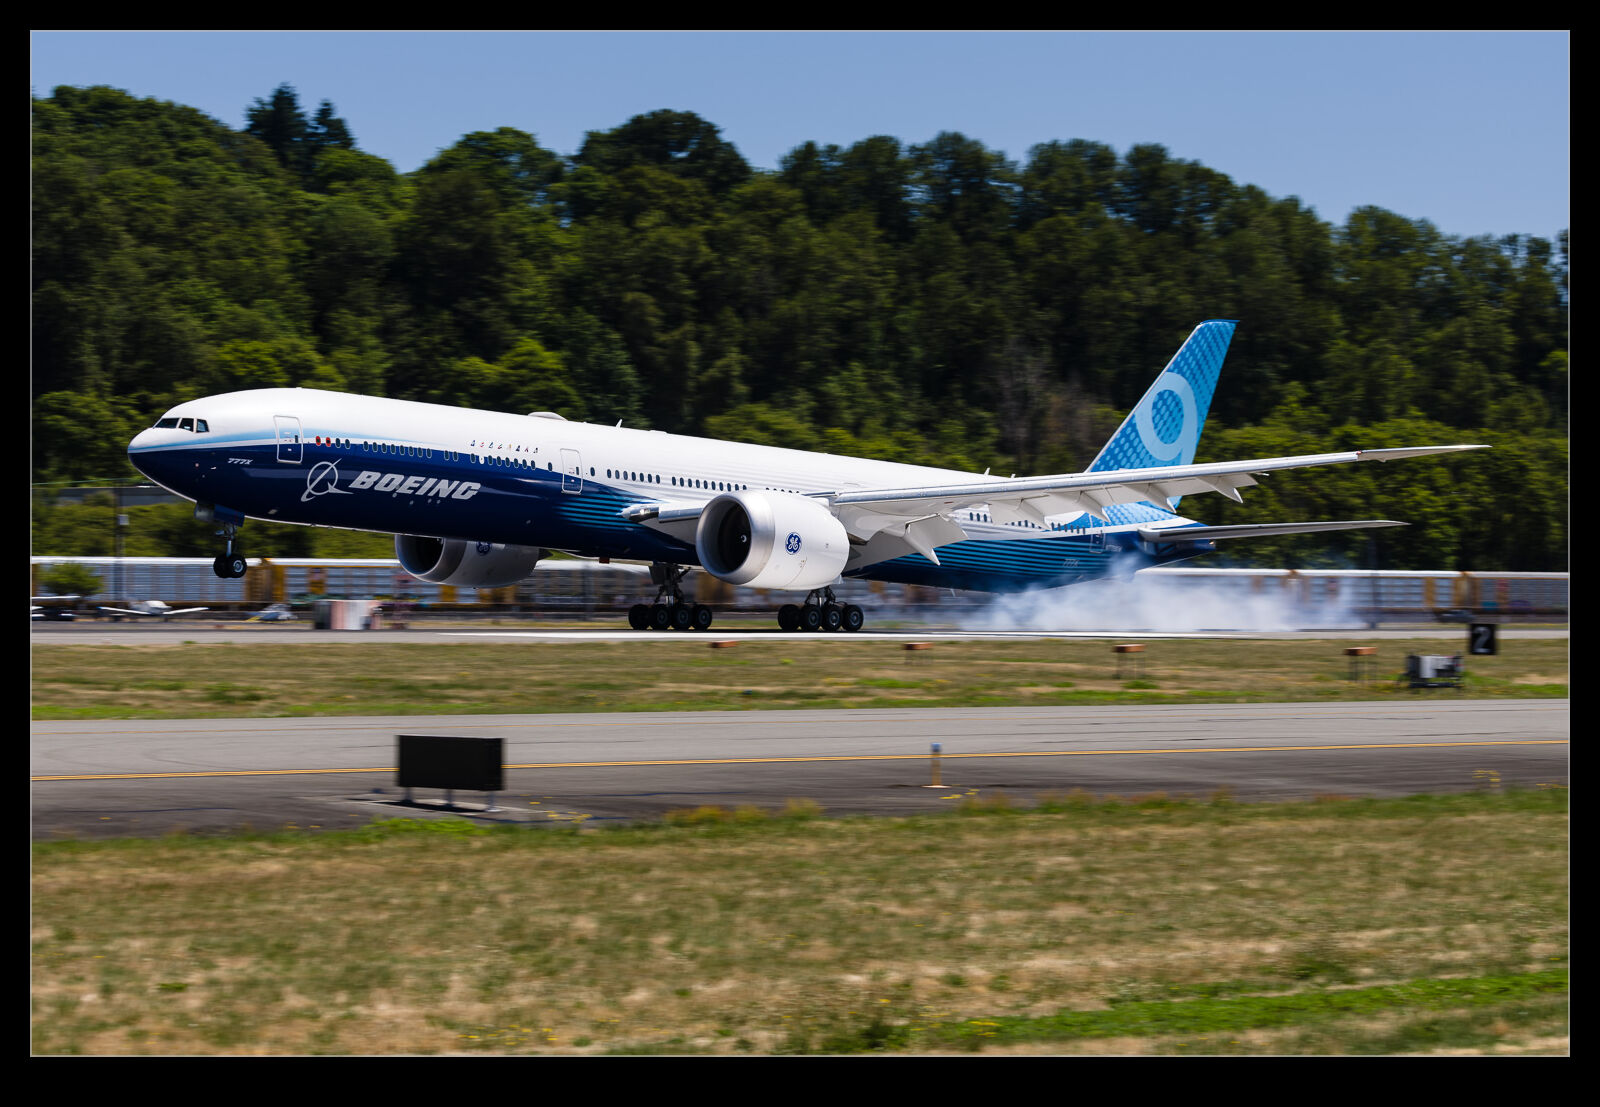
I have some photography friends that don’t like the effect that the differential speeds of the parts of the airframe have on sharpness.  A sharp nose might mean a pretty blurry tail since the relative motions as I pan are different.  When I am filtering through the shots, I often “focus” on how the nose looks since it is like having the sharp eyes on a wildlife shot.  I care less about the tail unless it looks terrible.  However, getting the middle of the airframe sharp might result in a sharper overall shot even if the nose is a little blurry.

These are the things I was thinking about with these shots of a 777X landing at Boeing Field.  The reason for the post is to see what matters to other people.  These shots are a mix of which part of the airframe is sharp and which bits are more blurred.  I may spend a fair bit of time deciding on which is best, but I wonder whether anyone looking at them is going to like the same things as me or will even care about it.  Maybe the composition of the image is all that they care about, and the pixel peeping is irrelevant.  I would really appreciate feedback if you have an opinion.

Why Am I Struggling with the Butterflies?

The flowers in our back yard are very popular with butterflies and, with nice evening light in the garden, I was bound to drag out the macro lens.  However, when I tried getting some shots, the camera was having a really hard time focusing.  I often ended up using the manual focus ring to get something close when the camera kept focusing on the background.  I had struggled with a couple of other subjects previously and I was beginning to get really annoyed.  This was not a cheap lens, and the camera certainly isn’t cheap but why wouldn’t it focus on a butterfly?  I was using animal mode so thought it would cope.

I ended up trying different focus area modes.  Narrowing it down to the small focus spot and moving that around by hand rather than using the subject detection modes was my next effort.  I seemed to have some better luck, but it still was unreliable and was giving me a red box around the focus area.  Why wouldn’t it work.  I took a look in the menus to see if there was something in there which was going to be an issue but nothing there either.  I was beginning to be fearful I had a dud.  Then I noticed something.  The focus limit switch had moved from the full range to having a minimum focus distance of 0.5m.  That would certainly be an issue.  Put it back to where it should have been and suddenly the focus was working perfectly.  What a dope.  Not sure when I had knocked that switch but it might have been a while back.  Doh!

IPMS Northwest Gathering – Time to Focus Stack

Once a year, the IPMS northwest group has a gathering at the Museum of Flight at Boeing Field.  The modelers from around the region come with their creations to put them on display.  I used to make models in my youth and have done a little bit since the pandemic started but not a huge amount and definitely not that good.  I do like to go and see how good some of the work can be.  I tend to focus on the aviation models but the others are of interest and anyone that has put together a diorama is going to get my attention.

Here are a bunch of shots of the various models on display that particularly caught my attention.  When trying to photograph models the problem is that focus is usually very shallow and so it makes the subject look very small.  I use focus stacking to try and give a clearer view of the full model and make it look slightly larger.  I am doing this handheld which is not ideal and, in some cases, the shots just don’t blend well.  Most of them came out okay though.

Focus Stacking With The Camera’s Help

One of the functions that my new camera has built in is a focus stacking function.  I know this is not unique to this camera but it is a first for me so I was keen to play with it.  The mode, when enabled, allows you to set how many shots you want taken and set a scale for how close the focus points will be to each other.  You then pick you initial focus point and set it off and it takes the sequence of shots incrementing the focus slightly between each one.

The resulting stack of images can then be processed in Photoshop to get the focus stacked output.  This is so much nicer than making minor focus adjustments by hand between shots.  The sequence gets created really quickly.  I also was able to do reshoots easily.  On one of the sequences, I had left it on auto ISO so it shot at a really high ISO level.  I could reshoot with the ISO set low (tripod mounting means this was not a problem) in no time at all.  (As an aside, the focus stacking algorithm actually seems to do a good job of reducing noise as well.)

I experimented with how fine a scale to use.  Initially, I was taking way too many shots with very little movement through the image so I coarsened up the scale a bit.  The nice thing was, if it didn’t go all through the range, I could just hit the shutter again and it would keep going.  Photoshop chunked through the processing pretty well.  I was shooting a few things but also experimented with some coins on my desk.  Not the most original subject but one that shows the result well unlike the other things I was shooting.  The software seemed to struggle a little on some of the coin edges so maybe a finer shoot next time or maybe I should just hand blend those bits.

Disassembled Bicycle Tire Valve

I recently bought some replacement valve cores for my bicycle tires.   I notice that part of the core was bent so decided to replace it.  It is a quick job to change the core over and, prior to throwing the old core away, I figure I would play with the macro lens.  I first too a picture of the still assembled core trying to angle it to show how badly bent the part was.  Then I figured I could take the core apart altogether.  Another focus stack and I could show the parts separated.  I love the detail you get of the metal surfaces when you shoot macro.

Focus Stacking and Backyard Arachnids

I’m sure a bunch of my relatives will look away for this post.  Maybe they aren’t fans of focus stacking but it could be the spiders that put them off.  My macro lens has been out a lot during the pandemic since it provides something to photograph close at home that is a bit different.  In fact, I have got so used to having it available, when I am out with a normal lens and come across something small and interesting, I am a bit frustrated to realize I can’t get a close up shot.

The problem with the lens is that it is not a very advanced one and the autofocus on it is pretty crap.  When I am trying to hand hold the lens and something is moving and so am I, things get a little unpredictable.  We had a few spider webs in the backyard with the owners sitting in the middle.  The afternoon sun provided great illumination so I figured I should give it a go.  I tend to go to manual focus and move to get the shot but with the breeze moving the web a lot, things are pretty tricky.  This is what prompted me to try cheating.

I figured that focus stacking does a good job of increasing the area in focus and it manages to align images and make use of what is already in focus.  If I can be straight on to the spider and stay reasonably still and roughly at the right focus point, let the web move towards and away from me and fire a bunch of shots off hand held.  Ignore the ones that have nothing in focus and then let Photoshop work on the remainder.

It isn’t a perfect solution and some weird things happen at the edges of the frame but the center works out pretty well and you can crop in a little to address the edges.  I was quite pleased with the outcome to be honest.  It is making the best of a few bad elements but it did do quite well.  You don’t get to control what is in focus for each shot so getting a complete set to work with is unlikely but overall, not a bad experiment.

Focus Stacking Issues

There was a meeting of the IPMS northwest branch at the Museum of Flight recently.  My friend Jim had given me a heads up about it taking place and, with a day free, I figured I would pop along.  The display as a whole gets its own post but this one was about my experimenting with focus stacking.  I went to this a previous year and took some focus stacking shots handheld to see how it would go.  This time I went prepared and took a bunch of shots.

I took a tripod and my macro f/2.8 lens to try and get detailed shots while isolating the background.  There were lots of models on display, some of which were really good.  However, they didn’t all make good subjects since many were displayed in amongst lots of other models.  I picked the ones I liked as a wandered around and them went back to shoot them.  Many of the stacks worked out just fine and I include an example or two of what worked well.  However, some of them just confused the software.

I use Photoshop to do my focus stacks.  However, on one of the shots that I really wanted to work well – the FW190 which had a diorama – things didn’t work well.  I decided to Google other software solutions and came up with two other applications for focus stacking.  I downloaded trials of both but neither managed to do a good job of it.  I guess this combination of shots just made it too hard for the software to make it work.  I can see the rear fuselage markings of the FW190 showing through the wing of the aircraft.  Maybe this is a function of the narrow depth of field of the f/2.8 shots.  The wing gets blurred out a lot when the rear fuselage is in focus and it decides to take that area as the one to give preference too.

All of this is to say, I have found a new aspect of this technique that needs further investigation.  My earlier experiments with focus stacking probably made it easier on the software.  I have now started to make it a bit harder.  Maybe I need to control the aperture to get things to behave the way I want.  That might have to be tailored to make sure I don’t get the background coming in to focus too much since that separation is something that I want to preserve.  If you have experience with this, I would welcome advice.

Focus Stack Animation

In some previous posts I showed the results of experimenting with focus stacking.  In those posts, I would combine one of the individual shots with the finished effort to show how shallow the depth of field could be on individual shots and how deep the focus was on the final image.  I was pondering whether this was an effective way of communicating the concept to someone when it occurred to me that animation might be a better way.  I created a new stack of images for a different subject but this time I used Photoshop to animate the movement of the point of focus through the shot and then show the final image.  This can then be an animated GIF.  I wonder, does this provide a better demonstration?

A Further Trial in Focus Stacking

In a previous post I wrote about a focus stacking effort I made with images of a model aircraft at a show.  I had been meaning to have another go at this and do so in a more controlled environment.  I then ended up buying myself a macro lens for use in my negative scanning efforts and immediately started playing with it to shoot things close up – it’s a macro lens for goodness sake!

As an f/2.8 lens, when shooting macro shots, the depth of field is really shallow.  This got me thinking about trying another focus stack.  A small Leatherman seemed as good a target as anything.  I set up with manual focus, put the camera on a tripod, went to manual exposure and then shot a sequence with small changes to the position of focus for each shot.  Then it was off to Photoshop.

Photoshop did a pretty good job really.  The distortion of the areas out of focus means that the area that the subject covers can vary quite dramatically as the focus shifts backwards and forwards.  The algorithm did well getting things masked and blended.  The only bit it struggled with was at the very top where the knurled edge seemed to confuse it a bit.  The top shot is the finished effort while two others are included to show how much things are out of focus in the individual shots.

My First Attempt at Focus Stacking

I first read about focus stacking a long time ago and I have been meaning to try it for ages.  The premise is to take a series of shots with the focus set in different positions throughout the scene and then to use software to blend the images together to create on image with focus all the way through the shot.  This seemed like a simple thing to have a try with but I never got around to having a go.  Then I came across a situation that looked like it might be a good example to try.

I was visiting a model show at the Museum of Flight.  I was taking a few photos of some of the more expertly crafted models on display.  I was shooting with a longer lens and using a relatively small aperture to try and minimize the shallow depth of field that you get when shooting small objects close up.  I decided to shoot a model of a Fairey Gannet and the shallow depth of field triggered something in the deep recesses of my brain about focus stacking.  Of course, I had not planned for this so no tripod and just an effort to get focus on different parts of the model without moving the camera too much.

I took the shots and got on with my visit.  When I got home, I almost forgot about the stacking experiment but, fortunately, I did remember.  I exported the images to Photoshop as layers of the same shot.  Then, since they were hand held, I did an Auto-Align action to get them in place.  After that, Auto-Blend was selected.  It seemed to realize that they were a blend stack rather than a panorama – quite clever – and the software quickly did its thing.  Despite not taking too many shots and do it all hand held, the result came out pretty well.  The top shot is the finished product while the lower two show the extremes of the focus range for the original shots.  If I had managed a shot focused right on the back of the fin, the result may have been a bit better still.