Category Archives: equipment

Lightroom Furor Missing the Point?

Adobe recently updated Lightroom and introduced a new version of the import dialog. This move caused consternation in the online photo world and they are currently planning to revert back to the previous version. So much of the focus was on lost functionality in the new version. I have struggled to see how bad the losses were. Everything I needed before was in the revised dialog and from what I can see, the bits that went away were not exactly game changers. Of course, different people have different uses so it might matter to them.

What I am surprised about is that far less attention is being given to the fact the new release is horribly buggy. The new import dialog is a prime example. You have the import presets as before but if you change to a new preset, the location that is shown for where the files will be copied is the previous one. If you click to change it, you see that the correct folder for the new preset has been selected. It actually sends them where it is supposed to but it shows a different location. This is annoying but not impossible. The import dialog presets have been buggy for as long as I can recall with certain elements impossible to get rid of once selected.

Overall, the program is a lot less reliable. I have had develop screens lock up when it gets tired with a blue block replacing the image in question. If I leave it open long enough, it locks up completely. Sometimes, when I go to the Open Recent tab, the arrow appears but no recent catalogs are on display.

So, while everyone has been getting really messaged up about the import dialog, I am not that bothered. I think they should have been focusing on how Adobe released an update to Lightroom that seems to have a ton of problems with doing the basic stuff it is supposed to do. That seems far more worrying to me.

Windows 10 Upgrade Experience

The upgrade to Windows 10 was one I have been thinking about for a while. I wasn’t interested in upgrading straightaway since I figured there would be a bit of debugging of the OS by the early adopters. I also didn’t want to compromise any of the important stuff I have. Therefore, I decided to use my laptop as the prototype for the upgrade to see how it went before upgrading anything else.

The upgrade went surprisingly easily. It downloaded all of the new files when it started which took a fair bit of time but then it went off through the upgrade process with little involvement from me. When everything was done, I went through the options rather than accept the recommended selections an unchecked a bunch of the items that appear to share more information than may be preferable. I shall wait to see whether any of those selections limit any functionality.

The only issue I have had so far related to the trackpad on my laptop. Previously, the trackpad allowed scrolling by running my finger along the right side of the pad. This function has gone away and now I use two fingers to swipe up and down. This is taking me a while to get the hang of since other machines still operate the old way but I think this will be okay in due course. The other issue with the trackpad is that, periodically, it appears to freeze for a moment and the cursor doesn’t move. It then clears itself with no further issue so I suspect it is a minor driver issue that will, hopefully, be updated in due course.

I was also able to copy the old version of the Windows games from Windows 7 to the Windows 10 system. They have updated versions in Windows 10 but, if you like the previous versions, you can keep them. Otherwise, the changes seem pretty reasonable and I haven’t had any issues so I think I will be upgrading the rest of our machines. We shall see whether they also go smoothly. Getting Nancy’s laptop off Windows 8 will probably be a popular move!

Blog Image Upload Using WP/LR Sync

Providing a review on something you haven’t had a lot of use of doesn’t seem like a good plan. This is something I have been using for a while and, now I have had a bit of time with it, I thought I would share what it is like. Uploading images to the blog is obviously a big part of the preparation of posts since, at the end of the day, this is primarily a photographic blog. When I first started out, I would create the images I wanted and then upload them manually. That was time consuming but was soon superseded by an alternative.

I started using the LR/Blog plugin to Lightroom. This would create a version of the file including any formatting, borders and conversion to the right color space and would then upload it to the blog. This worked okay for a long time but it had one significant limitation. If I tried to upload too many shots at once, it would fail and then lock me out of the blog for a while. I started searching for an alternative when my efforts to solve this problem went nowhere fast.

If you Google this topic, almost everything brings you to LR/Blog. However, recently I came across WP/LR Sync. It is a Lightroom plug in that makes use of the Publish services in Lightroom. Rather than uploading the images one time, you add the files to a collection that is then published to your blog. If you change the image, you can have the online version amended in sync with the original. If you go to http://apps.meow.fr/wplr-sync/ you can read more about it.

I decided to give this a go. However, in the guidance, Jordy provides a piece of information for people like me who have problems uploading lots of images. Apparently, my hosting service treats too many upload attempts in a short time as an attack and you get locked out. This was what was happening before. WP/LR Sync has a field that allows a small time delay between images which, if set just long enough, will prevent you getting treated as an attack. Something like this would also cure my LR/Blog issues I guess but that ship has sailed.

I am very happy with the new plug in. It works well and allows the same edits of the image before uploading as before. A benefit is that, if you drag images to the sync collection and they were already in there, you don’t end up with duplication on the blog. The one you previously uploaded is there. You just might have to scroll down a bit to try and find it. If you want to have a go with this add on to Lightroom, visit http://apps.meow.fr/wplr-sync/ and check it out.

Haze Filter

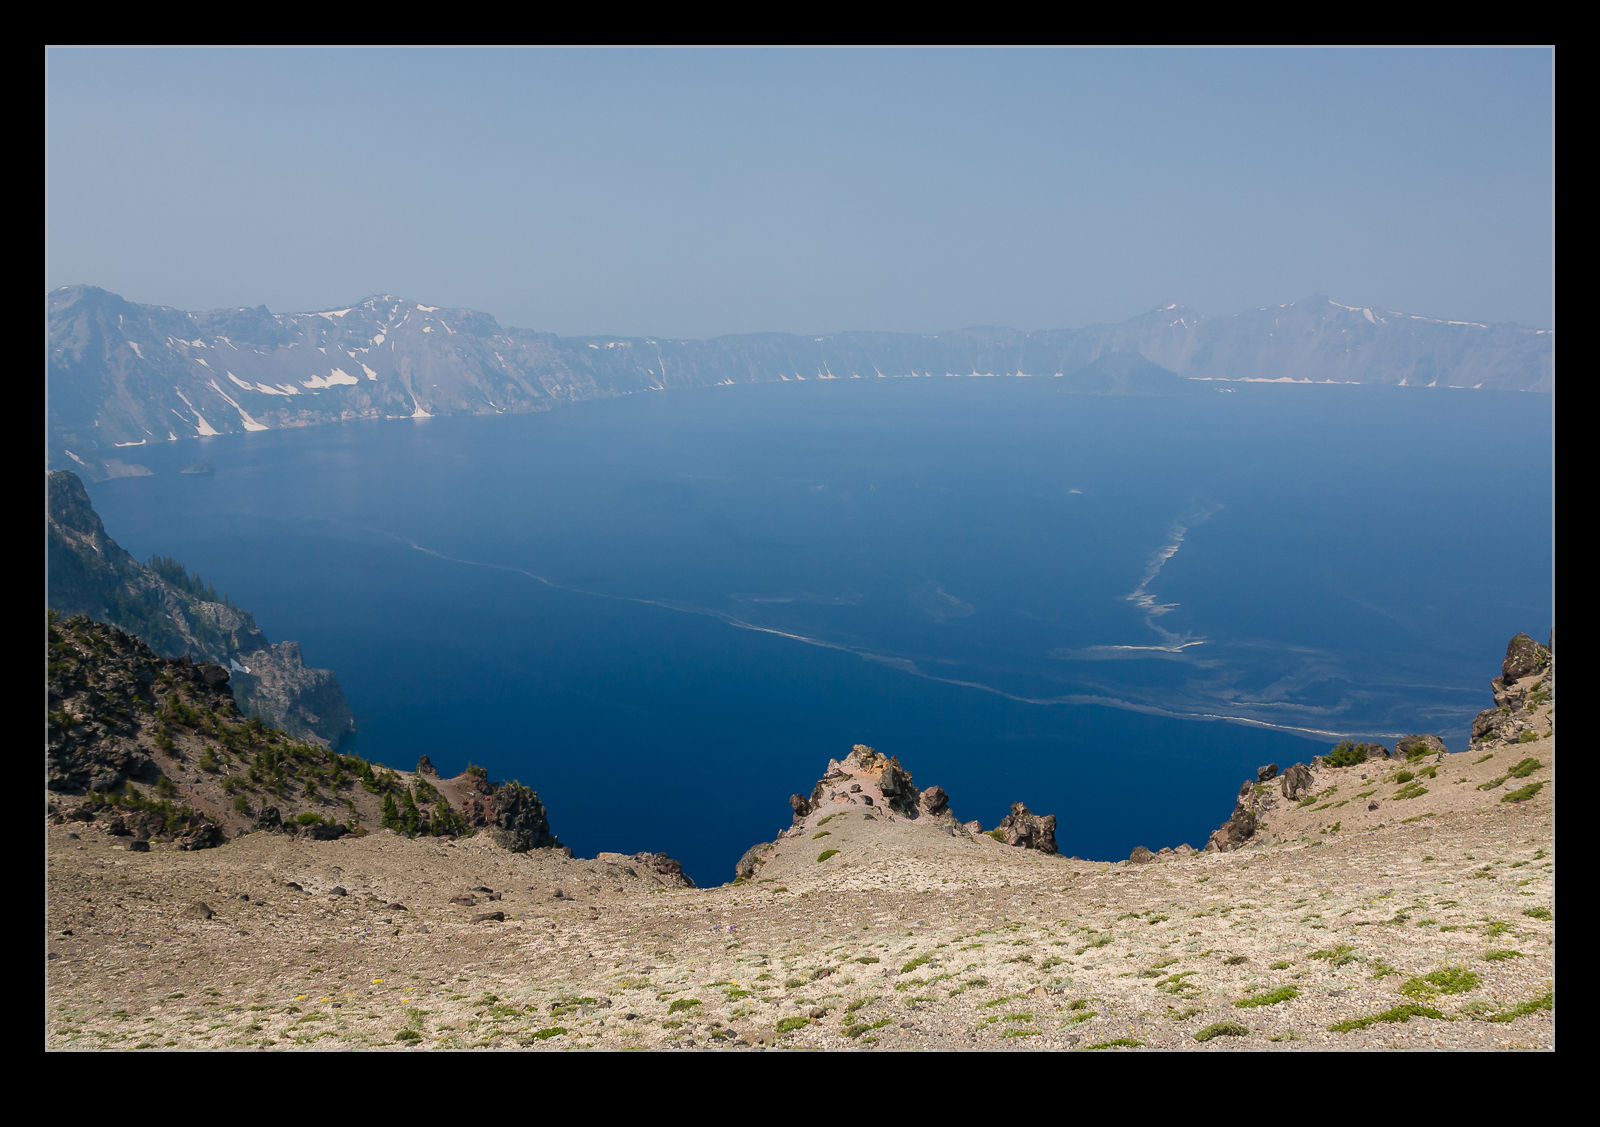
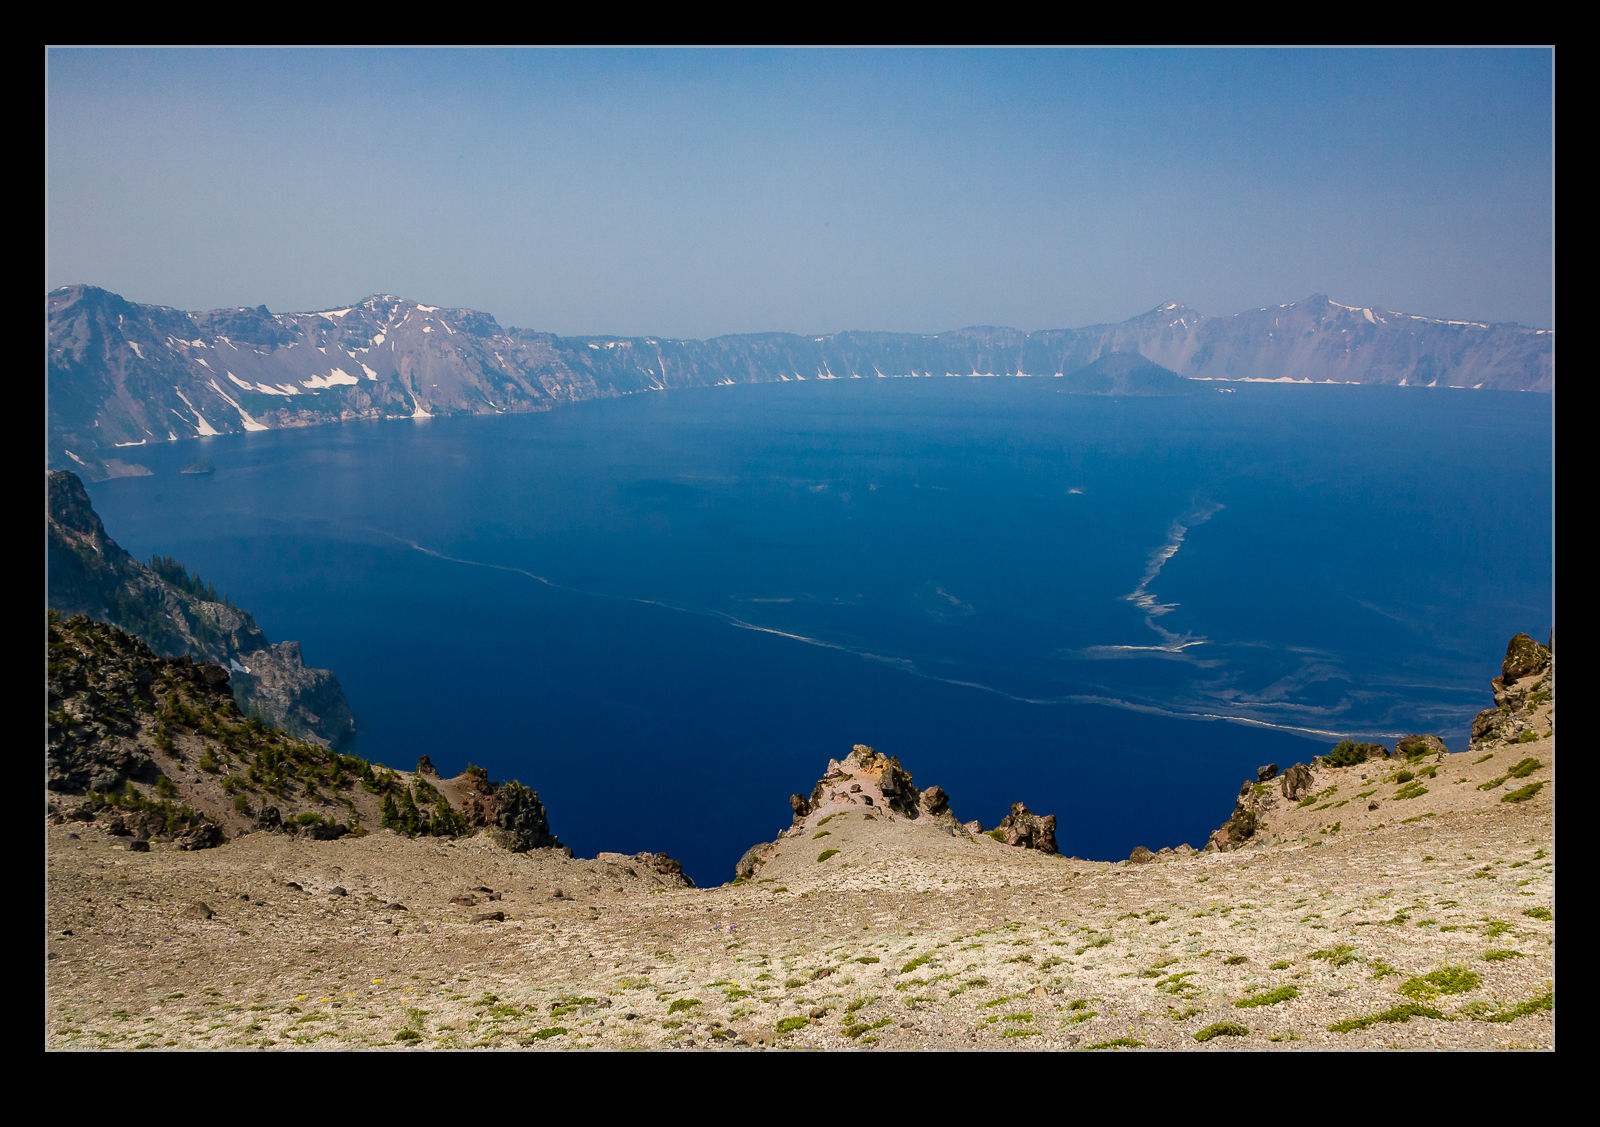
The Creative Cloud version of Lightroom drops new features in to the software when the updates are installed. This is a nice thing to have happen but, unless you are paying attention, you might not be aware of some of the new features. It took me a while after the last update to learn that a new filter had been added that was designed to take haze out of images. This is a great idea. I have experimented with trying to remove the effect of haze in shots before but, because the effect varies by distance, it can be quite tricky to get something that doesn’t look totally wrong.

QB5Y5727.jpg QB5Y5727-2.jpgI have not played with the filter a lot but I did decide to try it out on a shot I took at Crater Lake a few years back. Wildfires had resulted in smoke in the air which meant the usual clear view across the lake was obscured. I thought I would see how the filter worked out. Above are the before and after shots. It is an improvement but obviously isn’t going to rescue a totally messed up shot. I did try a more aggressive setting but that looked wrong itself so this was the one I went with. We shall see if this has other uses for me over time.

Clever Feature of Lightroom CC

This one is something that I can attribute to the Kelby media juggernaut. I did not discover this myself but, if you are a user of Lightroom CC and use either the HDR or the panorama functions, this could be of interest. One of my issues with them was that they took a while to bring up a preview. Once you had got this, the processing would work in the background.

It turns out, if you don’t need to tweak the settings and are happy with what you used previously, you can hold Shift and Ctrl and press either M for panorama or H for HDR and it will launch right into processing the whole thing in the background. You can set multiple versions off if you wish and they will all get to work out of sight while you do something else. While my feelings on the outcome of the processing are not universally great and I covered this in some previous posts, it does a reasonable job most of the time and this is an even better feature that is well concealed!

Experiences with Lightroom CC

I have discussed some of the new functions of Lightroom CC here and here. Aside from those changes, how have things been with the program overall? To be honest, I am a bit underwhelmed by the new version. There have been a few minor functionality upgrades but nothing huge. I do like the ability to add images to a collection when importing them since that has saved a step for me. However, the presets do not seem happy remembering which collection it is so that is rather buggy. Many of the bugs in the previous version also exist so, if they have really recoded a lot, they have still reused a lot of the code.

The new version also seems to have a fair few bugs of its own. The crop tool seems to have developed some new quirks that result in it deciding you have finished selecting the area a short while after you actually do so, if you have moved the cursor away, you get some very odd effects. I still can’t get it to stop trying to create a backup copy of my files when I import new images. Nothing new was added for video which I think is daft. They give you the capability to import video and even trim and edit clips. However, with Photoshop having the ability to be a basic video editor (and now my default), there is no way to connect videos in Lightroom with Photoshop in the same way as you do for stills. That baffles me.

The big benefit is in processing speed. My workflow involves rendering 100% views to speed me through the culling process. The new version certainly renders them a lot faster. I did have to upgrade my graphics cards though. My vintage cards did not have the necessary version of OpenGL to let Lightroom take advantage of them. It also has lens profiles for two of my lenses that were not in the previous version which is nice to have.

Overall, I am okay but a bit underwhelmed. Since I pay for the subscription, I am paying for it but it does have the feel of being free so I am less concerned even if I can understand the truth. What I am hoping for is a bit more frequency in fixes to deal with the bugs and maybe bring some extra capabilities.

Time Lapse Tutorial

I have mentioned in the past some of my interest in time lapse. I recently posted a sequence on here and a friend of mine asked me to put together a guide to how I had gone about doing it so here you go.

When putting together a time lapse, the first thing is trying to establish what will be special about what you are shooting a sequence of that will make a time lapse more interesting than any other form of presentation. Usually this involves something that changes slowly in real time but becomes more dynamic in a time lapse such as a sunset or storm cloud development. Alternatively, it is something where a lot happens over a long time that isn’t terribly dramatic on its own but, when speeded up, becomes far more impressive. This could be a sequence of activities with multiple people or launching airplanes as was the case for the one I recently made.

Once you have established what it is that makes it interesting, then you have to decide how best to portray that. Choosing your location and your angle of view are the next challenges. I was shooting departing and arriving aircraft at SFO so I needed an angle that gave me a good view of them and a field of view that allowed plenty of the movement to be seen without everything being too far away to be noticeable. In this case, shooting at night works well because the lights stand out far more making the aircraft more conspicuous than would be the case during the day.

Now it is time to get into the technical issues. How long a clip do I want to make? Shooting time lapses means getting a large number of still shots which will each be a single frame of video. Video frame rates vary but I used 30fps for the sequences I make. Therefore, 30 shots will give me a second of video. If I want a minute of video, I need to shoot 1,800 shots. That’s a lot of shots. Also, figure on shooting more before and after the main action since it is nice to have some spare video at each end to play with in future editing.

You know how many shots you need but how long in real time do you want to cover? Are you starting before sunset and finishing well after sunset? Do you have a peak period of activity that you want to cover? Now you can see how many shots you need over a given amount of time so you will work out how long the interval between each shot can be? The interval between shots is critical but you must also factor in how long a shutter speed you want. This is where shooting at night is a lot nicer because you can get nice long shutter speeds. These make for smoother looking videos because there is no jerkiness. Shooting on a sunny day with a very short shutter speed and a few second interval will result in a jerkier output. The “rule” is to have the exposure time at least half the interval. Doing that during the day may require some neutral density filters. At night it is a lot easier to manage.

Now to mount and control the camera. Obviously a tripod is a necessity to make a stable platform for the shots. A cable release is a must have and preferably one with a timer built in so you can program the intervals. However, if you are shooting at night, you can get away with putting the camera on burst mode with a shutter speed to match your interval and then lock the shutter release open. It will then just keep shooting. The other camera thing to consider is image stabilization if you have long shutter speeds. IS can wander around for long exposures making everything blurred. Keep it turned off. I would also switch autofocus off once you are happy everything is sharp to avoid the focus getting changed by the camera. If the conditions are changeable, you might go with something like aperture priority to accommodate changing exposures. At night, manual might be your best bet. Always keep an eye on how the exposures are doing if in a programmed mode to ensure you aren’t exceeding your interval with your shutter speed. There are complex bulb ramping tools available to use if you want to get advanced. I haven’t tried these since they haven’t been necessary for my purposes so I can’t give good advice. I do have the functionality in a cable release device that connects to my iPhone called Triggertrap but I haven’t ever pushed it to its limits.

One thing you will discover is that fixed apertures are not fixed. Cameras will go to a slightly different aperture for each shot which can result in slight variations in exposure. This “flicker” can be managed by clever manipulation of the lens position but I prefer to use software to fix it. The software will also help if you end up tweaking the camera settings during the capture sequence.

Last piece of equipment advice is bring a chair. Once everything is at work, you don’t have much to do. You can shoot with a second body of course or you can sit back and relax. If you have a buddy along, that is not a bad thing! I shoot all of my sequences in RAW format. For night shoots this gives you a lot of latitude for tweaking the exposures. It does use up a lot of memory but storage is cheap these days. With charged batteries and big cards, you are good to go.

Once the shoot is done, you get home with a ton of images that look remarkably similar. First I import them into Lightroom. I will keyword them in the same way as anything else from a shoot including adding a time lapse keyword. Then I will make sure all of the time lapse shots are in one subfolder before jumping over the LRTimelapse. I am not going to try and write a tutorial on using LRTimelapse. The website for the software has far better guides to how to use everything. However, I will focus on the key elements I go for.

The main one is the Deflicker process. This is a routine that analyses each shot and applies little tweaks to the exposure to avoid any visible flicker. You can draw out a box in the image preview to tell it where to analyze. This means you can pick an area that is constant in the image as a reference and avoid areas where there is a lot going on. If the image exposure is gradually changing, it won’t affect that. It will just take out the individual variance. You can see a trace of how the overall exposure tracks during the sequence.

The other element I sometimes use is panning. You can define keyframes in the sequence and jump back into Lightroom to crop each one as you wish. Back to LRTimelapse and it will calculate the individual crops for each frame to make a smooth pan between your chosen keyframes. Quite nice to provide a little variety if you wish. I always crop the images to a 16×9 format since that works nicely for HD output formats.

When all of your tweaks are fixed, you save the metadata files and go back to Lightroom to reload them. (There can be a bit of back and forth like this throughout the process.) In Lightroom, there is an export dialog from LRTimelapse which then renders out the individual files from each shot. These will then be taken by LRTimelapse and rendered as a video clip.

Sounds really simple that way and, to be honest, it is pretty straightforward. A little practice helps of course. When it works out, the result can be very satisfying. Of course, a lot of times, you see something that you really wish you had done differently. That is something you will have to put down to experience and try to remember next time you are out shooting.

One last thought – if you are shooting something that involves light trails at night, consider making each image a layer in Photoshop and blending them together as a stack to see what happens. It can work pretty nicely sometimes. However, you can end up with a pretty huge Photoshop file so your computer may groan while processing it. Happy shooting!
Canon 100-400 Review

One of the longest running sagas in the world of camera equipment watchers was the replacement of the venerable 100-400 zoom lens. I have had the old version for about ten years and it has been a useful workhorse for me. However, it was becoming a little unreliable in recent years. A trip to Canon came back with a clean bill of health but I still found it a little trickier to get good results with. I had totally given up on the image stabilization as I found it often made things go strangely, particularly in the view finder.

Consequently, I have been keeping an eye out for when the new lens was due to come out. I planned to replace mine when the new one showed itself. As it was, I had been waiting of quite a while. Then, at the end of 2014, the new lens was released. There was not a glut of them available (and at the time of writing they are still pretty hard to come by) but I placed an early order and a couple of days before Christmas, it showed up on the doorstep.

First impressions had to wait as it was taken away to become a gift. However, once I did get it in my hands, I was quite impressed. For those that aren’t following these things (and if you are interested, you probably are following them), Canon have changed from the push-pull style of zoom to a ring operated zoom. This is like most other zoom lenses and it seems to work well. However, they have made the zoom ring the outer ring which is the opposite of my 70-200 so makes for a little adjustment. It does mean that the focus ring is where your hand might be when bracing the camera for steadiness. However, this has not been an issue for me yet.

I took the old and the new lenses out for a shoot to see how they compared. I shot with each in turn as well as doing some comparison shots to see how much they varied. It was interesting that, when I imported the images into Lightroom, I went through them to cull the poor shots and found the rejection rate would go up and down. This was when switching from one to the other. The newer lens seems to have a higher rate of keeping focus for moving subjects (surfers in this case). The bodies were the same so the lenses were the only variable.

I quickly adjusted to the new lens and find it easy to work with. It certainly feels solid and there isn’t the play I found with the old version. The image stabilization is a major improvement. It is great for static subjects with a major improvement in steadiness. It has three modes – static targets, panning targets and a third mode that only starts the stabilization when you fire the shutter. I have played with that but have not found it to be so reliable. I suspect it is a lack of understanding on my part. However, I think Mode 2 for panning will be where mine stays.

Aside from focus, how is the image quality? Pretty impressive. In the comparison shots things were a little sharper all over but more so at the edges. I will have a word of warning here though. I have had a series of shots where one side was noticeably blurred. What I have not been able to break down is whether that is a focus plane issue, a haze issue or a problem with the lens. I have tried a number of test shots to try and get to the bottom of this but everything seems to be solid. There is possibly an issue around the 300mm mark in some one test I ran which does coincide with what I have experienced in the field but it is far less than I had seen before. However, I have had plenty of good shots so I suspect the issue is not with the lens but with what I was shooting.

The new lens hood is one that leaves me with mixed feelings. Overall, it is good. The newer lens hoods on Canon lenses now include a button to lock it in place which stops them dropping off at odd moments. This one also includes a small “window” in the side of the hood to allow you to adjust polarizers without taking the hood off. This is a nice enough idea but the sliding panel over this window, while having a detent, is easily disturbed and I frequently find it is open. Not a huge problem but a bit of a compromise in the design.

My remaining issue is not with the lens but with Lightroom. Adobe have not created a lens profile yet (or rather not released one) which I suspect means it will be in the new version of Lightroom which is supposedly imminent. I have shot a lot of stuff wide open with the lens and there is some vignetting which is not a big problem but having a well worked out correction profile will be very helpful.

Overall, I am very happy with the lens. It seems to perform very well. Once I have convinced myself the minor problems I have seen are down to me rather than the lens, I shall relax into this being a regular part of my kit. It doesn’t have the low light capability of the 70-200 but it might find itself being used more for shoots when that lens was previously in the bag. We shall see.

HDR Pro Comparison

wpid12423-IMG_2448.jpgThe iPhone has an HDR function available in the camera’s software. However, it hasn’t impressed me in the past. My friend Hayman introduced me to an app called HDR Pro and I have used that as my default iPhone HDR app since. Recently, they introduced an updated version of the app called HDR Pro X. I decided to give it a go. I wanted to see what the images it produced were like, how the new controls worked and also to make a comparison with the output from HDR Pro.

wpid12425-IMG_2449.jpgThe top shot is from the new app.  The second one is the previous version.  The added control certainly seems to be beneficial and the blowing out of the higlihgts is far better controlled.  I am generally happy with the new version.  The controls could be more user friendly.  When you use Lightroom/Camera Raw all the time, anything less seems clunky!  See what you think of the results.

Golden Gate Sunset Time Lapse

After my buddy John had headed back into San Francisco, I had the choice to go home or to head back to the Marin Headlands to see whether I could get some shots across the Golden Gate to the city. The sunset was not too far off although the cloud levels looked like they might take away the best light. However, I figured the transition might make it worth a time lapse attempt.

I had come prepared with both a tripod and an intervalometer. As it turned out, I thought I had got this wrong when the intervalometer had dead batteries. However, I did have a backup plan with the Triggertrap iPhone app. (It turned out later that I had brought spare batteries with me for the intervalometer so I actually had more redundancy than I realized. However, I did manage to harm things a bit by nudging the tripod a couple of times when shooting so it didn’t all go well.

Even so, I did get a good set of shots to process. I was more conscious this time of having some spare footage before and after the sequence to make sure it didn’t have a sudden ending or one that cut off some aspect of motion. This ended up being the tour boats. They come out to the bridge and turn around. They provide some good motion in the sequence but also need to be complete or the eye is too aware of their sudden demise. Consequently, after shooting the sequence I wanted, I had to keep it running for a while in order to avoid the boat suddenly vanishing.

All of this was then processed in Lightroom and LRTimelapse, a program I have posted about before here.