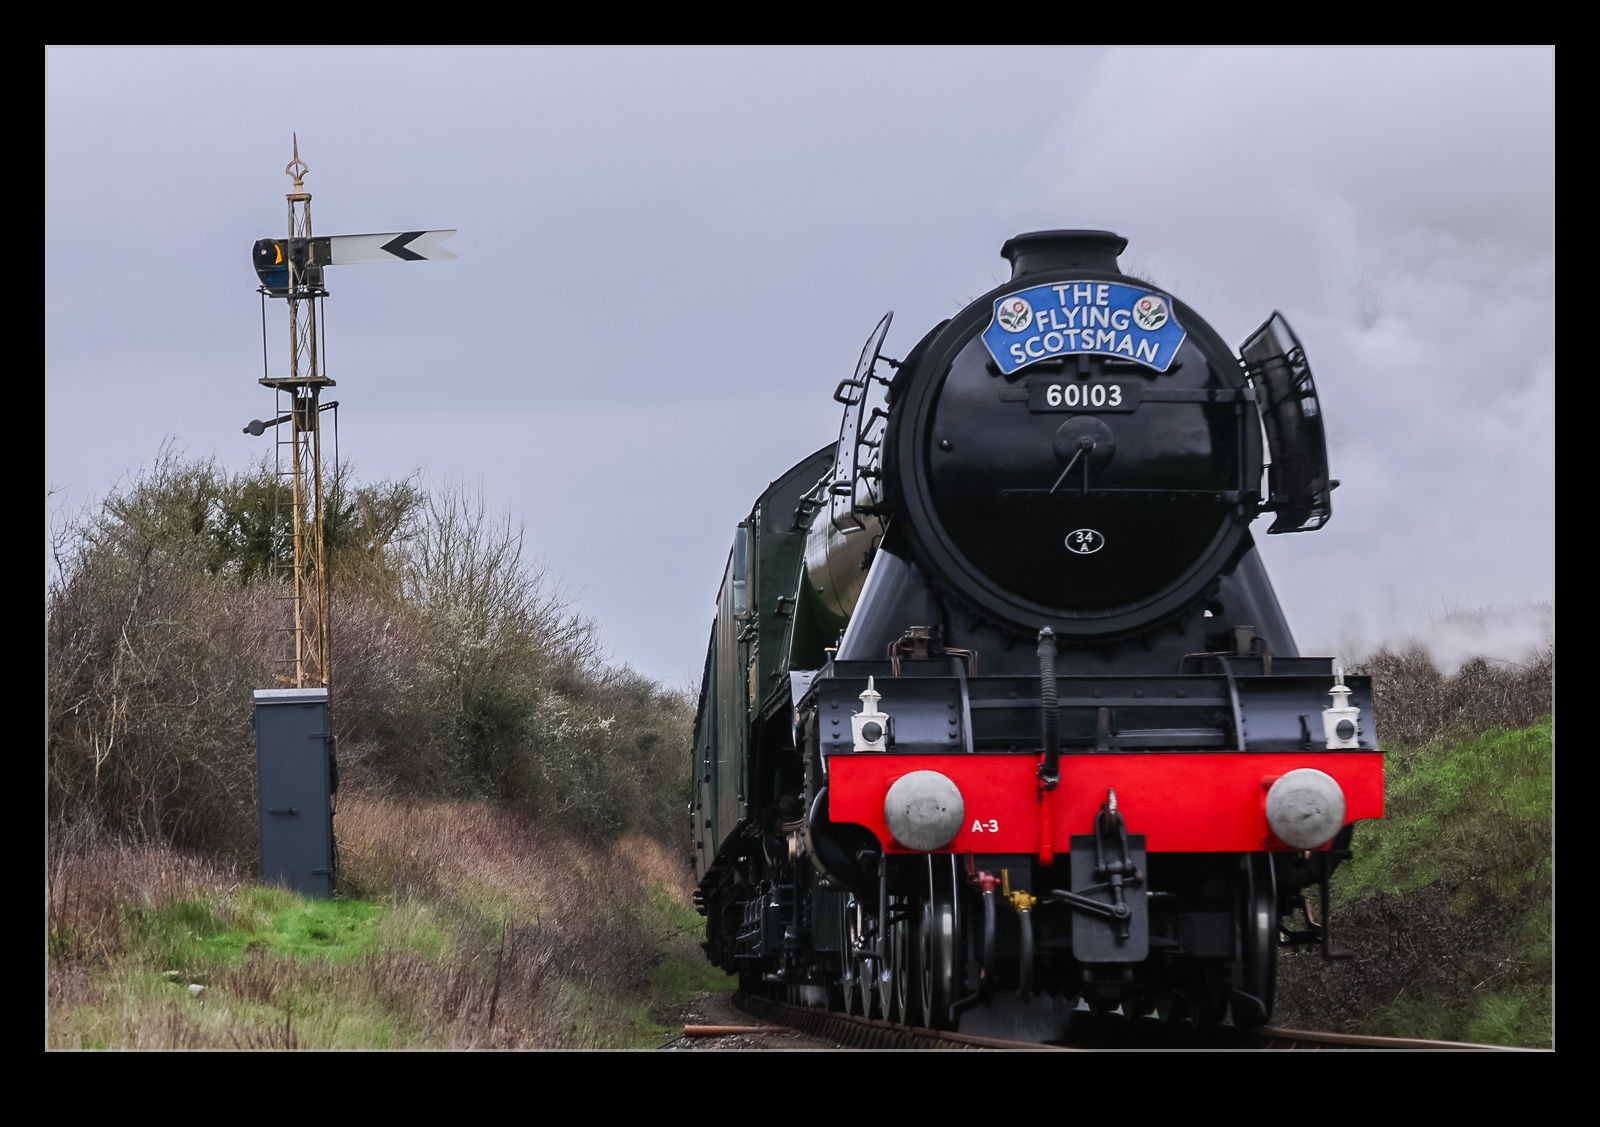
Tag Archives: technique

Catching an Evolution in the Gloom

The Lancair Evolution is not a particularly common aircraft although I have come across examples over the years. However, one slightly gloomy Sunday afternoon, I saw that one was heading to Paine Field. I understand that it might be locally based but I hadn’t seen it before and, with not a lot else going on, made the short trip up to Everett. On jaunts like this, you start persuading yourself that the clouds are going to part at just the right moment and then the sun will illuminate your subject against a dark and foreboding sky.

That has worked for me on occasion but this was not such an occasion. The conditions were still pretty dull when they showed up on approach. As is often my technique in these conditions, I shot quite heavily over-exposed. This allows for lots of detail in the aircraft to be captured and then for some masking of the background to bring it back down to something resembling what it actually was on the day. The eye does such a good job of dealing with dynamic range that it is amazing to see just how badly the exposures can vary in conditions like this. Getting the most of the data from the initial image and then letting the post processing techniques bring it back to what you actually saw is the way I like to go. This plane flew quite a bit after this day but never when I had a chance to catch it again so no sunny shots of it I’m afraid.

More Super High Frame Rates for the Red’s Syncro Pair

A bit of a theme for me recently has been playing with the super fast frame rates on my camera. Last year I tried this out with the Blue Angels and posted on here about that. It worked well but they were rather distant. At RIAT, I decided to try again but with the Red Arrows this time. The syncro pair will make many crosses during the course of the show so I had a few opportunities.

First, let’s talk about what didn’t go so well. When you select this mode, it will fire off a bunch of shots – I set it to the maximum at 50 – and, when it has taken them, the camera will be effectively locked up until they finish writing. It doesn’t take long, and it shouldn’t matter because not much is happening for a while. However, if you are a dope and forget you have selected it and then take a shot of a plane coming around the turn towards you, you will get a lot of shots you didn’t intend and you may still be writing them when the cross actually happens. I am speculating, of course. No way I would make such a mistake.

The other issue I had was one of choosing focal length. On some crosses I zoomed out quite wide and the jets ended up being further away than expected and quite small in the frame although it gave me multiple framing options. This had been an over correction after having been too tight on a previous cross. Basic stuff but, at least with a bunch of crosses, I had more chances to sort things out.

Then we come to the crux of it. Did I get stuff I liked? Absolutely. I was always tracking the plane coming from the right so my left eye could see enough of the opposite jet, so I did run the risk of having the background jet in focus, but it all worked out fine. The biggest issue is that you end up with a ton of shots to work through. Then again, that is my story of RIAT as a whole! I have included so of the stills here but also an animated GIF of a sequence so you can see how close the frames are to each other. Please forgive the crappy colour space of the GIF.

Return of the Reds

One of my days at RIAT was spent down towards the threshold of the runway. This meant I was able to get shots of the approaching planes and, hopefully, their touchdown. I say hopefully because a couple of things were working against me. First, there were some distance to go boards that could be in just the wrong spot depending on where the plane touched down. Second, because I was close in and there was a lot of distracting stuff in the background, I was going with a lower shutter speed to give the sense of motion and blur out some of the distractions.

I didn’t have a high success rate with some of these shots which was expected. When going through them, I can be pretty aggressive at culling anything that is not super sharp (at least on a part of the airframe that will be the first point of interest for a viewer) but I do have to bear in mind that I am looking at a high resolution version of the image zoomed in to 100%. When it is a 1600 pixel image on a screen, it will forgive a lot of the detail problems.

Anyway, I got some shots of the jets on approach and then as they touched down. Some of them came out pretty well. I did also use the location for take off shots where, since the planes were just beginning their take off rolls, they weren’t going that fast and getting the blur required was a bit trickier. Some of those will, at some point, show up on here too.

Experimenting With Sport and Silly Frame Rates

I recently wrote about spending a bit of time at a local cricket club watching a couple of games for a while. I haven’t really photographed cricket much so didn’t have strong ideas about what to try and get with regard to angles and action. I was just playing around, really, to see how things came out. I ramped up the frame rate for some of the shots that the batsmen were making. I was interested to see how I might miss the critical moments and how far the ball had moved between frames.

Now, clearly getting the shot is something that technique and skill should deliver. Compensating with the tech is not ideal but I wasn’t trying to prove anything to anyone. Instead, I was just out having fun. Consequently, I decided to use a feature on the R3 that I only occasionally drag out and that is the super fast frame rate of 194fps. This will not use autofocus or auto exposure once the sequence starts, but that isn’t a problem in the 0.2 seconds that it takes to shoot the 50 raw frames that are the limit.

It is amazing that, even with such a high frame rate, the ball still can move quite a distance between shots. You do end up with a ton of frames that are going straight in the bin. Since the ball either hasn’t arrived in frame or it has gone. That is a pretty easy process of culling of course. You also never know whether a given delivery is going to result in anything. You can get 50 frames as the batsman lets the ball through. Those are even easier to cull! Did I get anything I really liked? No, to be honest, I wasn’t too excited by any of them. However, it has got me thinking about what would make for a better shot. I shall have to work on that and head back to see if I can improve things.

Getting the Shutter Speed Wrong Makes Editing Quicker

I have made this mistake before and, no doubt, I shall make this mistake again. Setting up the camera for one shot and then not changing the settings before shooting something else. I had the 200-800 lens on the camera, and I dropped the shutter speed down to 1/100th of a second for some take off shots. This is where I left it while shooting the flying display of a couple of aircraft. A long focal length and moving target with a slow shutter speed means that there are a ton of shots that are totally unusable. That really does help in the process of deleting shots. Most of them are toast. A few did survive and that was quite a relief!

Messing Up the F-35B Departure

Since I switched to my R3 bodies, I have been playing a lot more with low shutter speeds to emphasise speed in images. This has been a topic in multiple posts on the blog in recent years. However, it doesn’t always work out well. I know that the keeper rate will fall when shooting fast moving objects at low shutter speeds, but you hope/expect that you’ll get something worthwhile from the ones you take.

However, that doesn’t always happen. During Seafair last year, the US Marine Corps F-35B departed Boeing Field for its display. I decided to go low with the shutter speed from my location up on the tower with the aim of having the airfield background blurring out and leaving me with the plane as the dominant element in the shot with little distraction. However, when I came to go through the sequence of shots that I took, I had some sharp ones as it approached me and as it flew away but nothing that really pleased me as it was closest and alongside me.

Some of them weren’t terrible but it was a huge disappointment as I clicked through the images and came to the realisation that I had blown it. You can’t always get lucky, and I knew what I was doing so I can’t be totally surprised that it didn’t work out, but it was still a bit galling. Does this mean I won’t do it again? No. Getting the record shot is fine, but I am more bothered about having a shot I really like these days. Might as well give it a go!

Reflection Removing – Choose Settings Wisely

A previous post had looked at what was, at that time, a development feature in Photoshop that removed reflections from images. Adobe puts development items in Photoshop first to get user experience with them before rolling them out to the software suite. Since Camera Raw and Lightroom’s develop module are basically the same, once it becomes a production item, it also makes it into Lightroom. Such is the case with the reflection removal tool.

I have used it a few times on shots, and it does work pretty well. It isn’t perfect but can be effective. I tried it out on a Typhoon that was refuelling from a Voyager. Shooting through the windows of the Voyager can be a bit tricky and the reflection removal tool can really help. I gave it a go, and the reflection was swiftly taken out. However, when I checked the rest of the image, I saw that a lot of detail in the shot was gone. It was at this point that I realised that the tool has three settings. I was on Preview. I switched to Best and, while the processing took a lot longer, lo and behold the detail was restored.

I have the overall photo above with the before and after versions for a comparison. Beneath I have two crops of the larger image with the Preview and Best settings. I won’t say which is which, but I think it should be pretty obvious. The tool defaults to Preview when you use it so, if you give it a try, don’t be put off if the initial results are disappointing. Make sure to experiment with the settings.

National’s A330 Moving Some Troops

Another one from the archive. National Airlines has made a few appearances in this blog over the years. I do find their livery very cool and a welcome change from the norm on airlines. They had one of their A330s in Boeing Field on, I believe, a troop transport flight. I don’t know that for certain and don’t know why it wasn’t at McChord but I’m not complaining.

The light was better on the aircraft when they were loading it up on the Modern ramp. Unfortunately, departures were towards the north which meant the only option for a takeoff shot was going to be over by the terminal building and that would mean quite strong backlighting. Nevertheless, I figured it would be worth a try. You can get quite a good angle from that location on a rotating aircraft provided that it uses a reasonable amount of the runway.

However, there are two downsides to the images that you get. First, the aforementioned backlighting is not going to make for an easy job processing the image. The latest masking tools in Lightroom do give you more flexibility with what you do but there is only so much you can do before things look really funky. The second issue is that the Boeing ramp is going to be in the background which makes for a very cluttered view. In hindsight, I should have tried going with a very low shutter speed to try and blur as much of that distracting material as possible. Guess I won’t be trying that out for a while!

Recovering a Fence Shot

In an earlier post, I had shared some images of and A340-600 operated by European Cargo that I saw at Bournemouth. What I didn’t include in that post was any images close to the rotation point, despite me having been well positioned for that. When I say well positioned, I omit one key element which is that there was a fence between me and the plane, and I wasn’t able to photograph above the fence. Shooting through it was the only option.

I tried a couple of things to mitigate the issue with the fence. First, I was as close to it as possible to take the fence wires as far out of focus as possible. I was also shooting wide open – again to try and throw the wires out of focus. The last thing I tried was to go with a low shutter speed to smear the wires as I panned. With this combination, I was hopeful that I wouldn’t really have the wires in the shots. I was wrong.

When I took a look at the shots, the fence was very obvious. I did start to wonder whether it would have been better to have the wires well defined as maybe that would be easier to remove. However, too late for that as the shots were done. Now to see if there was anything I could do to recover them to something usable (and by usable, I mean that might be shareable but nothing that was going to be a great publishable image).

I tried some of the healing tools in Lightroom to see if that would work. I was getting nowhere fast – possibly a sign of how little I understand the capabilities of the tools or maybe they are just not the right thing. Then I decided to try something else. Because of the way I had shot the image, none of the airframe was obscured. There was just the grey overlay from the fence. That made me think that it was more like a darker area of the shot. I decided to use the brush tool in the masking panel and draw some lines that were heavily feathered across the lines that the fence wire created. Having made a grid of these, I then bumped up the exposure for the mask.

The result was surprisingly effective. However, I then ended up with some overly bright areas at the edge of the mask. A rework of the mask to change the size and the feather amount and this time the result was pretty good. There were a few areas that were still a touch dark and I used a large, soft brush to address those parts. If you know what the original image looked like, you will probably spot the remnants of the work. If you had never known before, it’s possible that you might not notice how much work had been done on this.

Time Lapse into National

This is some older footage I took a while back when I was making a work trip to DC. I have done a bunch of these over the years. The phone allows you to get a good time lapse video (or I should say hyperlapse since it is a bit different) of the approach to landing. The countryside zips by in this type of video and you get the rapid changes in aircraft configuration along with the taxi in and shut down at the end of the flight. For those of you familiar with the northern Virginia area, you might well recognise some places. I did the same on the return leg into SEA as the day was ending.