Tag Archives: Lightroom

32 Bit HDR

wpid5294-C59F0909-Edit.jpgWhile HDR might be a topic that causes all sorts of heartache for some people (they either love it or loathe it), I find it to be a really useful tool in some situations.  I have played around with some really over the top processing in the past just for the fun of it but my main interest has been in getting an image that can cope with the wide range of lighting that sometimes shows up in images.  While I have experimented with some of the third party HDR packages, I have ultimately ended up using the HDR Pro functionality of Photoshop.

This has been working okay for me but I was always a little less than satisfied with the results.  I have understood that the HDR merging process is only the first part of the technique and then the Develop settings in Lightroom (or ACR) are required to make the whole thing work a lot more effectively.  However, the slightly flatter look along with a level of desaturation that it was hard to bring back meant I was almost there but not quite.

wpid5292-C59F0909-Edit-2.jpgA recent change that has been introduced and which it took me a while to get around to playing with was the 32 bit HDR approach.  In this, the original files are merged to create a 32 bit TIF file.  Getting to this from Lightroom required me to tweak my settings slightly. I always had the file edit settings laid out to make a PSD file.  I had to tweak them to make TIF the preferred file.  I have to remember this so that I don’t always have TIF output instead of PSD which seems to have a smaller file size.

Once you get into HDR Pro, the choice in the tab at the top covers whether you want 8 biit, 16 bit or 32 bit output.  I had previously been using 16 bit.  This includes a lot of sliders that give you options as to what you want the output to look like.  If you change to 32 bit, there is a single slider. It shows you an effect of changing the white point but I don’t think it actually changes the output file.  You decide whether any ghost removal is required as with the 16 bit file and then click to get it on its way.  Once the final file is created, I just save it and go back to Lightroom.

wpid5290-C59F0911.jpgHere, the Develop module is changed in its functionality.  You can make some pretty aggressive changes with the sliders compared to a normal RAW file.  You can work with the exposure, the shadows and highlights and the contract as well as using the Clarity and Vibrance to punch up the image.  The nice thing is that the results are a lot more natural looking.  You don’t have the really crazy styles and you don’t have the flat look that sometimes is the result with the traditional approach.

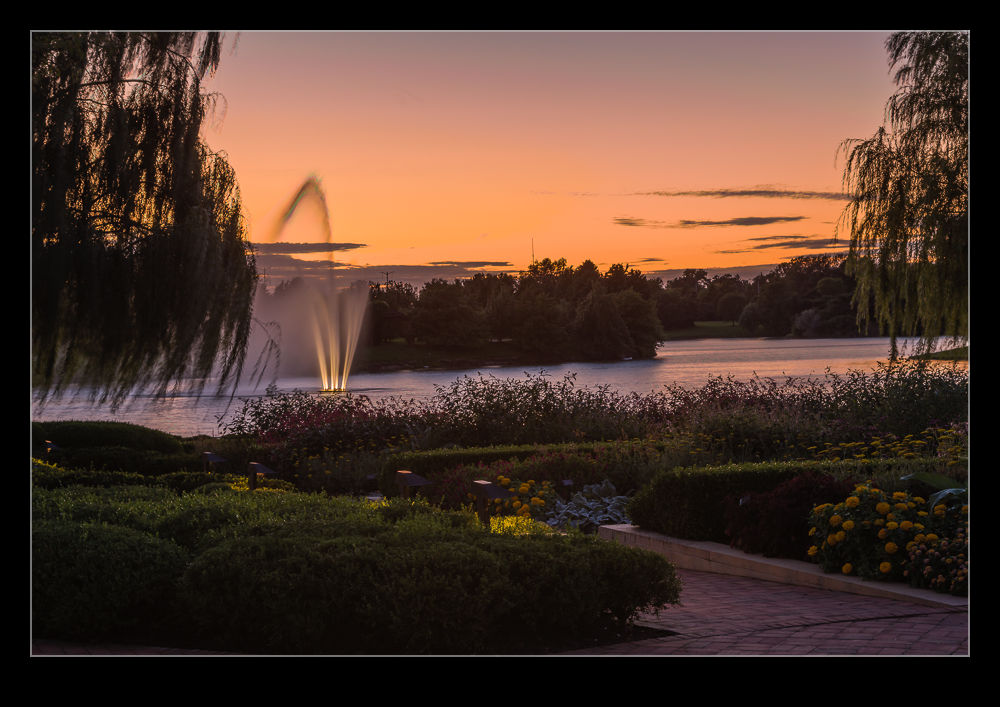
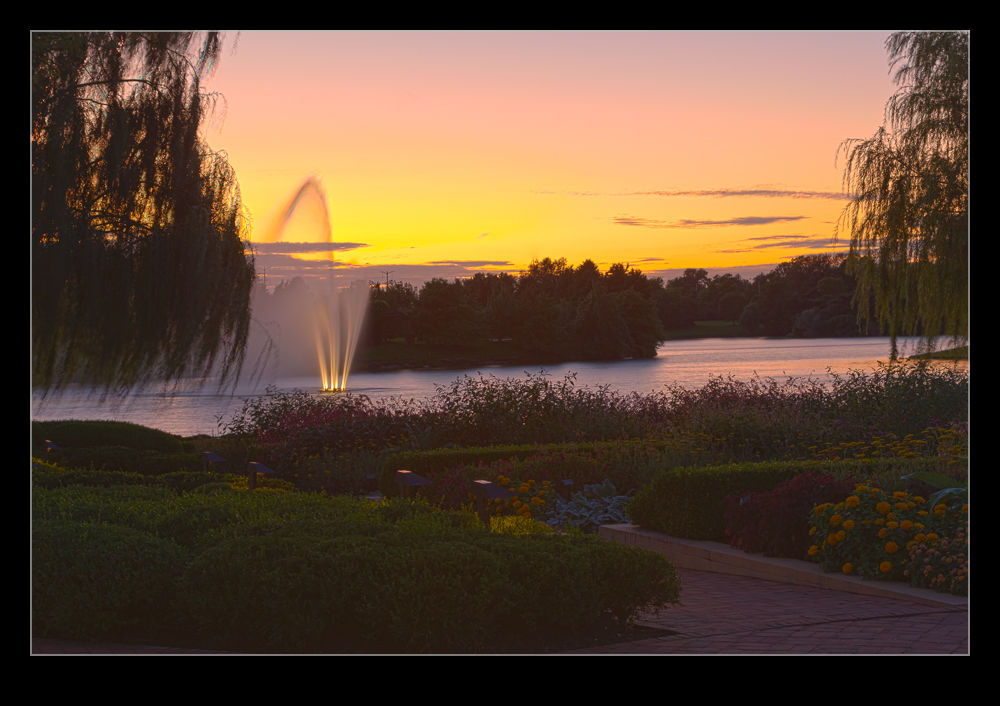
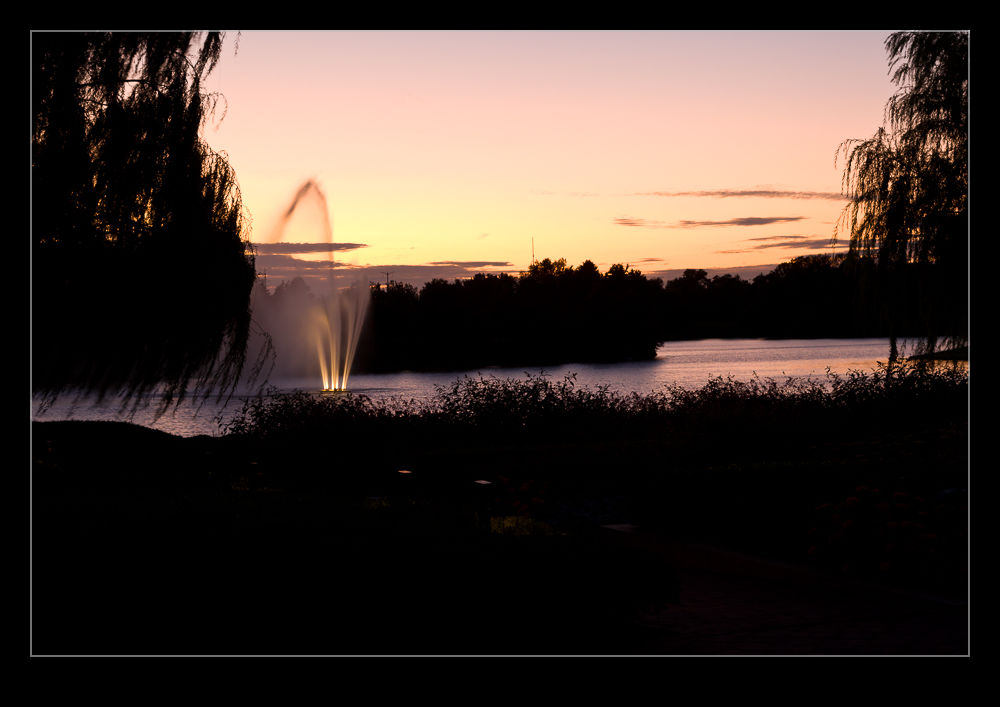
HDR is not a huge part of what I do but I am interested in having a better result.  I am not interested in investing in new software to achieve this when it is an infrequent issue for me and not usually something that a client cares about.  However, the fact I can now do a better job with the software I already have is a great step forward.  As for these three examples, the top is the new process, the middle is the old way and the bottom is using Lightroom to try and get detail from a single RAW file.

Playing with Noise Reduction

One of the biggest developments that there has been in digital imaging in recent years has been the improvement of performance in low light.  A few years ago, it was hard to get a decent image at above ISO400 and much post processing work was required to try and make the images workable.  Plug-ins for noise reduction were very popular.  However, the camera manufacturers have been very aggressive in developing chips and processors that allow shooting at ISO levels that would have been unthinkable a while back.  You hear of cameras being perfectly acceptable at ISO6400 and above.

My cameras are not the newest on the market but there are certainly not slouches in low light.  However, I have never been terribly happy with the performance at high ISO settings with the image breaking up a bit when viewed up close.  This is where I have to admit that I can be a complete idiot sometimes.

I shoot RAW all of the time and then process the images in Lightroom.  I have created some presets of development settings that I apply each time I import an image and which then acts as the starting point for any additional editing.  This is where my problem lies and why it has taken me so long to realize it I can’t imagine.  Anyway, enough of the self-flagellation and on with the topic.

The problem lies in the Detail section of the Develop module.  This is where sharpening and noise reduction are applied.  I have some basic settings I start with here and, when I was importing shots taken at high ISO settings, I was not changing them.  I would play with the noise reduction but things still didn’t look right.  The problem was, of course, the sharpening.  The basic setting I had entered was sharpening far too much for the ISO setting and was causing some odd breakup of the image.  I finally realized this one morning while lying in bed – I have no idea why I was thinking of this but it suddenly came to me.

I got up and opened some high ISO images and went to the detail area.  I zeroed out the sharpening and the noise reduction.  Everything looked awful.  Then I brought back the noise reduction and things suddenly started looking a lot better.  When I was happy with the noise, it was time to bring back some sharpening.  Things were a little soft after the noise was taken out so the sharpening brought back a bit of punch to the image.  A tweak on the amount and opening up the radius a bit made things look good.  Then a more aggressive level of masking of the sharpening and suddenly the image was looking way better than before.

When I was happy with things, I saved a new preset that was just sharpening and noise reduction and labeled it as High ISO Detail.  Now I can apply it to any images that need it and be in a far better starting position for further processing.  Each image will require its own approach if I am going to make more effort on post processing but I will now be starting from a far cleaner place.  The samples above are comparison of approximately 100% crops with my original settings and the revised approach.  Hopefully you can see the difference.  It might be annoying to realize you have been missing something for so long but at least I finally worked it out!

Lightroom 4 and ACR

One of the guest speakers at ISAP this year was Scott Kelby.  Nikon have sponsored Scott to speak at ISAP in the past and it was good that they brought him again this year.  He had a longer slot than in past events and so was able to go into a great level of detail in what he discussed.  He also brought his normal style of presenting which combines a lot of humor with the educational elements.  I find him a good guy to listen to.

I learned a lot of little things from him during the course of his presentation but today I want to focus on just one thing.  This relates to the processing of images using Lightroom 4 and Adobe Camera Raw in Photoshop CS6.  As he pointed out throughout his session and for those of you that don’t already know, these two things are exactly the same.  The processing engine and the controls are identical and the images can be processed in either and get exactly the same results.

What I found fascinating was the level of aggressiveness possible with the controls.  Having used the previous three versions of Lightroom, I have become accustomed to just how much I can use the sliders without the whole thing becoming a total mess.  With Lightroom 4 there is a new processing engine available and the sliders have been changed in their functionality.  I have been getting used to them and experimenting a little with what they do.

What Scott showed us was that you can really be a lot more forceful with the slider use.  Previously, if you used too much of a slider, the image would begin to look really bad.  Now, the sliders are a lot better controlled and you can use far more of the available range without everything becoming scary.  Scott’s methodology through the sequence of sliders also helps out with this.  After his lecture, I went to the laptop and had a go.  It was true.  You really can be a lot more aggressive and the results are really good rather than horrifying!  This was a great learning opportunity and will significantly impact how I approach things in future as well as making me revisit a few previous shots!

Lightroom 4 Impressions

It is a little while now since I upgraded to Lightroom 4 from the previous version (I will let you fill in the name here!). There were a few aspects of the new version that made me want to upgrade and I had played with the public beta version when it first came out. Of course, having ongoing support and updates is always helpful so staying with the old version was never going to be likely and when they halved the price, no further thought was required.

Now I have been using it for a while, what do I think? Well, on the whole I am reasonably pleased with the changes. The new sliders in the Develop module seem to be an improvement on the previous develop version. I was pretty happy with the way it worked before so the changes had to sell themselves to me. They have modified the way I think about the development settings since I used to be able to use Exposure alone to bring back a sky and maintain the shadows. Now I have to consider the White and Highlight sliders a lot more. I am not convinced that Highlight does a lot. White seems to be far more effective in my new approach.  Similarly the shadows slider is now more important to me than the blacks which is a change.

Another issue is with converting previous develop settings. Since the change of sliders is significant, going to the new develop version tends to result in all sliders being reset to zero. This can turn a reasonable image into something far worse initially. Lightroom does not have a conversion algorithm to get you somewhere close. It is back to the beginning. Maybe this makes a lot more sense.

The Map capability is a big improvement for me. Canon cameras are not well designed for adding a geotagging capability so I have ignored it on the whole or experimented with Jeffrey Friedl’s plugin. This is a very user friendly method and I shall make use of it a lot more I think. I like the book creation capability but would welcome some other outlets getting in the game. I have used Blurb before and they are fine but I have liked Adoramapix and have contacted them to see if they will be making templates soon. Let’s hope so.

So, is there anything wrong? Oh yes! It is slow!! The Develop module is awful at the moment. I have a pretty capable system but the sliders we very slow to react. The real time view of what you are changing is not there yet. You pick a slider, hope that the mouse click has actually selected it and then move to where you think works and then wait to see what happens. Is this acceptable? Not at all. Am I annoyed? Yes I am. Is it the end of the world? Probably not. I seem to recall that Lightroom 3 had similar issues when it first came out and was slow. Adobe released some updates pretty quickly and it ended up being a great tool. I am not going to revert back and will manage the sluggishness until they come up with a fix. If they don’t, I may have to consider but I am not the only one having an issue so I suspect it will be dealt with in the coming weeks.  Turning off the second screen makes a substantial difference but is not very useful so hopefully that will be tweaked.  A release candidate for version 4.1 is out now so, while I won’t try it out, hopefully that means the formal release is pretty close.

One other thing I will tag on her and that is the arrival of the beta version of Photoshop CS6. When the beta was released, I was not sure I would bother to try it out just yet. Photoshop is still part of my workflow but, as Lightroom has become more capable, Photoshop has been used less often and for more specialized tasks. I could probably wait, or so I thought. However, I watched some of the demonstrations of new features online and liked some of what I saw, especially the video editing. Since I shoot mo video these days, having an alternative video editor rather than upgrading the package I have might be good. It does seem to have some good basic capabilities and that is all I do most of the time. What isn’t there at the moment is good bio integration with Lightroom. Version 4 has some video clip editing for end points. It would be good if you could send the video to Photoshop in the same way you can an image. Since it would then come back to the catalog when you had finished, it would help in managing everything. Now I finish an edit and I have to import it – if I remember. If they could allow you to take multiple clips and open them as layers (again like you can with images), that would be even better since that lines up with the way video editing is set up in Photoshop. I commented on this on the Lightroom blog but we shall see if they are already working on this.

In conclusion, I am pretty happy with the new Lightroom. With the price halved I am even happier not least because the Photoshop upgrade is obviously not far away. Now to see whether they can tweak it enough to fix the minor problems.

Dust Spotting – It’s Over There!

A slight change in direction today.  I am going to talk about a post processing tip that I recently read in the NAPP magazine, Photoshop User.  It was a tip about how to manage dust in images.  This may be something that everyone knows about in which case I apologize for being late to the game.

Dust is a familiar problem to a lot of photographers.  It isn’t familiar to a lot more but it should be given the number of shots you can see that have dust spots all over them.  Cameras have got better in recent years with the addition of dust cleaning functions that shake the dust off.  However, not all cameras have them and they don’t always work perfectly.

When shooting aircraft against a blue sky, dust spots can be particularly conspicuous.  If the area with the spot already has a lot of detail in it, the chances are you won’t notice it – particularly if the aperture is reasonably wide.  In that case, you don’t really have a problem.  The difficulty with dust spots is that you can get to a point where you cease to be able to see them.

Lightroom has a nice feature to assist in dust spotting.  If you zoom in to 1:1 view in the Develop module and press Page Up or Page Down, you can look at the whole image to use your spot removal tool.  As it moves down to the bottom of the image, another press of the button will move you across and back to the top so you cover the whole image without having to think about it.  In the past, I have used this technique combined with really ramping up the Blacks slider to make the dust show up.  Even then, the results are not always perfect.

The tip from the magazine was the creation of two Tone Curves to help show up the dust.  I will describe the creation of the curves at the bottom since it is a bit long-winded and many may not be interested.  The two curves when applied to the image create a very freaky effect.  You could actually think of it as a creative finish itself but I will leave you to decide on that one.  You can save the curves as a preset and use them whenever you need them.  (I assume you can do this too in Camera Raw if you are using Photoshop since ACR and Lightroom use the same processing.)

The colors will be really messed up but the effect will make the dust spots really jump out of the image.  You might wonder why there are two curves but, interestingly enough, some spots will show up clearly with one curve but barely at all with the other.  I tend to apply one curve and run across the image, then apply the other curve and run back the way I came.  It really doesn’t take very long to do.

One thing to bear in mind with this.  The technique finds dust spots you had no idea were there.  You will start to think that your sensor is filthy.  Yes, it is – BUT – most of this stuff is totally invisible.  Don’t get paranoid.  You can get messed up with this.  I had some shots of a vintage prop aircraft and the slow shutter speeds had resulted in small apertures and more conspicuous dust.  I ended up with so many spot removal edits that the image rendering took a lot longer than normal.  I suspect I had gone overboard with those shots.

Do you have to do this with all shots?  Nah.  However, if you are planning on doing something significant with the shots and you are concerned to keep dust spots out of the image, this could be a good way for you to find the dust more quickly and get back to what you really want to be doing rather than hunting for dust which, I suspect, is not most people’s favorite task.

Creating the Curve:

The curves are reversed versions of each other.  One of them starts at 0,0 and the other starts at 0,100.  Create a point at each 10% across the x-axis with each point alternating between 0 and 100.  You then have a very aggressive looking sine curve (or cosine curve for the alternate I guess).

More Time Lapse Fun

I have been messing around with time lapses for a while as regular readers will know.  One of the things that I had been thinking about was getting a panning effect in a time lapse.  I was chatting with Ken Sklute at ISAP and he told me that, rather than bothering with expensive motorized panning heads, it was simpler to use the full image size that a DSLR offers and let the video software undertake the panning for you by cropping in on the shots.

I am not a big video guy and have Pinnacle Studio as my package.  It is fine for the basic stuff but doesn’t have the most impressive features.  When I goggled this topic, I came up with After Effects techniques for doing what I wanted.  I tried the free trial but struggle to come to terms with what was required, despite the detailed tutorial.  Guess that says something about me as a self teaching student.

Then I got lucky,  My friend Jo Hunter over at futurshox posted some video from Oshkosh of time lapses doing exactly what I wanted.  I dropped her a message and she came straight back with the solution.  The program is called LRTimelapse and it is a standalone program that makes Lightroom develop settings that you can then combine with a video output setting to make the final product.  It is developed by a guy called Gunther Wegner and you can find the whole thing at his website.  It is donationware and I have made one because it works and has solved a problem that had been troubling me for a while.

I need to get better at the effect but for the time being, here is a sample of the effect.  For comparison, first I have the original time lapse and second I have the panning version.  No change in the content but certainly a more interesting thing to watch I think.

When Does Noise Matter?

I will freely admit I am as much of a gearhead as the next photographer.  New toys always catch my attention and then it is a matter of time before the battle is won between my sensible side or my not very sensible side as to whether I am going to get something.  The price of said item may well have an influence on which side wins that battle.

One thing that is a popular discussion for the pixel peepers is noise.  Having started off with a Canon EOS10D when I first went digital and worked through a number of bodies since – none of which have left my ownership I must confess – I have seen some steady improvement in noise reduction capabilities although not always with as much benefit to the final image as I might have liked but I digress.

A while back I was shooting at the Oceana air show with two of my buddies, Ben and Simon.  We had trekked down from DC for the show and were greeted by less than ideal weather.  The cloud base was solid and low and a bunch of displays didn’t take place.  Some did though and we still had a good day.  Given the heavy cloud, though, we were struggling for light.  I was shooting mainly with the MkIIN and was up at ISO 800 for a lot of the time.

The MkIIN is well into the noisy range at 800 and I knew that was the case but there was little option.  A while after this show, Lightroom 3 came out and it had a lot of noise reduction built in that wasn’t in the previous version.  I took a look at some of the Oceana shots to see how much better they might look.  There was a noticeable improvement and I was happy.

Why am I discussing this now, over a year later?  I was mulling over this topic for some reason, probably related to another acquisition decision, and I wondered how the printed version was affected by this noise.  There are plenty of things that I fret over in an image when looking at it on screen, usually zoomed in far too close, that really don’t become apparent at all when printing.  Is noise one of those things that looks better on paper?

I picked one of the shots from that day to experiment with.  The shot in question is this one of one of the Blue Angels taking off.  Since there was the treeline behind, the gray sky was not an issue and the burner plumes show up nicely given how dark it is so I like the shot.  Now to check it out on a print.

One of the nice features of Lightroom is the ability to mess with the print layouts.  I made a couple of virtual copies of the image and one one of them did my best to optimize the noise reduction and on the other switched it off for the most part.  On screen, it did not look great.  I then set up a page in the print module with two cells right next to each other and put the left side of one image in the left cell and the right side of the other in the right cell.  It looks like a full aircraft if I get the positioning just right.

First I printed it on an 8.5×11 sheet.  If I look closely, I can see the divide.  It actually shows more in the background than on the aircraft.  It is visible but it isn’t as noticeable as you might expect.  This had got my interest!  What about the size of the print.  I repeated the layout on some Super B (13×19) paper of the same type and printed it again.

As you might expect, this time is is a little more noticeable – hey, it’s twice the size!  However, even now, while it isn’t great, it really isn’t that bad.  We are talking about turning the NR almost off.

So, what do I conclude from this?  Well, technology is going to always get better, both in camera and on the computer processing it and I am still going to be a sucker for a new piece of kit.  However, while there is a noticeable noise difference on screen, the print is really a lot more forgiving.  Maybe I should relax about it a lot more and just enjoy the shooting, even when the light is limited.